So, your little munchkins (or, let’s be real, you) are demanding to decorate cookies, huh? And you’re picturing a scene out of a baking show, but secretly dreading the inevitable sticky mess and complicated instructions? Deep breaths, my friend. We’re about to tackle cookie frosting that’s so easy, so fun, and so utterly kid-proof, you’ll wonder why you ever bothered with those fancy royal icing recipes that require a microscope and a steady surgeon’s hand. Forget that! We’re going for vibrant, delicious, and stress-free. Let’s do this!
Why This Recipe is Awesome
Look, I get it. Sometimes you just want to make something fun without needing a culinary degree or sacrificing a small goat to the baking gods. This frosting recipe? It’s your new best friend. It’s practically idiot-proof – even I didn’t mess it up, and my kitchen adventures often end with a call to the fire department. Seriously, though, it’s:
- **Super Quick:** We’re talking minutes, not hours. Perfect for those ‘I need sprinkles NOW!’ moments.
- **Kid-Friendly:** Not too sweet (well, as much as frosting can be not-too-sweet) and easy for little hands to manage.
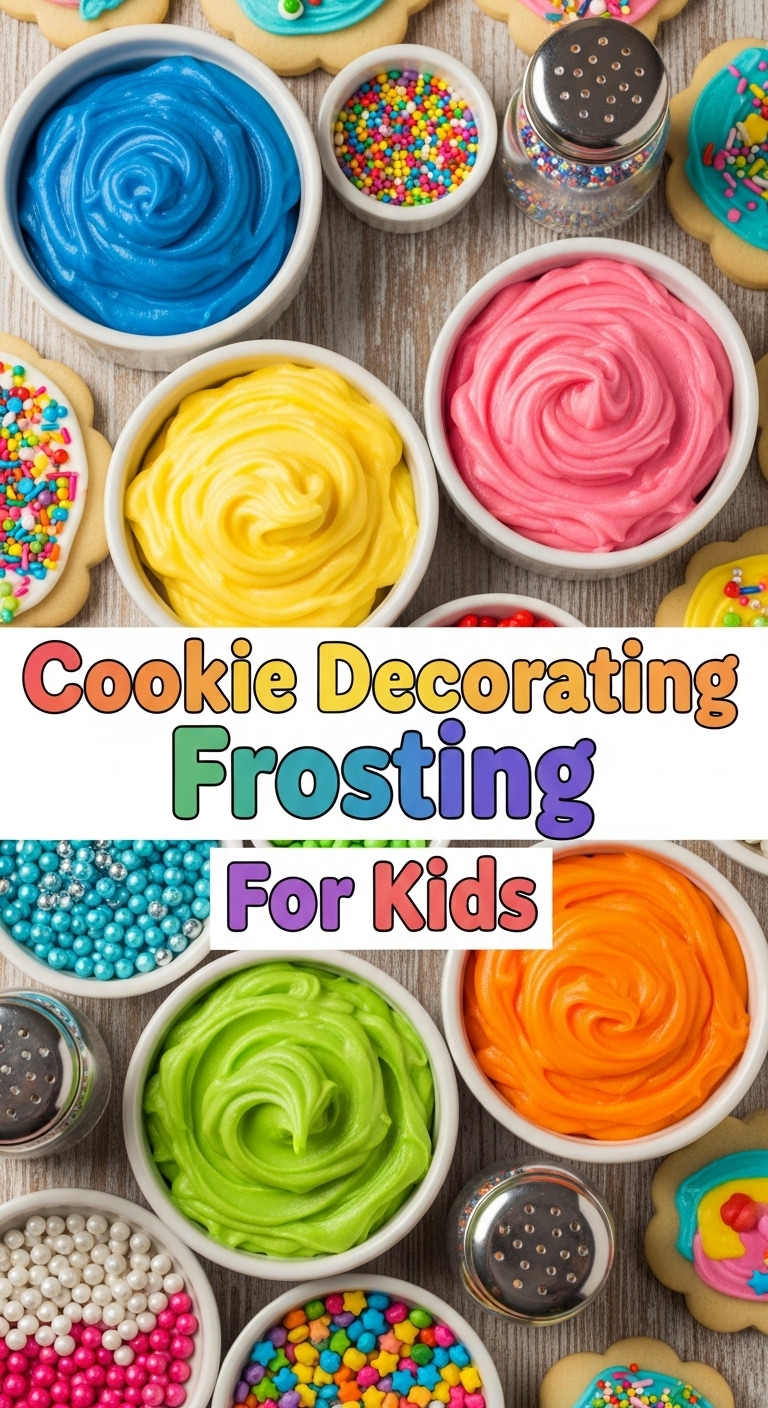
- **Versatile:** Thick for piping, thin for flooding – you control the flow!
- **Vibrant Colors:** Holds food coloring like a champ, so your cookies will look like a unicorn threw up a rainbow (in the best possible way).
- **Dries Nicely:** No more smudged masterpieces! It sets enough to stack without too much drama.
Ingredients You’ll Need
Gather ’round, my fellow kitchen adventurers! Here’s your treasure map of ingredients. Simple stuff, honestly.
- 2 cups Powdered Sugar (Confectioners’ Sugar): This is the star of the show. Don’t even *think* about granulated sugar here, unless you want gritty frosting that feels like sand in your mouth. We’re going for smooth sailing!
- 2-3 tablespoons Milk (or Water): Just a splash! Whole milk works best for creaminess, but tap water is perfectly fine if you’re feeling minimalist (or, *ahem*, ran out of milk because someone drank it all).
- 1/2 teaspoon Vanilla Extract: A tiny dash for that ‘mmm, what *is* that delicious flavor?’ vibe. Or skip it if you’re going for pure sugar shock.
- Food Coloring Gels: The fun part! Gels are best for vibrant colors without watering down your frosting too much. Liquids work too, but might thin your frosting a tad. Go wild, it’s for kids!
Step-by-Step Instructions
Alright, apron on (or don’t, I won’t tell), let’s get frosting!
- Get Sifting: Grab your powdered sugar and a fine-mesh sieve. Sift the sugar into a medium bowl. This step is **crucial** for avoiding lumps. Nobody likes a lumpy frosting, unless it’s on purpose (and even then, debatable).
- Add the Wet Stuff: Pour in your vanilla extract and start with 2 tablespoons of milk (or water). Don’t dump it all in at once; we’re aiming for control here, people!
- Mix it Up: Grab a whisk or a spoon and start mixing. It’ll look a bit dry and crumbly at first, but keep going. You’re building a masterpiece!
- Adjust Consistency: This is where the magic happens. If your frosting is too thick (like cement), add the remaining tablespoon of milk a tiny bit at a time until it’s smooth and spreadable. If it’s too thin (like milk), add a little more sifted powdered sugar until it thickens up. You want it thick enough to stay on the cookie but thin enough to spread easily. **A good rule of thumb:** if it drips off your spoon in a slow, steady stream, you’re golden.
- Divide and Conquer (with Color!): Now for the party! Divide your beautiful white frosting into separate small bowls – one for each color you want to create. Dip a toothpick into your food gel and add a tiny speck to each bowl. Mix thoroughly. Remember, a little goes a long way with gel colors, so start small and add more if you want a deeper hue.
- Frost Away! Grab your cooled cookies (key tip: always cool your cookies completely! Warm cookies melt frosting, and that’s just sad) and let the kids go wild. Spoons, butter knives, small offset spatulas – whatever gets the job done.
Common Mistakes to Avoid
Because nobody’s perfect, and we all make oopsies. Learn from my (many) past mistakes!
- Skipping the Sift: You think you’re saving time, but you’re just inviting lumps to the party. Lumps are not fun party guests. Sift, my friend, sift!
- Adding Too Much Liquid Too Fast: This is the most common rookie mistake. You’ll end up with frosting soup, and the only way back is to add a LOT more powdered sugar, which can change the texture. Go slow, one tiny drop at a time!
- Using Too Much Food Coloring: Especially with liquid colors. It can make your frosting bitter (yuck!) and sometimes stain everything from tongues to countertops. Start small, mix, then add more if needed.
- Frosting Warm Cookies: We talked about this. It’s a no-go. Your frosting will melt and slide right off, turning your beautiful creation into a sad, colorful puddle. Patience, young grasshopper.
- Thinking You Need Fancy Tools: Nope! While piping bags are cool, a simple butter knife or the back of a spoon is perfectly adequate for kid-friendly decorating. Embrace the rustic charm!
Alternatives & Substitutions
Feeling adventurous? Or just missing an ingredient? No stress, we’ve got options!
- No Milk? No Problem! You can totally use water, as mentioned. Or, for a slightly tangy frosting, try a tiny bit of lemon juice – it adds a nice zing! Plant-based milks (almond, soy, oat) also work beautifully for a dairy-free option.
- Flavor Frenzy: Instead of vanilla, try almond extract for a marzipan-y vibe, or a tiny dash of peppermint extract for holiday cookies. Lemon or orange zest grated finely into the sugar before sifting can also add a delightful burst of citrus.
- Natural Colors: Want to go au naturel? A tiny bit of beet juice can give you pinks, spinach juice for greens (though it might slightly affect flavor), or turmeric for yellow (use sparingly!). IMO, stick to gel colors for the most vibrant, predictable results, especially with kids.
- Consistency Control: For thinner, more “flooding” style frosting (where you outline then fill in), add a little more liquid. For thicker, more defined lines or decorations, add a bit more powdered sugar. It’s all about balance!
FAQ (Frequently Asked Questions)
Got questions? I’ve got casual, slightly sarcastic answers!
- Can I use regular granulated sugar instead of powdered sugar? Oh, bless your heart. Technically you *could*, but why hurt your soul like that? You’ll end up with gritty, weirdly textured frosting. Stick to the powdered stuff, trust me.
- How long does this frosting last? If kept in an airtight container at room temperature, it’s good for about 2-3 days. In the fridge, maybe a week. Just give it a good stir before using.
- My frosting is too thick! What do I do? Add a tiny bit more milk (or water) at a time, stirring until it reaches your desired consistency. Remember: slow and steady wins the race.
- My frosting is too thin! Help! Add a spoonful of sifted powdered sugar, mix, and repeat until it thickens up. It’s like a culinary seesaw!
- Will this frosting harden completely? It will set and become firm enough to stack cookies without major smudging, especially if it’s on the slightly thicker side. It won’t be rock-hard like royal icing, but it’s perfect for kid-friendly decorating!
- Can I make it dairy-free? Absolutely! Just swap out the regular milk for water or your favorite plant-based milk. Easy peasy!
- Can adults use this frosting too, or is it strictly for kids? *Gasp!* Is that even a question? Of course! This frosting is for anyone who wants delicious, easy, colorful fun. No age limits on joy here!
Final Thoughts
You’ve just conquered cookie decorating frosting, my friend! See? That wasn’t so scary, was it? Now go forth and create edible masterpieces (or at least really fun, colorful cookies). Don’t forget to “accidentally” taste test a few of your creations. You’ve earned it! Seriously, baking should be fun, not a chore. So crank up some tunes, gather your tiny helpers (or enjoy some solo decorating bliss), and make some memories. Happy frosting!


