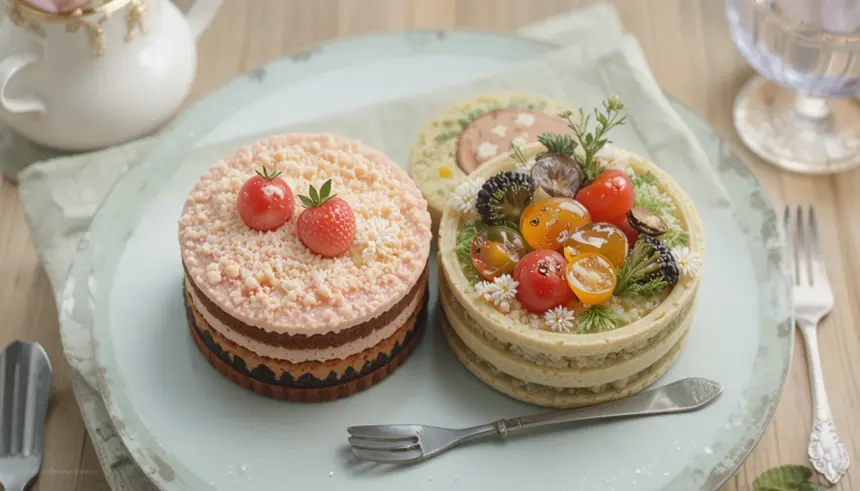
So you’re craving something cute, delicious, and *totally* Instagrammable, but your energy levels are currently stuck in “sloth mode”? You, my friend, are speaking my language. We’ve all been there: that sudden urge for homemade goodness without, you know, the *huge* effort. Well, buckle up, buttercup, because today we’re diving into the ridiculously adorable world of bento cakes! And not just one, but **two super easy, super fun designs** that’ll have everyone thinking you secretly went to pastry school. Spoiler alert: you totally didn’t. 😉
Why This Recipe is Awesome
Alright, let’s be real. In a world full of complex baking projects that require a chemistry degree, this bento cake recipe is like a breath of fresh, sugary air. Why is it so awesome, you ask? Because:
- It’s **idiot-proof**. Seriously, if I can do it without setting off the smoke alarm, you’re golden.
- It’s ridiculously **quick**. We’re talking minimal kitchen time for maximum “wow” factor.
- You get **two designs for the price of one effort!** Perfect for showing off versatility or just having double the fun.
- They’re the perfect size. No giant cake commitment, just a personal little slice of heaven (or a cute gift!).
- Minimal dishes, because nobody wants to spend all day scrubbing pans.
Ingredients You’ll Need
Gather ’round, my fellow lazy gourmets! Here’s what you’ll need to conjure up these mini masterpieces. Nothing fancy, I promise.
For the Mini Cake Base (makes two small cakes):
- 1 cup (120g) All-Purpose Flour: The backbone of our bento dreams.
- 1/2 tsp Baking Powder: To make sure they’re fluffy, not bricks.
- 1/4 tsp Baking Soda: The silent hero for tenderness.
- Pinch of Salt: Because every good cake needs a little sass.
- 1/2 cup (100g) Granulated Sugar: Sweetness is non-negotiable.
- 1/4 cup (55g) Unsalted Butter: Softened, please! Don’t be a monster and use it cold.
- 1 Large Egg: Room temperature is best, it mixes better, trust me.
- 1/2 cup (120ml) Buttermilk: Or regular milk with a splash of vinegar/lemon juice if you’re feeling resourceful (and out of buttermilk).
- 1 tsp Vanilla Extract: The soul of all good baking.
For the Dreamy Buttercream Frosting & Decoration:
- 1/2 cup (110g) Unsalted Butter: Softened again, you know the drill.
- 2 cups (240g) Powdered Sugar (Icing Sugar): Sifted, unless you enjoy lumpy frosting. You don’t.
- 1-2 tbsp Heavy Cream or Milk: Just enough to make it spreadable.
- 1/2 tsp Vanilla Extract: Extra vanilla never hurt anyone.
- Pinch of Salt: To cut the sweetness a bit.
- Gel Food Coloring: Pick your favorite hues! We’ll use two for our designs.
- Sprinkles/Edible Glitter (optional): For a little extra sparkle, because why not?
- Small round piping tip (like Wilton 1A or 12): For Design 1.
- Small star piping tip (like Wilton 1M or 21): Also for Design 1, or any fun accents.
- Fine tip for writing (like Wilton 2 or 3): For Design 2’s minimalist vibe.
Step-by-Step Instructions
Let’s get this party started! Follow these super simple steps and prepare to amaze yourself.
Part 1: The Cake Base
- Preheat & Prep: Preheat your oven to 350°F (175°C). Lightly grease and flour two 4-inch bento cake pans (or two small ramekins/muffin tins if you’re improvising, just adjust baking time). Don’t skip the prep!
- Dry Mix It Up: In a medium bowl, whisk together the flour, baking powder, baking soda, and salt. Set aside.
- Wet Mix Wonders: In a separate, larger bowl, cream the softened butter and granulated sugar together until light and fluffy. This usually takes about 2-3 minutes with an electric mixer.
- Egg-cellent Addition: Beat in the egg and vanilla extract until well combined, scraping down the sides of the bowl as needed.
- Alternate & Combine: Gradually add the dry ingredients to the wet ingredients in three additions, alternating with the buttermilk in two additions. Begin and end with the dry ingredients. Mix until just combined – overmixing is a crime against cake!
- Bake ‘Em Up: Divide the batter evenly between your prepared pans. Bake for 18-22 minutes, or until a toothpick inserted into the center comes out clean.
- Cool Down: Let the cakes cool in their pans for about 10 minutes before carefully inverting them onto a wire rack to cool completely. This is crucial! A warm cake + frosting = disaster.
Part 2: The Dreamy Buttercream Frosting
- Butter Power: In a large bowl, beat the softened butter with an electric mixer until creamy and light (about 2 minutes).
- Sugar Rush: Gradually add the sifted powdered sugar, one cup at a time, mixing on low speed until combined, then increasing to medium-high.
- Cream & Vanilla: Add the heavy cream (or milk), vanilla extract, and pinch of salt. Beat on medium-high for another 2-3 minutes until the frosting is light, fluffy, and spreadable. If it’s too thick, add more cream a teaspoon at a time. Too thin? Add more powdered sugar.
Part 3: Decorating Your Two Awesome Bento Cakes!
- Crumb Coat Magic: Once your cakes are completely cool, apply a thin layer of frosting to each one. This “crumb coat” traps any loose crumbs, making your final frosting layer smooth and pristine. Chill in the fridge for 15-20 minutes.
- Divide & Conquer (Colors!): Divide your remaining buttercream into two portions. Color each portion with your chosen gel food coloring. Let’s say, a pretty pastel pink and a lovely light blue.
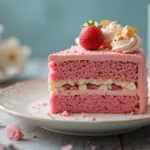
- Design 1: Swirly Delight (Pink Cake)
- Take your pink frosting. Frost the entire crumb-coated cake smoothly with a thin layer.
- Using a small round piping tip (like a Wilton 1A or 12), pipe a beautiful swirl on top of the cake. Start from the outside and work your way in.
- For an extra touch, use a small star tip to pipe a few tiny stars around the base or on top. Add some sprinkles if you’re feeling extra!
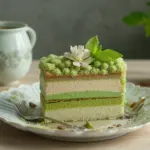
- Design 2: Minimalist Chic (Blue Cake)
- Take your blue frosting. Frost this crumb-coated cake smoothly, aiming for a clean, even finish.
- With a contrasting color (a small amount of white frosting, or even a different pastel you mixed up!), use a fine writing tip (like Wilton 2 or 3) to pipe a simple message like “Happy Day!” or “Hello!” in the center.
- Add a simple piped border around the top or bottom edge of the cake for a polished look.
- Chill Out: Pop your beautifully decorated bento cakes back into the fridge for at least 30 minutes to let the frosting set. Then, they’re ready for their close-up!
Common Mistakes to Avoid
Alright, listen up, buttercups. We want flawless cakes, not kitchen nightmares. Steer clear of these common blunders:
- Thinking you don’t need to preheat the oven. Rookie mistake! A cold oven means uneven baking and sad, dense cakes.
- Overmixing the batter. Once you add the dry ingredients, mix *just* until combined. Overmixing develops gluten, leading to tough cakes. No one wants a cake that doubles as a stress ball.
- Not letting cakes cool completely. Seriously, I cannot stress this enough. Frosting a warm cake is a recipe for a melty, crumbly, frosting-puddle disaster. Have patience, young Padawan.
- Not sifting powdered sugar. Lumpy frosting is a tell-tale sign of a lazy baker. Just do it. Your taste buds will thank you.
- Eyeballing ingredients. Baking is a science, not an art (mostly). Use measuring cups and spoons properly for consistent results.
Alternatives & Substitutions
Feeling adventurous or just realized you’re out of something vital? No sweat! Here are a few swaps that won’t totally derail your bento cake dreams:
- Cake Base:
- Box Mix: Shhh, don’t tell anyone, but a good quality box cake mix (prepared according to package directions, then baked in your bento pans) works perfectly. It’s a fantastic shortcut, and honestly, sometimes a girl just needs a break.
- Flavor Twists: Add lemon zest for a zesty cake, or swap out 2 tablespoons of flour for cocoa powder for a chocolatey vibe.
- Frosting:
- Cream Cheese Frosting: Want something a little less sweet and tangy? Use cream cheese frosting! Just make sure it’s firm enough for piping.
- Whipped Cream: Lighter option, but less stable for intricate piping, IMO. Best for simple dollops and quick consumption.
- Vegan Buttercream: Use plant-based butter and a milk alternative for a dairy-free version.
- Decorations:
- Fresh Fruit: A few artfully placed raspberries or blueberry clusters can look super elegant.
- Edible Flowers: For a truly fancy touch.
- Chocolate Ganache Drip: Melt some chocolate with a bit of cream, let it cool slightly, and drizzle it around the edges.
- Different Piping Tips: Experiment! There are tons of fun tips out there to create different textures and patterns.
FAQ (Frequently Asked Questions)
Got questions? I’ve got (casual) answers!
- Can I use margarine instead of butter? Well, technically yes, but why hurt your soul like that? Butter just tastes better and gives a superior texture. For best results, stick with the good stuff.
- How long do these beauties last? Tightly covered in the fridge, they’ll be good for 3-4 days. But let’s be real, they rarely last that long!
- Do I need special bento cake molds? Nope! While 4-inch round pans are ideal, you can totally use oven-safe ramekins or even muffin tins (just fill them half full and adjust baking time). Embrace the improviser within!
- Can I make them ahead of time? Absolutely! Bake the cakes, let them cool completely, then wrap them tightly in plastic wrap and freeze for up to 2 weeks. Thaw them in the fridge before frosting. The frosting can also be made ahead and stored in the fridge for up to a week; just let it come to room temp and re-beat before using.
- What if my frosting is too runny/stiff? Too runny? Add more sifted powdered sugar, a tablespoon at a time. Too stiff? Add more cream or milk, a teaspoon at a time. It’s all about finding that perfect, spreadable consistency.
- My cake tops are domed, not flat! What gives? Totally normal for home baking! You can easily level them with a serrated knife once cooled for a super professional look. Or just embrace the dome – it’s character!
- Can I make a larger batch? For sure! Just double or triple the ingredients and use larger cake pans, adjusting baking times accordingly.
Final Thoughts
So there you have it, folks! Two absolutely adorable, unbelievably easy bento cake designs ready for you to whip up and impress everyone (or just yourself, because self-love is important). These little gems are perfect for birthdays, anniversaries, or just a Tuesday afternoon when you need a dose of joy. Now go forth, conquer your kitchen, and enjoy the sweet rewards of your (minimal) labor. You’ve earned it!
