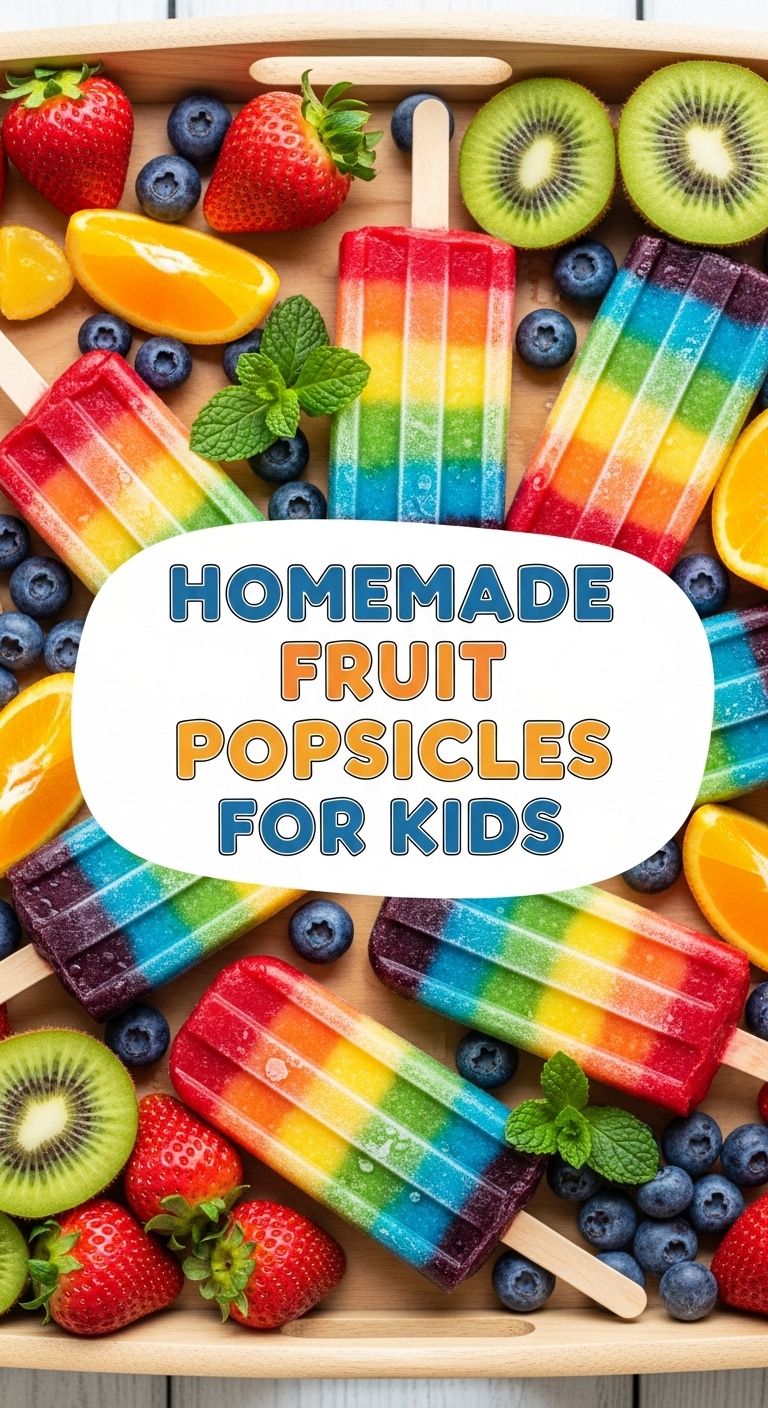
So, your little humans are running on pure sugar and sunshine, and you need a quick win to cool them down without resorting to another juice box, huh? Or maybe *you’re* the big human craving something ridiculously easy and ridiculously delicious? Same, friend, same. We’re talking about a recipe so simple, it practically makes itself. Get ready to whip up some Homemade Fruit Popsicles!
Why This Recipe is Awesome
Okay, let’s be real. Cooking for kids can sometimes feel like a high-stakes culinary circus. But this recipe? It’s like the chill, laid-back cousin of gourmet desserts. It’s so **mind-blowingly simple**, even your pet goldfish could probably supervise (if it had opposable thumbs, that is). Plus, it’s packed with actual fruit, so you can totally high-five yourself for being a super parent. Or, you know, just a regular human who appreciates not eating artificial colors. You can also customize these bad boys to fit any picky eater’s preference. Think of it as your secret weapon against summer meltdowns (for both you and the kids).
Ingredients You’ll Need
Gather ’round, fellow kitchen adventurer! Here’s your hit list. No fancy stuff, promise.
- Your Favorite Fruits (2-3 cups): Think berries (strawberries, blueberries, raspberries – fresh or frozen, your call!), mango, pineapple, banana, peaches. The riper, the sweeter, the less you’ll need to sweeten. Go wild!
- Liquid Base (1/2 – 1 cup): This is your binder. Options include:
- **Coconut Water:** For a subtly sweet, tropical vibe.
- **Apple or White Grape Juice:** Adds sweetness without being too overwhelming.
- **Filtered Water:** If your fruit is super sweet and you want to keep it simple.
- **Yogurt (plain or vanilla):** For a creamier, “creamsicle” texture. Seriously good.
- Optional Sweetener (1-2 tablespoons): Only if your fruit isn’t sweet enough for your crowd. We’re talking a drizzle of honey, maple syrup, or a pinch of stevia. Don’t overdo it!
- Popsicle Molds & Sticks: Can’t make a popsicle without ’em, right? If you don’t have proper molds, small paper cups and wooden sticks work in a pinch!
Step-by-Step Instructions
Alright, superstar, let’s get down to business. You’re five easy steps away from popsicle glory!
- **Prep Your Fruit:** If using fresh fruit, wash it thoroughly and chop it into smaller pieces. If using frozen fruit, you’re already halfway there – just dump it in! Got any soft spots on your bananas? Perfect, those are extra sweet.
- **Blend It Up:** Toss your chosen fruit and liquid base into a blender. If you’re adding an optional sweetener, now’s the time. Blend until completely smooth. You want a consistency like a thin smoothie – no chunky bits unless that’s your jam. Taste it! Adjust sweetness or add more fruit/liquid as needed.
- **Pour into Molds:** Carefully pour your fruity concoction into your popsicle molds. **Don’t overfill!** Leave a little space at the top, maybe about a quarter-inch, because liquids expand slightly when they freeze. It’s science, baby.
- **Insert Sticks & Freeze:** Pop your popsicle sticks into the molds. If your mixture is a bit thin, you might need to freeze it for about 30-60 minutes *before* adding the sticks so they stand upright. Then, transfer the molds to the freezer and let them chill out (pun intended!) for at least 4-6 hours, or even better, overnight.
- **Unmold & Enjoy:** When they’re rock solid, run the molds under warm water for about 10-20 seconds to help loosen the popsicles. Gently pull ’em out and get ready for some happy faces. **Pro tip:** Have a napkin ready for drippy goodness!
Common Mistakes to Avoid
Look, we all make mistakes. But with these tips, you won’t be making *these* mistakes. You’re welcome.
- **Under-Blended Fruit:** Nobody wants a lumpy popsicle, unless you’re specifically going for that “rustic” vibe. Blend until it’s super smooth. Seriously, blend it.
- **Overfilling the Molds:** Remember that whole “expansion” thing? If you fill them to the brim, you’ll end up with a messy, frozen dome and possibly stuck sticks. Rookie mistake.
- **Impatience:** Trying to yank a popsicle out after only an hour or two? That’s just asking for a broken stick and a sad, slushy mess. **Give them time to fully freeze.**
- **Forgetting Sticks:** Happens more often than you’d think. Unless you’re planning on eating your popsicle with a spoon (which is also totally valid, IMO), remember those sticks!
Alternatives & Substitutions
Feeling creative? Good. This recipe is your canvas! Here are some ideas:
- **Creamy Dreamy Pops:** Swap some of that liquid base for Greek yogurt or even a bit of full-fat coconut milk (from a can, not a carton!) for a richer, creamier texture. Think strawberry-banana yogurt pops – delicious!
- **Sneak in Some Veggies:** Want to be a super sneaky parent? A handful of spinach or a small cooked beet (don’t knock it ’til you try it!) blends seamlessly into berry or cherry pops without affecting the taste. The color might get a little… earthy, but the kids won’t care!
- **Layered Masterpieces:** Feeling fancy? Make two different fruit purees and layer them in the molds, freezing each layer for about 30 minutes before adding the next. Boom, rainbow popsicles!
- **Juice It Up:** Not a fan of water? Use 100% fruit juice (like orange or pineapple) as your base. Just be mindful of the added sugar content if that’s a concern.
FAQ (Frequently Asked Questions)
Got questions? I’ve got answers. Mostly.
- Can I use only frozen fruit? Absolutely! In fact, frozen fruit often makes for a thicker, colder mixture right from the blender, which helps prevent separation in the molds. Plus, it’s super convenient.
- Do I *have* to add sweetener? Nah, not if your fruit is ripe and naturally sweet. I often skip it entirely, especially for mango or very ripe berries. It’s totally a personal preference!
- What if I don’t have popsicle molds? No molds? No problem! Small paper cups (like Dixie cups) work perfectly. Pour in your mixture, cover with foil (to hold the stick straight), insert your stick, and freeze. When solid, just tear off the paper cup. Genius, right?
- My popsicles are too hard/icy, help! This usually means too much water or not enough natural sugar/fiber from the fruit. Try adding a bit more ripe fruit, a dash of honey, or even some yogurt next time for a creamier texture.
- How long do these homemade popsicles last? In an airtight container in the freezer, they’ll be good for about 2-3 weeks. After that, they might start to get a bit icy or lose some flavor, but they’ll still be edible.
- Can adults eat these too? Uh, are you kidding me? Of course! These aren’t just for kids. I might even add a splash of rum to my mango ones sometimes, but you didn’t hear that from me.
Final Thoughts
So there you have it, folks! Your new favorite, super-easy, ridiculously tasty summer (or any season!) treat. You’ve officially conquered the art of homemade fruit popsicles, proving that delicious doesn’t have to mean complicated. Now go impress someone – or yourself – with your new culinary skills. You’ve earned it!

