So, the 4th of July is lurking around the corner, and you’re probably already dreading the sugar rush, the questionable fireworks, and the inevitable “I’m bored!” from the kiddos, right? Don’t even get me started on trying to find a dessert that screams ‘America!’ without requiring you to become a pastry chef overnight. But fear not, my friend! I’ve got a secret weapon for you: 4th of July Jell-O Cups for Kids. They’re super easy, unbelievably festive, and basically guarantee you ‘Cool Parent’ points without any actual effort. You’re welcome.
Why This Recipe is Awesome
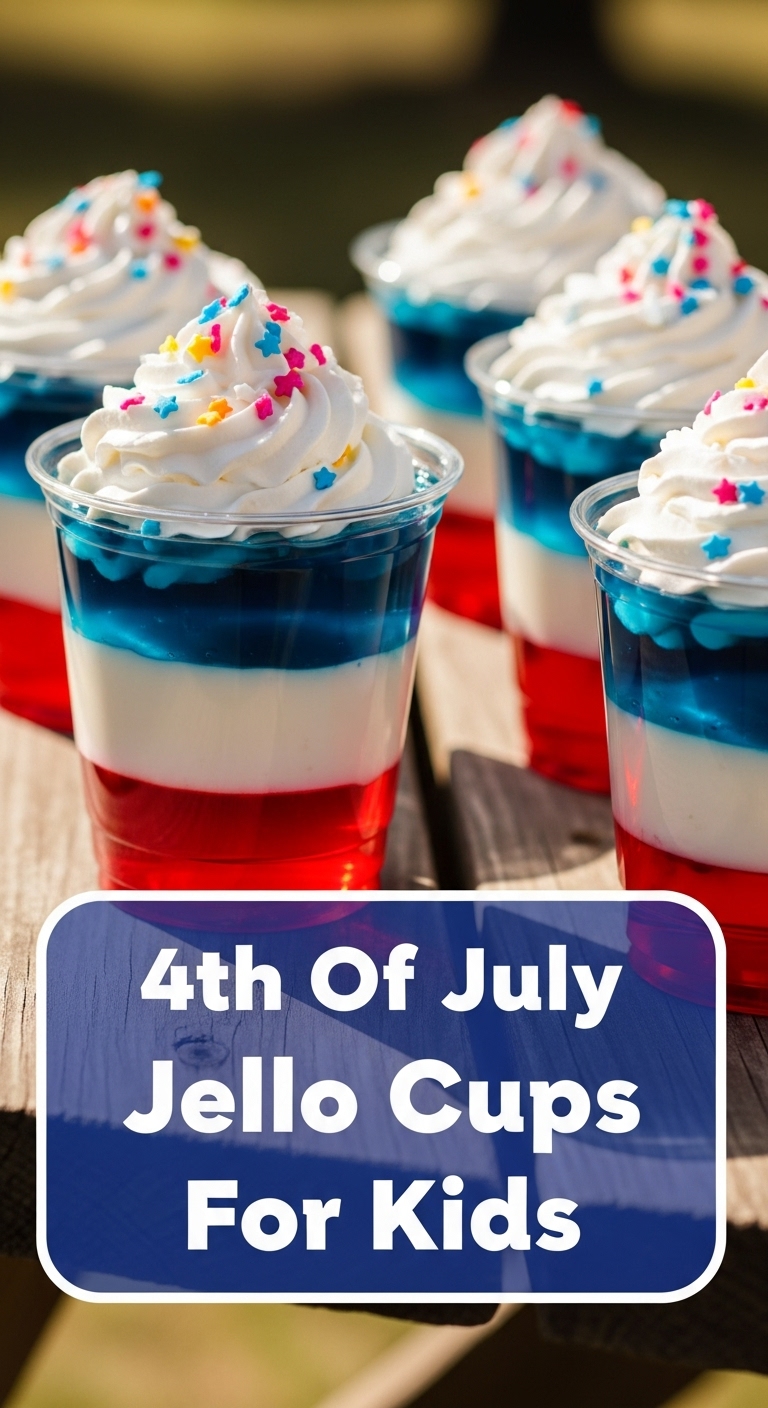
Listen, if you can boil water without calling the fire department, you can absolutely nail these Jell-O cups. Seriously. This isn’t one of those recipes where you need a stand mixer, a blowtorch, or a secret ingredient sourced from the Himalayas. Nope. It’s a three-layer, red, white, and blue masterpiece that looks way more impressive than the minimal brain power required to assemble it. Plus, kids are obsessed with anything jiggly and colorful. It’s practically a science experiment they can eat! And **it requires no baking**, so your kitchen stays cool, and your sanity remains intact. Win-win-win.
Ingredients You’ll Need
Get ready for a shopping list that won’t make your wallet cry, and frankly, is probably already half-stocked in your pantry. We’re talking super basic stuff here.
- 1 (3 oz) box Berry Blue Jell-O: Because, duh, we need blue!
- 1 (3 oz) box Cherry or Strawberry Jell-O: For that glorious red layer.
- 2 envelopes unflavored gelatin: This is the secret to our luscious white layer. Don’t skip it!
- 1 (14 oz) can sweetened condensed milk: Pure, unadulterated sweetness for our creamy middle.
- Hot water: For dissolving all the gelatin goodness.
- Cold water: To cool things down and fill out the volume.
- Small, clear plastic cups (about 9-12 oz size): These are key for showing off those patriotic layers. Presentation, people!
- Optional: Whipped cream and patriotic sprinkles: For the grand finale, because why not go all out?
Step-by-Step Instructions
Alright, apron on (or not, let’s be real), let’s get jiggly with it! Remember, patience is a virtue here, especially between layers.
- Red Layer First: Grab your red Jell-O. In a medium bowl, dissolve the Jell-O mix in 1 cup of hot water. Stir for about 2 minutes until it’s completely dissolved. Now, stir in 1 cup of cold water. Pour this mixture evenly into your clear cups, filling each cup about 1/3 of the way. Pop them in the fridge for at least 30-45 minutes, or until the Jell-O is set but still a little sticky. **This chilling step is crucial!**
- White Layer Wonders: While the red layer is chilling, let’s make the magical white layer. In another bowl, sprinkle both envelopes of unflavored gelatin over 1/2 cup of cold water. Let it sit for 5 minutes to “bloom” (it’ll get wrinkly, it’s fine). Now, add 1 1/2 cups of hot water and stir until the gelatin is completely dissolved. Stir in the can of sweetened condensed milk. Let this mixture cool down to room temperature.
- Add the White: Once your red layer is firm, carefully pour the cooled white layer on top, filling another 1/3 of each cup. Be gentle so you don’t break through the red layer! Back to the fridge they go for another 30-45 minutes to set.
- Blue Layer Bliss: Almost there! Repeat step 1 with your blue Jell-O. Dissolve in 1 cup hot water, then add 1 cup cold water. Let it cool slightly (don’t pour hot liquid on your nice, set layers!).
- The Grand Finale (Pouring): Once the white layer is firm, carefully pour the blue Jell-O mixture over the white layer, filling the remaining 1/3 of each cup. Send them back to the fridge for at least 2-4 hours, or even better, overnight, until everything is super firm and ready for its close-up.
- Serve it Up: When it’s time to party, pull them out, top with a dollop of whipped cream and a sprinkle of patriotic magic. Ta-da!
Common Mistakes to Avoid
Look, we all make mistakes. It’s part of the human (and cooking) experience. But I’m here to save you from these rookie errors:
- Impatience is NOT a Virtue: The biggest mistake? Not letting each layer **fully set** before adding the next. If you pour a liquid layer onto a gooey one, guess what? It’s gonna mix. And your beautiful stripes will turn into a patriotic blur. Don’t rush it!
- Hot on Cold Crime: Pouring hot Jell-O or the white mixture directly onto a chilled layer can melt it. Make sure your subsequent layers have cooled down a bit before pouring. We want layers, not a Jell-O soup.
- Forgetting the Unflavored Gelatin: For the white layer, that unflavored gelatin is what gives it structure. Without it, you’ve just got sweet milk, which won’t set into that creamy, dreamy layer. Don’t do it!
- Eyeballing It: While I’m usually a fan of “a dash of this, a sprinkle of that,” Jell-O is a bit more particular. Stick to the water measurements. Too much water, and it won’t set properly. Too little, and it’ll be rubbery.
Alternatives & Substitutions
Feeling a little rebellious? Or maybe you just don’t have certain things on hand? No worries, we can usually make it work!
- Jell-O Flavors: Any red (strawberry, raspberry, cherry) and any blue (berry blue, blue raspberry) will work perfectly. Mix and match to your heart’s content!
- White Layer Swap: If sweetened condensed milk isn’t your jam, you *could* try using vanilla pudding (prepared and cooled) mixed with a little extra unflavored gelatin for a thicker, more opaque white layer. However, **IMO**, the condensed milk gives it that unique creamy texture that’s just superior.
- Dairy-Free? For the white layer, you could experiment with a full-fat coconut milk (the kind in a can) mixed with the unflavored gelatin. The flavor will be different, but it should still set!
- No Small Cups? You can absolutely make this in a larger clear dish (like a 9×13 pan) and then cut into squares. Just know it won’t be quite as “cup-like” for individual servings.
- Cool Whip for Whipped Cream: If you’re feeling extra lazy (and who isn’t sometimes?), a dollop of Cool Whip is a perfectly acceptable, ready-to-go topping.
FAQ (Frequently Asked Questions)
Got questions? I’ve got answers (mostly humorous ones).
- Can I make these ahead of time? Absolutely! They’re actually *better* made ahead. Make them the day before your celebration, and they’ll be perfectly set and ready to rock. Just add toppings right before serving.
- Why is my white layer not setting? Did you forget the unflavored gelatin? Or perhaps you didn’t dissolve it fully in the hot water? That little packet is mighty important for setting. Also, ensure it had enough chill time!
- Can I use sugar-free Jell-O? You sure can! The process is exactly the same. The sweetened condensed milk will still be sugary, but you can definitely cut back on the Jell-O sugar.
- My layers mixed! What went wrong? Ah, impatience, my old foe. You likely didn’t let the previous layer set long enough, or your new layer was too warm when poured. Slow and steady wins the Jell-O race!
- How long do these last in the fridge? If sealed well (plastic wrap on top), they’ll last about 3-4 days. But let’s be real, they’ll be gone way before then!
- Can I add fruit to these? For the Jell-O layers, stick to fruit that works well with gelatin (like peaches, bananas, or grapes). Avoid fresh pineapple, kiwi, or papaya, as they contain enzymes that will prevent Jell-O from setting.
- Do I really need clear cups? Not “need,” but they really make the visual impact, which is half the fun of these. They just look so darn patriotic in those clear cups!
Final Thoughts
See? You’re practically a Jell-O architect now! You’ve successfully created a vibrant, delicious, and undeniably patriotic treat that required minimal fuss. Your little ones will adore these, and honestly, so will the grown-ups (they just won’t admit it). So go forth and conquer your 4th of July celebrations with these beauties. You’ve earned it, and now you have more time to perfect your potato salad. 😉


