So, you’ve survived another day of tiny humans, and now your brain is doing that fuzzy “what-do-I-feed-them-next?” dance, right? And maybe, just maybe, you’re craving something that doesn’t involve wrestling a vegetable into submission or pretending that an apple slice is a gourmet dessert. I get it. We’re on the same team. That’s why we’re making Oatmeal Bars for Kids today. These aren’t just snacks; they’re tiny, edible peace treaties that taste amazing and trick everyone into thinking you’re a super-parent. Win-win!
Why This Recipe is Awesome
Let’s be real. We want easy, we want tasty, and we want something that won’t make us want to pull our hair out. This recipe? It ticks all those boxes and then some. First off, it’s pretty much **idiot-proof**. I mean, if I can make these without summoning a fire truck, you absolutely can too. They’re also packed with oats, which means fibre, which means… well, you know what that means for little tummies. Plus, they’re perfectly customizable, so whether your kid is a chocolate fiend or a berry enthusiast, you’re covered. **They’re fast to whip up and even faster to disappear**, which is the ultimate compliment, IMO.
Ingredients You’ll Need
Gather your troops! Here’s what you’ll need to make these magical bars:
- 1 cup (2 sticks) unsalted butter, softened: The good stuff. Don’t skimp. Life’s too short for sad, flavourless bars.
- 1 cup packed light brown sugar: For that caramel-y goodness. Also, it’s brown, so it’s practically healthy, right? (Don’t quote me on that.)
- 1 teaspoon vanilla extract: Because everything is better with vanilla. It’s science.
- 1 large egg: The binder that holds it all together, like a tiny, edible superhero.
- 1 ½ cups all-purpose flour: The backbone of our bars.
- 1 teaspoon baking soda: To give them a little lift, so they’re not dense like bricks.
- ½ teaspoon salt: Balances out all that sweetness. Crucial!
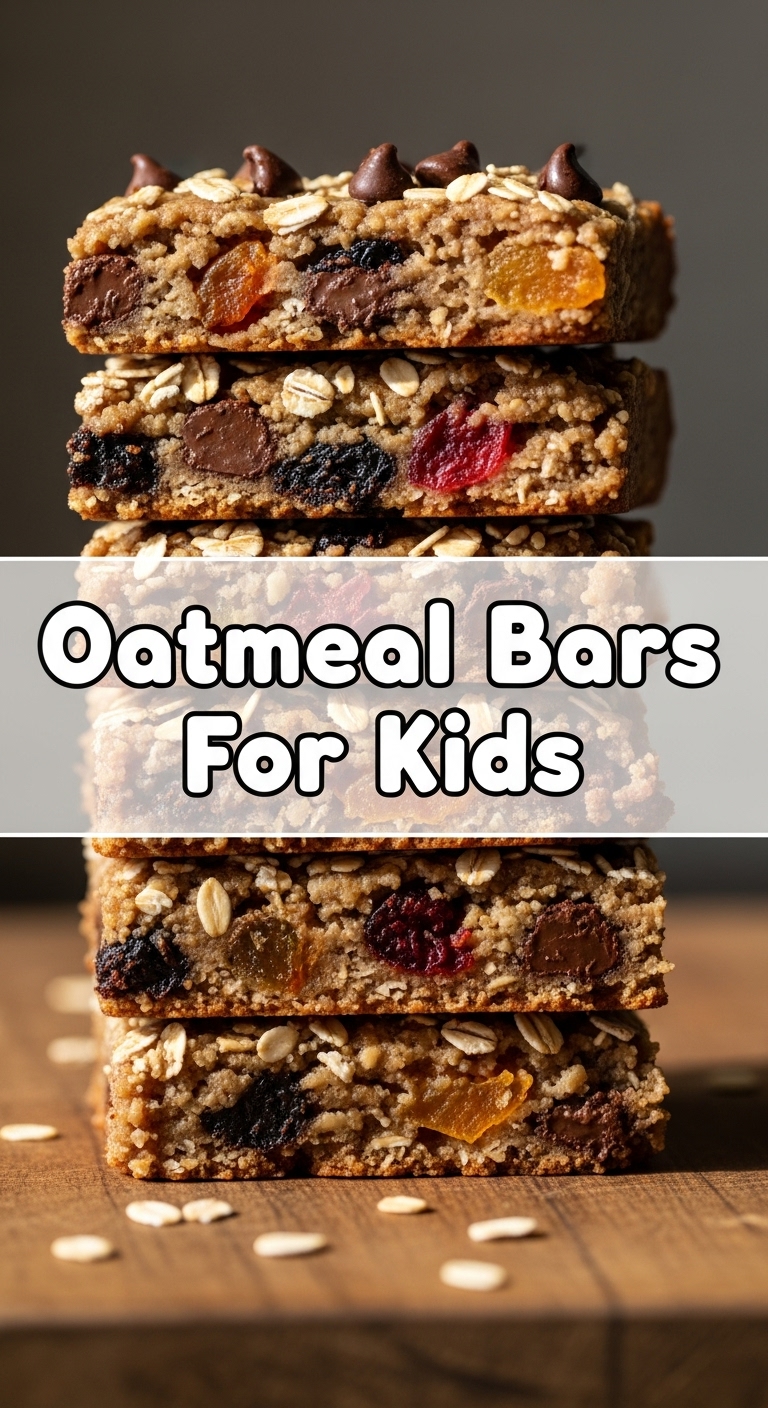
- 3 cups old-fashioned rolled oats: The star of the show! Make sure they’re not instant oats, unless you want oatmeal mush. You don’t.
- Optional add-ins (½ to 1 cup): Chocolate chips, dried cranberries, chopped nuts (if no allergies), sprinkles (because why not?).
Step-by-Step Instructions
Alright, apron on, game face ready! Let’s get baking!
- Preheat & Prep: Get your oven ready by preheating it to 350°F (175°C). While it’s warming up, grab a 9×13 inch baking pan and **line it with parchment paper**, leaving a little overhang on the sides. This makes lifting the bars out a breeze later. Trust me on this.
- Cream It Up: In a large mixing bowl, beat together the softened butter and brown sugar until they’re light and fluffy. Use an electric mixer if you have one – your arms will thank you. Now, stir in the vanilla extract and crack in that egg. Mix until everything is just combined.
- Dry Ingredients Party: In a separate, medium-sized bowl, whisk together the flour, baking soda, and salt. Make sure there are no lumps of baking soda hanging out.
- Combine Forces: Slowly add the dry ingredients to the wet ingredients, mixing on low speed until just combined. Don’t overmix! We’re not making bread here.
- Oats In!: Now, fold in the old-fashioned oats. Stir until they’re evenly distributed throughout the dough. If you’re using any optional add-ins like chocolate chips, now’s the time to toss them in too!
- Press & Bake: Dump the glorious dough into your prepared baking pan. Use the back of a spoon or your (clean!) hands to **firmly press the dough evenly into the pan**. The flatter and more even, the better your bars will be.
- Bake It ‘Til Golden: Pop the pan into your preheated oven and bake for 25-30 minutes. You’re looking for the edges to be a beautiful golden brown and the centre to look set.
- Cool Down: Once baked, take the pan out of the oven and let it cool completely on a wire rack before attempting to cut them. **This is crucial for nice, clean bars!** If you cut them hot, they’ll crumble like your last attempt at a healthy dinner.
- Slice & Serve: Once cool, use the parchment paper overhang to lift the whole slab out of the pan. Cut into squares or rectangles, depending on how fancy you’re feeling.
Common Mistakes to Avoid
Nobody’s perfect, but we can at least avoid the most common pitfalls, right?
- Forgetting to line the pan: Seriously, just do it. Otherwise, you’ll be scraping, cursing, and possibly crying. It’s not a fun time.
- Overmixing the dough: Once you add the flour, mix until *just* combined. Overmixing develops gluten, which makes things tough, and nobody wants a tough oatmeal bar.
- Using instant oats: Big nope. Instant oats absorb liquid way too fast and will give you a gummy, sad bar instead of a chewy, delightful one. Stick to old-fashioned.
- Cutting them hot: Impatience is a virtue, but not here. These bars need to cool down and firm up completely before slicing, or they’ll fall apart like a house of cards.
- Eyeballing ingredients: Baking is science! While a pinch of this or that works for some recipes, for baking, measuring properly is your best friend.
Alternatives & Substitutions
Feeling adventurous? Or just missing an ingredient? No worries, I got you!
- Flour Power: You can swap out some of the all-purpose flour for whole wheat flour if you’re feeling extra virtuous. Start with substituting about half and see how you like the texture. Gluten-free flour blends usually work too, but you might need a tiny bit more liquid.
- Sweet Swaps: Not a fan of brown sugar? You could use granulated sugar, or a mix of both. Maple syrup or honey *could* work, but you’d need to adjust the wet/dry ratios, which is a bit more advanced. For simplicity, stick to solid sugars.
- Fat Facts: While butter is king here for flavour, a good quality vegan butter substitute can work if you need dairy-free. Just avoid anything too watery.
- Mix-in Madness: This is where the real fun begins! Think dried cherries, blueberries, chopped nuts (pecans or walnuts are great!), shredded coconut, white chocolate chips, or even a swirl of cinnamon sugar on top before baking. The world is your oyster!
FAQ (Frequently Asked Questions)
Got questions? I’ve got (casual) answers!
- Can I make these dairy-free? Absolutely! Swap the butter for a good quality vegan butter alternative. Most work like a charm.
- How long do these bars last? If they even make it that long, they’ll stay fresh in an airtight container at room temperature for about 3-4 days. You can also freeze them for up to 3 months. Just thaw at room temp when you’re ready to devour!
- My kids don’t like chocolate chips. What else can I add? Oh, the possibilities! Try dried cranberries or raisins for a chewy fruit burst, or even a handful of finely shredded carrots or zucchini if you’re feeling sneaky (they won’t even know!).
- Do I really need to use parchment paper? **YES.** Unless you enjoy chiseling your bars out of the pan and losing half of them in the process, parchment paper is your best friend. Don’t skip it.
- Can I reduce the sugar? You can try! I wouldn’t go below ¾ cup, as the sugar contributes to texture and moisture, not just sweetness. Plus, these are for *kids*. Let them live a little!
- What if my bars are too crumbly? You might not have pressed the dough firmly enough into the pan, or you didn’t let them cool completely before cutting. Patience, grasshopper!
Final Thoughts
And there you have it! Delicious, easy, and kid-approved Oatmeal Bars that will make you feel like a culinary genius (even if you just followed my instructions to the letter, which is totally fine!). So go ahead, pat yourself on the back. You’ve created something tasty, probably saved yourself from a snack-related meltdown, and maybe even got a few extra minutes of peace and quiet. Now go impress someone—or yourself—with your new culinary skills. You’ve earned it!


