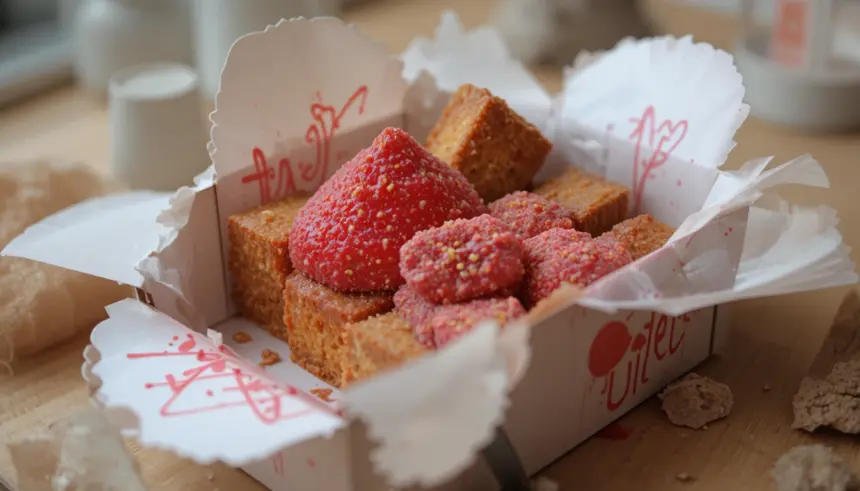
Okay, so you’ve scrolled through a million aesthetically pleasing bento box pics, right? And maybe thought, “My lunch looks like an actual crime scene compared to that.” Same, friend, same. But what if I told you we could level up our bento game with something ridiculously cute, surprisingly easy, and *red*? Like, show-stopping, “did-you-hire-a-pastry-chef?” red? We’re diving into the glorious world of Red Cake in a Bento Box, and trust me, your lunch just got an instant upgrade from drab to fab. No fancy tools, no stress, just pure cake-y joy. Let’s do this!
Why This Recipe is Awesome
Let’s be real, life is too short for bland lunches and complicated baking. This recipe? It’s basically the superhero of desserts. First off, it’s tiny. Which means portion control (if you can resist going back for more, good luck with that). Second, it’s red. Like, vibrant, “look at me!” red. It instantly makes any bento box look like a work of art, even if the rest of it is just leftover pasta. And finally, it’s pretty much idiot-proof. Seriously, I’ve had kitchen mishaps involving smoke alarms and forgotten ingredients, and even I didn’t mess this up. Plus, imagine the looks you’ll get when you pull out a miniature red cake during your lunch break. Pure flex, right?
Ingredients You’ll Need
- For the Cake:
- All-purpose flour: Just a half cup. Don’t go wild, we’re making tiny cakes, not a wedding cake.
- Granulated sugar: Quarter cup of sweetness. Because life needs sugar.
- Unsweetened cocoa powder: A tiny bit (1 tablespoon). This isn’t chocolate cake, it’s red cake with a whisper of cocoa magic.
- Baking powder: Half a teaspoon. For that essential fluff.
- Salt: A pinch. Balances all that sweet goodness.
- Buttermilk: Quarter cup. If you don’t have it, a quick hack: milk + a tiny bit of lemon juice/vinegar. Let it sit for 5 mins. You’re welcome.
- Vegetable oil: 2 tablespoons. Keeps it moist. Nobody likes dry cake.
- Egg: 1 small one. Or half of a large one if you’re good at splitting. Or just use a whole small one and adjust other liquids slightly. Don’t overthink it.
- Vanilla extract: Half a teaspoon. The soul of any good cake.
- Red food coloring: 1-2 teaspoons (gel works best for vibrant color!). This is where the magic happens, people. Go bold!
- For the Cream Cheese Frosting (because what else?):
- Cream cheese: 2 oz, softened. The star of the show.
- Unsalted butter: 1 tablespoon, softened. Butter makes everything better.
- Powdered sugar: Quarter cup (or more, to taste). Sift it if you’re feeling fancy.
- Vanilla extract: A splash. Just because.
Step-by-Step Instructions
- Prep Your Station: First things first, preheat your oven to 350°F (175°C). Then, grab a small baking pan (like an 8×8 inch brownie pan, or even a loaf pan will work if you adjust baking time). Grease and flour it, or line with parchment paper. Trust me, you don’t want your beautiful red creation sticking.
- Mix the Dry: In a medium bowl, whisk together your flour, sugar, cocoa powder, baking powder, and salt. Give it a good whisk until everything is friends and evenly distributed. No lumpy bits allowed!
- Combine the Wet: In a separate bowl, whisk together the buttermilk, vegetable oil, egg, and vanilla extract. Now for the star – add your red food coloring. Stir it in until it’s a jaw-dropping shade of red. Don’t be shy; this is your moment to shine!
- Marry Them Together: Pour the wet ingredients into the dry ingredients. Mix with a spatula or whisk just until combined. Be careful not to overmix! Overmixing leads to tough cake, and we’re aiming for tender, fluffy perfection. A few streaks of flour are totally fine.
- Bake It Up: Pour your vibrant red batter into your prepared pan. Pop it into the preheated oven and bake for about 15-20 minutes, or until a toothpick inserted into the center comes out clean. Baking times can vary, so keep an eye on it!
- Cool Down: Once baked, let the cake cool in the pan for about 10 minutes before carefully transferring it to a wire rack to cool completely. Patience is a virtue, especially when cake is involved.
- Whip Up the Frosting: While the cake is chilling, make your frosting. In a small bowl, beat the softened cream cheese and butter together until smooth and creamy. Gradually add the powdered sugar, mixing until well combined and lump-free. Stir in the vanilla extract. If it’s too thick, add a tiny splash of milk; too thin, add more powdered sugar.
- Assemble Your Bento Bites: Once the cake is completely cool (this is important, folks, or your frosting will melt into a sad puddle), use a small cookie cutter (squares, circles, hearts – whatever floats your bento boat!) to cut out individual cake pieces. Frost each piece generously.
- Bento Box Ready: Arrange your glorious mini red cakes in your bento box, maybe with some berries or mint leaves for extra flair. And there you have it – bento box bragging rights, secured!
Common Mistakes to Avoid
- Ignoring Preheat: Thinking you don’t need to preheat the oven. Rookie mistake. Your oven needs to be hot and ready to greet that batter, otherwise, you’ll end up with a dense, sad cake.
- Overmixing the Batter: “Just combine until *just* combined” isn’t a suggestion, it’s a command! Overmixing develops gluten too much, leading to a tough, rubbery cake. We want tender, not tire-like.
- Not Cooling the Cake (before frosting): You’ve baked a beautiful cake, and you’re excited. I get it. But frosting a warm cake is a one-way ticket to a soupy, melty disaster. Patience, my friend, patience.
- Skimping on Food Coloring: This is RED cake, not “blush pink” cake. If you want that iconic vibrant color, use gel food coloring and don’t be afraid to add a bit more until you’re happy. Go big or go home!
- Using Cold Ingredients for Frosting: Ever tried to beat cold cream cheese and butter? It’s lumpy, sad, and just won’t cooperate. Make sure they’re softened to room temperature for that silky-smooth frosting texture.
Alternatives & Substitutions
Feeling a little rebellious, or just missing an ingredient? No stress, here are a few ideas:
- Buttermilk: If you don’t have buttermilk, remember the quick hack I mentioned: 1/4 cup milk + 1/4 teaspoon lemon juice or white vinegar. Let it sit for 5 minutes. Works like a charm, IMO.
- Food Coloring: If red isn’t your jam (gasp!), feel free to swap it for another color. Blue cake in a bento box? Why not! Or skip it entirely for a lovely vanilla/cocoa swirl. It won’t be “red cake,” but it’ll still be delicious.
- Oil: Can you use melted butter instead of vegetable oil? Yes, you can! It’ll give a slightly different flavor profile and texture, a bit richer. Just make sure it’s melted and cooled slightly.
- Flour: For a slightly healthier twist (sort of), you could try using half whole wheat pastry flour and half all-purpose flour. Don’t go 100% whole wheat unless you’re prepared for a denser cake, which might not be what we’re going for here.
- Frosting: Not a cream cheese fan? (Seriously? But okay.) You could do a simple vanilla buttercream or even a ganache if you’re feeling extra fancy. But honestly, cream cheese frosting and red cake are a match made in heaven. Just sayin’.
FAQ (Frequently Asked Questions)
- Can I make this ahead of time? Absolutely! The cake can be baked a day or two in advance and stored in an airtight container at room temperature. The frosting can also be made ahead and stored in the fridge. Just frost your bento bites when you’re ready to assemble.
- My cake looks more brownish-red than vibrant red, what gives? Ah, a common conundrum! This usually means you either didn’t use enough red food coloring, or you used liquid food coloring which isn’t as potent. Gel food coloring is your best friend here for that show-stopping vibrant hue.
- Can I use margarine instead of butter in the frosting? Well, technically yes, but why hurt your soul like that? Butter just tastes better and gives a superior texture. Margarine can work in a pinch, but it won’t be quite the same level of deliciousness.
- What if I don’t have a small pan? No small pan? No problem! You can use a standard muffin tin. Just fill the cups about two-thirds full and adjust baking time down to about 12-15 minutes. You’ll get cute little cupcakes perfect for bento!
- How long do these mini cakes last in the bento box? If kept refrigerated (especially with cream cheese frosting!), they’re good for 2-3 days. But let’s be real, are they really going to last that long? Probably not, they’re too delicious!
- Can I make these gluten-free? You bet! Swap the all-purpose flour for your favorite gluten-free all-purpose baking blend. Just make sure it contains xanthan gum, or add a tiny bit (1/4 tsp) to help with structure.
Final Thoughts
So there you have it, folks! Your new favorite way to make your lunch break (or any break, really) infinitely more exciting. This Red Cake in a Bento Box isn’t just a dessert; it’s a statement. It says, “Yes, I baked something adorable, and yes, it fits perfectly in this tiny box, and no, you can’t have any.” (Unless you’re feeling generous, then maybe a bite). Now go forth and conquer that kitchen, whip up these little red wonders, and impress everyone – or just yourself, because you totally deserve a treat. You’ve earned it!

