So, the little humans in your life have a birthday coming up, and you’re faced with the age-old dilemma: yet another store-bought cake, or do you channel your inner Martha Stewart (but, like, the fun, messy version) and make something yourself? If you picked the latter, high five! Because today, we’re diving into the ridiculously fun, surprisingly easy world of **animal cakes for kids**. Think less stress, more “OMG, you made that?!” moments.
Why This Recipe is Awesome
Okay, so it’s not *one* specific recipe, but rather a flexible blueprint for awesome. Why is it awesome, you ask? Well, for starters, it’s pretty much **idiot-proof**. If I can make it look decent after a stressful Tuesday, you definitely can. Secondly, it lets you be super creative without needing an art degree. We’re talking basic shapes, a bit of frosting magic, and some candy wizardry. The kids will think you’re a culinary genius, and you’ll know it only took slightly more effort than ordering pizza. Plus, imagine the photo ops! It’s pure, unadulterated, edible joy.
Ingredients You’ll Need
Here’s the lowdown on what you’ll need to create your edible masterpiece. Think of this as your basic cake and frosting toolkit, ready for its animal transformation!
- For the Cake: (Makes two 8-inch rounds or one 9×13 sheet cake)
- 2 ½ cups all-purpose flour (the boring but essential stuff)
- 2 cups granulated sugar (because life’s sweet, literally)
- 1 tablespoon baking powder (the fluffy-maker)
- ½ teaspoon salt (to balance out all that sweetness)
- 1 cup (2 sticks) unsalted butter, softened (your best friend, honestly)
- 1 cup whole milk (or any milk, don’t stress it)
- 4 large eggs (the binders of baking destiny)
- 2 teaspoons vanilla extract (non-negotiable for flavor)
- For the Buttercream Frosting:
- 1 cup (2 sticks) unsalted butter, softened (again with the butter, it’s a cake, not a salad)
- 4 cups powdered sugar, sifted (avoiding lumps is key, trust me)
- ¼ cup heavy cream or milk (for that perfect, spreadable consistency)
- 1 teaspoon vanilla extract (more vanilla, always)
- Pinch of salt (just a tiny bit!)
- For the Animal Magic (aka Decorations!):
- Food coloring gels (liquid works, but gels are more vibrant, FYI)
- Assorted candies: M&Ms, licorice, gummy candies, chocolate chips, mini marshmallows, sprinkles, pretzels, Oreo cookies (your animal’s eyes, ears, spots, and whatnot!)
- Fruit roll-ups or fruit leather (great for tongues, stripes, or other flexible details)
- Cereal or cookies (for textured fur, scales, or just extra crunch)
Step-by-Step Instructions
Alright, apron on, game face ready! Let’s get baking and then get decorating.
- **Preheat & Prep:** First things first, preheat your oven to 350°F (175°C). Grease and flour your chosen cake pans. This is not the step to skip, unless you enjoy wrestling with stuck cake.
- **Mix Dry Ingredients:** In a medium bowl, whisk together the flour, sugar, baking powder, and salt. Easy peasy.
- **Cream Wet Ingredients:** In a large bowl (or stand mixer if you’re fancy), beat the softened butter until light and fluffy. Add the eggs one at a time, beating well after each. Stir in the vanilla.
- **Combine Everything:** Gradually add the dry ingredients to the wet ingredients, alternating with the milk, beginning and ending with the dry. Mix until just combined – **don’t overmix!** Overmixing leads to tough cake, and nobody wants that.
- **Bake It Up:** Pour the batter evenly into your prepared pans. Bake for 25-30 minutes for round cakes, or 30-35 minutes for a sheet cake, or until a toothpick inserted into the center comes out clean.
- **Cool Down:** Let the cakes cool in the pans for about 10-15 minutes before flipping them out onto a wire rack to cool completely. This part is crucial; trying to frost a warm cake is a one-way ticket to a melted, crumbly disaster.
- **Whip Up Frosting:** While the cake cools, beat the softened butter in a large bowl until creamy. Gradually add the powdered sugar, a cup at a time, mixing well. Add the heavy cream (or milk), vanilla, and salt. Beat on high until light and fluffy. If it’s too thick, add more cream a teaspoon at a time. Too thin? Add more powdered sugar.
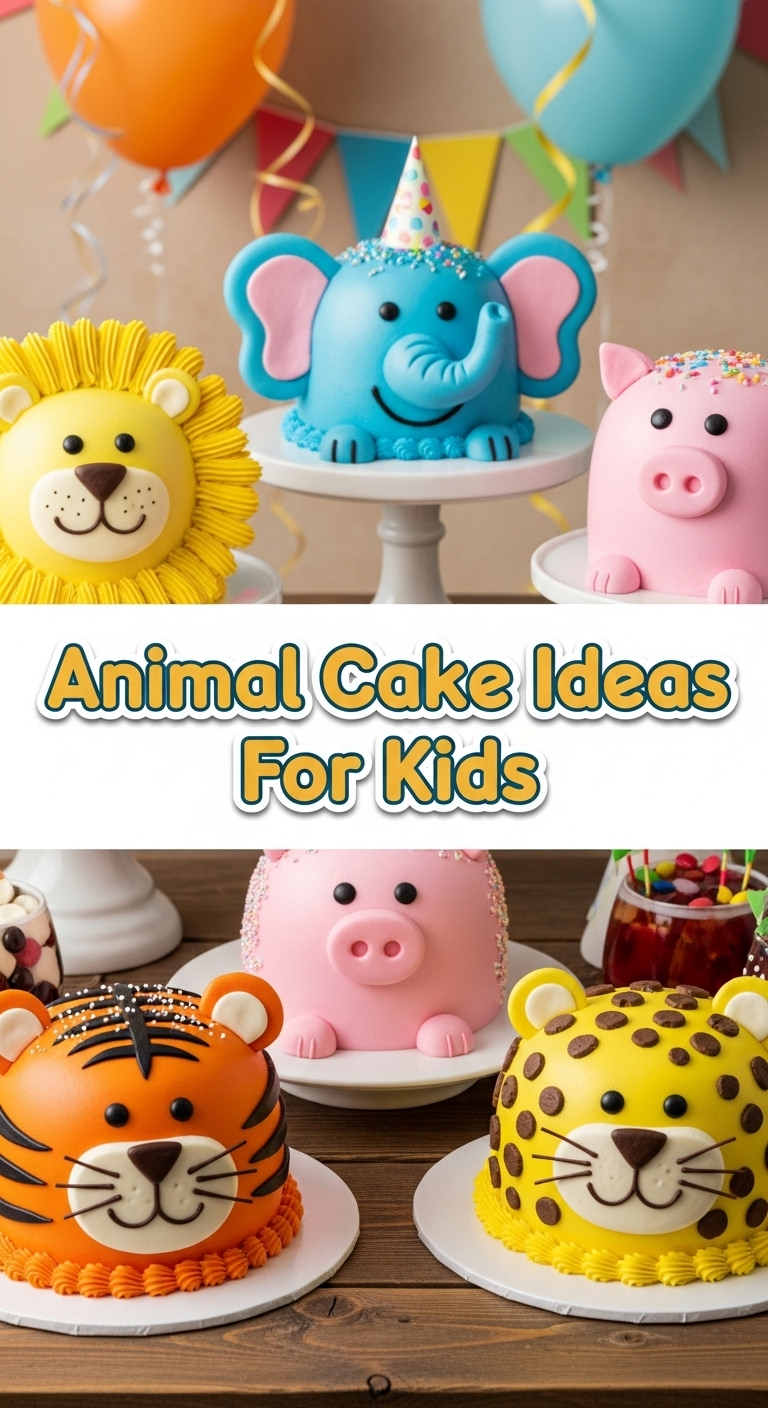
- **Color Your World:** Now for the fun part! Divide your frosting into separate bowls. Use food coloring gels to create the colors you need for your animal. Think brown for a bear, yellow for a lion, green for a frog, etc.
- **Shape & Frost:**
- **For a Bear/Lion/Owl:** Use two round cakes. Stack one, frost the top. Cut the second cake into shapes for ears, snout, or wings, and arrange on the main cake.
- **For a Caterpillar/Snake:** Use cupcakes! Arrange them in a curvy line.
- **For a Dog/Cat:** Use a sheet cake and cut out a simple dog bone or cat face shape.
- Once your base shape is ready, apply your colored frosting! Use an offset spatula or knife for smooth coverage. For “fur” texture, you can use a fork or a star tip.
- **Decorate Your Animal:** This is where the candies come in!
- **Eyes:** Oreo halves, large chocolate chips, or white candies with a small M&M in the center.
- **Noses:** Chocolate-covered cherries, a big gummy candy, or an upside-down chocolate chip.
- **Ears:** Half-Oreos, cookies, fruit roll-ups, or pieces of another cake.
- **Mane/Fur/Spots:** Pretzels, sprinkles, shredded coconut, or different colored frostings.
- **Tongues/Stripes:** Cut from fruit roll-ups.
- **Admire & Devour:** Step back and admire your handiwork! Then, let the kids go wild.
Common Mistakes to Avoid
Nobody’s perfect, especially when cake is involved. Learn from my past (many, many) mistakes!
- **Not Preheating the Oven:** Seriously, it’s not just a suggestion. Your cake will thank you for providing a stable temperature from the get-go. Rookie mistake if you skip this!
- **Overmixing the Batter:** We talked about this. A tough cake is a sad cake. Mix until just combined, then stop.
- **Frosting a Warm Cake:** This is like trying to ice skate uphill. Your frosting will melt, slide off, and take crumbs with it. **Always cool completely.**
- **Ignoring the Sifting:** For powdered sugar, sifting prevents lumps. Lumpy frosting is no fun. Don’t be lazy on this one.
- **Expecting Perfection:** Unless you’re a professional baker, your animal cake might look a little… rustic. And that’s okay! It adds character. The kids won’t care if the bear’s snout is slightly crooked.
- **Too Much Food Coloring:** A little goes a long way, especially with gel colors. Add sparingly, then mix and assess before adding more. You don’t want a cake that stains teeth purple for days!
Alternatives & Substitutions
Feeling adventurous, or just out of milk? No worries, we’ve got options!
- **Boxed Cake Mix:** Look, no judgment here. If you’re short on time, a good quality box mix is your best friend. Just follow the package directions for the cake part, and then jump straight to making the homemade frosting – it makes all the difference! IMO, even a simple cake mix can taste gourmet with homemade frosting.
- **Different Cake Flavors:** Not a vanilla fan? Swap out the vanilla extract for almond extract (for a more intense, slightly nutty flavor) or lemon zest (for a zesty, fresh cake). Chocolate cake works just as well too – hello, chocolate bear!
- **Cream Cheese Frosting:** If buttercream is too sweet for your palate, a cream cheese frosting (cream cheese, butter, powdered sugar, vanilla) is a fantastic, tangy alternative.
- **Dairy-Free Options:** Use a plant-based milk (almond, soy, oat) for the cake and frosting. For the butter, you can use a good quality dairy-free butter stick.
- **Gluten-Free Flour:** You can usually substitute an equal amount of a 1:1 gluten-free baking blend in the cake recipe. Just ensure it contains xanthan gum.
FAQ (Frequently Asked Questions)
Got questions? I’ve got (casual) answers!
- **Can I use a box mix instead of making cake from scratch?** Absolutely, you rebel! Seriously, it saves time and still tastes great, especially with homemade frosting. Nobody will judge, promise.
- **How far in advance can I make the cake?** You can bake the cake layers 2-3 days in advance. Once completely cooled, wrap them tightly in plastic wrap and store at room temp or freeze. Frosting can be made a day or two ahead and stored in the fridge, then re-whipped before using.
- **What’s the easiest animal cake for a beginner?** A bear or a lion cake from two round cakes is super easy! The round shape is already there, and you just add features with frosting and candies. An owl or a caterpillar made from cupcakes are also beginner-friendly.
- **My frosting is too runny/too stiff! Help!** Too runny? Add more powdered sugar, a tablespoon at a time, until it thickens. Too stiff? Add more milk or cream, a teaspoon at a time, until it reaches the right consistency. It’s all about adjusting, friend.
- **Can I use natural food coloring?** Yep! Spinach powder for green, beet powder for pink, turmeric for yellow, spirulina for blue. Just be aware the colors might be less vibrant than artificial gels, and some can impart a very subtle flavor.
- **How do I get smooth frosting?** An offset spatula is your best friend. Also, if your frosting is too thick, thin it with a touch more milk/cream. Once frosted, you can gently heat your spatula under hot water, wipe it dry, and run it over the frosting for an extra smooth finish.
- **What about storing leftovers?** Covered tightly, your cake will last 3-4 days at room temperature. If it has a cream cheese frosting or it’s super hot, keep it in the fridge.
Final Thoughts
There you have it, folks! Your new favorite party trick. Don’t stress the small stuff; baking should be fun, especially when you’re making a whimsical creature for a kiddo. The most important ingredient here is love (and maybe a little bit of caffeine). Now go impress someone—or yourself—with your new culinary skills. You’ve earned it!


