So, you’ve baked a batch of adorable cupcakes, maybe even from a box mix (no judgment here, we’ve all been there!). But now they’re just… plain. And let’s be real, plain cupcakes are like a party without music – functional, but seriously lacking sparkle. You want to unleash your inner pastry Picasso, but also, you know, not spend six hours piping delicate fondant roses. Especially when the target audience is a bunch of sugar-fueled kids who’ll probably smash them in 30 seconds. Sound familiar? Good, because we’re about to dive into the wonderful, messy, and ridiculously fun world of kid-friendly cupcake toppings!
Why This Recipe is Awesome
Okay, “recipe” is a strong word here. It’s more like a *guide to glorious cupcake chaos*. And why is it awesome? Because it’s **idiot-proof**. Seriously, if I can do it without setting off the smoke detector, you can too. It’s also incredibly flexible, utterly delicious, and practically guarantees you’ll be the coolest adult on the block (or at least, the one with the best sprinkles). Plus, it’s a fantastic way to get the kids involved without them destroying your kitchen… mostly. Think of it as a creative outlet that results in edible art. Win-win, IMO!
Ingredients You’ll Need
For the basic, super-fluffy frosting base (because every masterpiece needs a canvas):
- **1/2 cup (1 stick) unsalted butter**, softened (aka, leave it on the counter for a bit, don’t microwave it into a sad puddle).
- **2 cups powdered sugar** (also known as confectioners’ sugar. Don’t use granulated sugar unless you enjoy crunchy frosting, you rebel).
- **1-2 tablespoons milk** (any kind will do, even almond milk if you’re feeling fancy/dairy-free. Start with one, add more if needed).
- **1 teaspoon vanilla extract** (the good stuff, not the imitation kind that tastes like sadness).
- **A pinch of salt** (it really brightens the flavor, trust me).
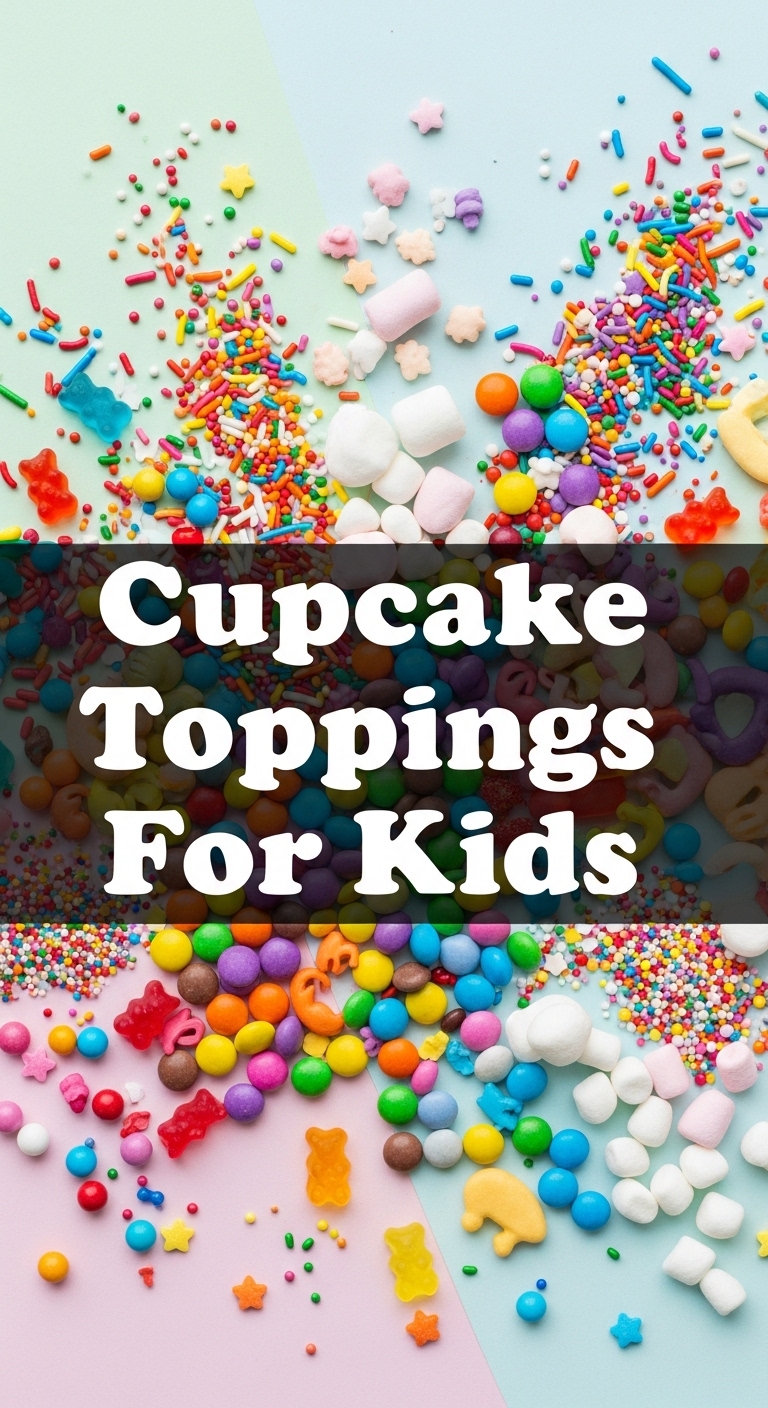
And now, for the FUN STUFF – the toppings! This is where you go wild:
- **Sprinkles**: All shapes, all colors. The more, the merrier!
- **Mini chocolate chips** (milk, dark, white – choose your fighter).
- **Crushed cookies**: Oreos, chocolate chip, graham crackers. Put ’em in a Ziploc and smash ’em with a rolling pin (therapeutic!).
- **Gummy candies**: Gummy bears, worms, sour strips – instant adorable decor.
- **Mini marshmallows**: Especially good if you lightly toast them with a kitchen torch (adult supervision required, obvs!).
- **Fruit**: Sliced strawberries, raspberries, blueberries (surprisingly pretty and a *little* bit healthy, maybe?).
- **Cereal**: Fruity Pebbles, Lucky Charms, even Cheerios for the tiny humans.
- **Candy melts/chocolate sauce**: For drizzling or making cute shapes.
- **Edible glitter**: Because why not make everything sparkle?
Step-by-Step Instructions
First, let’s get that frosting whipped up. It’s super simple, promise!
- **Cream the butter.** In a medium bowl, or your stand mixer (if you’re fancy like that), beat the softened butter on medium speed until it’s light and fluffy. This usually takes about 2-3 minutes. Don’t skimp on this step; it’s what makes the frosting airy!
- **Add the dry goods.** Gradually add the powdered sugar, a cup at a time, mixing on low speed until combined. Once it starts looking like a powdery blizzard, throw in that pinch of salt.
- **Pour in the liquids.** Now, add the vanilla extract and 1 tablespoon of milk. Beat on medium speed until smooth and creamy. If it’s too thick, add the second tablespoon of milk, half a teaspoon at a time, until it reaches your desired consistency. You want it spreadable, not stiff, but also not drippy.
- **Divide and conquer (optional).** If you want different colored frostings, divide your batch into separate bowls and add a tiny drop of food coloring to each. Mix well until you get your desired shade. Remember, a little goes a long way!
- **Frost the cupcakes!** Once your cupcakes are completely cool (this is crucial, trust me), spread a generous dollop of frosting on top of each one. You can use a knife, a small spatula, or even a piping bag if you’re feeling ambitious.
- **Unleash the toppings!** Now for the fun part! Set out all your glorious toppings in small bowls. Let the kids (and you, because you deserve it) go wild decorating. Sprinkle, stack, drizzle – there are no rules here, only deliciousness.
Common Mistakes to Avoid
- **Frosting hot cupcakes:** This is a rookie mistake. You’ll end up with melted frosting puddles and a sad, naked cupcake. **Always wait until cupcakes are completely cool.**
- **Ignoring softened butter:** Cold butter doesn’t cream well. It leads to lumpy, un-fluffy frosting. Patience, grasshopper!
- **Adding too much milk at once:** Frosting can go from perfect to soup in seconds. **Add milk slowly, a tiny bit at a time.** You can always add more, but you can’t take it away!
- **Hoarding the sprinkles:** What’s the point of cupcake toppings for kids if you’re not using enough sprinkles to warrant a vacuum cleaner intervention? Go big or go home!
- **Not having fun:** This isn’t brain surgery! Put on some tunes, get messy, and enjoy the process.
Alternatives & Substitutions
Feeling adventurous? Here are some tweaks:
- **Cream Cheese Frosting:** Swap out half the butter for cream cheese for a tangy, delicious frosting. Just make sure it’s full-fat cream cheese, and also softened. IMO, this is a superior frosting for red velvet or carrot cake cupcakes.
- **Different Flavor Extracts:** Instead of vanilla, try almond extract, peppermint extract (hello, holiday cupcakes!), or even a tiny splash of lemon extract for a zesty kick.
- **Cocoa Powder:** For chocolate lovers, whisk in 1/2 cup of unsweetened cocoa powder with the powdered sugar. You might need an extra splash of milk to maintain the right consistency.
- **Pre-made Frosting:** Listen, sometimes you just need a shortcut. Buy a can of vanilla frosting, doctor it up with a pinch of salt and an extra splash of vanilla. No one will ever know… unless you tell them.
- **Healthy-ish Toppings:** If you’re trying to sneak in some goodness, thinly sliced fruit (strawberries, kiwi, banana) can be surprisingly appealing, especially paired with a dollop of yogurt-based frosting (though that’s a whole other recipe!).
FAQ (Frequently Asked Questions)
Got questions? I’ve got answers (mostly).
- **Q: Can I use margarine instead of butter?** A: Well, technically yes, but why hurt your soul like that? Butter just tastes better and gives a richer texture. But in a pinch, margarine will work.
- **Q: How long does this frosting last?** A: In an airtight container in the fridge, about 3-4 days. Let it come to room temperature and give it a quick whip before using.
- **Q: Can I make the cupcakes ahead of time?** A: Absolutely! Bake them a day or two in advance, store them in an airtight container, and then frost them fresh before serving. Frosting just before eating is always best for optimal deliciousness.
- **Q: My frosting is too runny! Help!** A: Don’t panic! Add more powdered sugar, a tablespoon at a time, until it thickens up. You got this.
- **Q: My frosting is too stiff! What do I do?** A: Add more milk, half a teaspoon at a time, mixing well after each addition until it loosens up. Easy peasy!
- **Q: What if I don’t have a mixer? Can I use a whisk?** A: You absolutely can, but be prepared for an arm workout! It’ll take longer to get that fluffy texture, but it’s totally doable. Just embrace the burn!
- **Q: Can I freeze frosted cupcakes?** A: You can, but delicate toppings like fresh fruit or certain candies might not fare well. Cupcakes themselves freeze beautifully, but I’d recommend freezing them unfrosted and adding the magic touch later.
Final Thoughts
See? That wasn’t so scary, was it? You’ve just mastered the art of making cupcakes go from “meh” to “OMG, where’s my camera?!” This isn’t just about baking; it’s about making memories, having fun, and creating something ridiculously delicious. So go forth, wield your spatula (or piping bag), and get ready for some serious cupcake fun. Now go impress someone—or yourself—with your new culinary skills. You’ve earned it!


