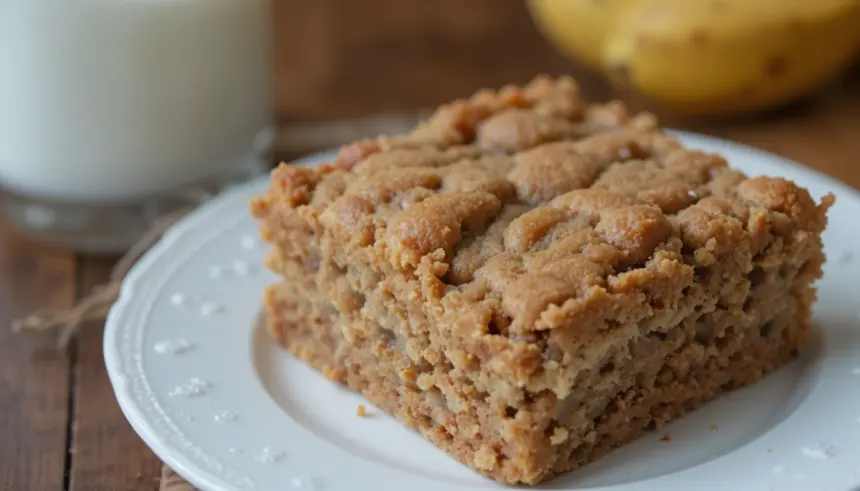
So, you’re standing in your kitchen, staring at those suspiciously spotty bananas on the counter, probably thinking, “Banana bread, again?” And then the thought of pulling out the loaf pan, waiting for it to cool, and slicing it perfectly makes you want to just toss ’em. **Don’t you dare!** Because today, my friend, we’re making Banana Bread Bars. It’s banana bread’s cooler, more laid-back cousin who shows up to the party in bar form and is way less fuss.
Why This Recipe is Awesome
Let’s be real: traditional banana bread can be a bit… prim and proper. These bars? They’re the wild child of the banana bread family. They bake faster, cool quicker (because who has patience?), and they’re practically portion-controlled (if you have more self-control than I do). Plus, they are ridiculously easy. **I swear, if you can mash a banana, you can make these.** Seriously, even I, the queen of “oops, did I burn that?”, manage to get these perfect every single time. It’s practically idiot-proof, and I say that with love.
Ingredients You’ll Need
Gather your troops! Most of these are probably already lurking in your pantry, just waiting for their moment to shine. No fancy shmancy stuff here!
- **Overripe Bananas (3 medium-sized):** We’re talking brown, spotty, practically black. These are your flavor bombs. Resist the urge to use firm, yellow ones unless you enjoy disappointment.
- **Unsalted Butter (1/2 cup or 1 stick), melted:** Because butter makes everything better. Don’t skimp, don’t substitute with anything less glorious.
- **Granulated Sugar (1/2 cup):** Just enough sweetness to balance the banana love.
- **Brown Sugar (1/4 cup, packed):** Adds that lovely, deep, caramel-y note.
- **Large Egg (1):** Your binding agent!
- **Vanilla Extract (1 teaspoon):** A baking MVP. Always.
- **All-Purpose Flour (1 1/2 cups):** The backbone of our bars.
- **Baking Soda (1 teaspoon):** Gives them that perfect lift.
- **Salt (1/2 teaspoon):** Crucial for balancing flavors. Don’t skip it!
- **Optional Add-ins (1/2 cup):** Chocolate chips (duh), chopped walnuts, pecans, or whatever your heart desires.
Step-by-Step Instructions
- **Preheat Power-Up:** First things first, get your oven ready. Crank it up to 350°F (175°C). Then, grab an 8×8 or 9×9 inch baking pan, line it with parchment paper, and give it a little spray with non-stick goodness. **This is key for easy removal!**
- **Banana Mash Party:** In a medium bowl, go to town on your overripe bananas. Mash ’em up with a fork until they’re mostly smooth but still have a few small lumps. We’re not aiming for baby food, just a good mush.
- **Wet Ingredients Whirlwind:** In a larger bowl, whisk together your melted butter, granulated sugar, and brown sugar until they’re well combined and look slightly creamy.
- **Egg & Vanilla Entrance:** Beat in the egg and then the vanilla extract into the butter-sugar mix. Stir until everything is nicely incorporated and smells amazing.
- **Dry Mix Magic:** In a separate, small bowl, whisk together your flour, baking soda, and salt. Make sure there are no lumpy bits.
- **Combine & Conquer:** Add the dry ingredients to the wet ingredients. Mix just until combined. **Do not overmix!** Lumps are fine, tough bars are not. If you’re using add-ins like chocolate chips, fold them in now.
- **Pan It Up:** Pour your glorious batter into your prepared baking pan. Spread it out evenly with a spatula.
- **Bake Away:** Pop that pan into your preheated oven. Bake for 25-30 minutes, or until a toothpick inserted into the center comes out clean.
- **Cool Down Crew:** Let those bars cool in the pan for at least 10-15 minutes before attempting to lift them out with the parchment paper. Then, transfer them to a wire rack to cool completely. Or, if you’re like me, cut a corner off while they’re still warm. **No judgment here.**
Common Mistakes to Avoid
- **Using Under-Ripe Bananas:** This is the cardinal sin of banana baking. Green bananas lack the sweetness and moisture you need. **Resist the urge!**
- **Overmixing the Batter:** You’re not making bread dough, you’re making bars! Overmixing develops gluten, which leads to tough, chewy bars instead of soft, tender ones. Mix just until no streaks of flour remain.
- **Not Lining Your Pan:** Rookie mistake! That parchment paper is your best friend for getting these beauties out of the pan in one piece. Trust me, you don’t want to be scraping.
- **Cutting While Hot:** Yes, I just told you I sometimes do it. But for perfectly structured bars that don’t crumble, **wait until they’re cooled.**
Alternatives & Substitutions
Feeling adventurous? Or just out of something crucial? Here are a few ways to tweak your bar game:
- **Spice It Up:** Add 1/2 teaspoon of cinnamon or a pinch of nutmeg to the dry ingredients for an extra cozy flavor.
- **Nutty Professor:** Swap chocolate chips for chopped walnuts or pecans for a delightful crunch. Or use both! **IMO, more is more.**
- **Sweetener Swap:** You can experiment with reducing the sugar slightly if your bananas are super ripe, or even try half maple syrup (just adjust the dry ingredients a tad to account for the extra liquid).
- **Vegan Vibes:** For a vegan version, use a flax egg (1 tbsp ground flaxseed + 3 tbsp water, let sit for 5 mins) and a plant-based butter alternative.
FAQ (Frequently Asked Questions)
Got questions? I’ve got (casual) answers!
- **Can I use frozen bananas?** Absolutely! Just thaw them completely and drain any excess liquid before mashing. They tend to be even sweeter and gooier once thawed.
- **How long do these bars last?** Stored in an airtight container at room temperature, they’re good for 3-4 days. In the fridge, maybe up to a week. If they last that long, you’re a hero.
- **Can I add frosting?** Um, yes! A simple cream cheese frosting would be divine. We’re talking next-level delicious.
- **What if I don’t have brown sugar?** You can use all granulated sugar, but you’ll miss that subtle molasses flavor. For a quick fix, you can make your own brown sugar by mixing a tablespoon of molasses into a cup of white sugar. **DIY, baby!**
- **My bars turned out dry, what went wrong?** Likely overbaked them, or maybe your bananas weren’t ripe enough. Keep an eye on the oven next time and pull them out as soon as the toothpick test is clean.
Final Thoughts
So there you have it! Easy-peasy, unbelievably delicious Banana Bread Bars that are perfect for breakfast, a snack, or a midnight treat (don’t tell me you haven’t done it). You just whipped up something amazing with minimal effort and maximum flavor. Now go impress someone—or yourself—with your new culinary skills. You’ve earned it!
