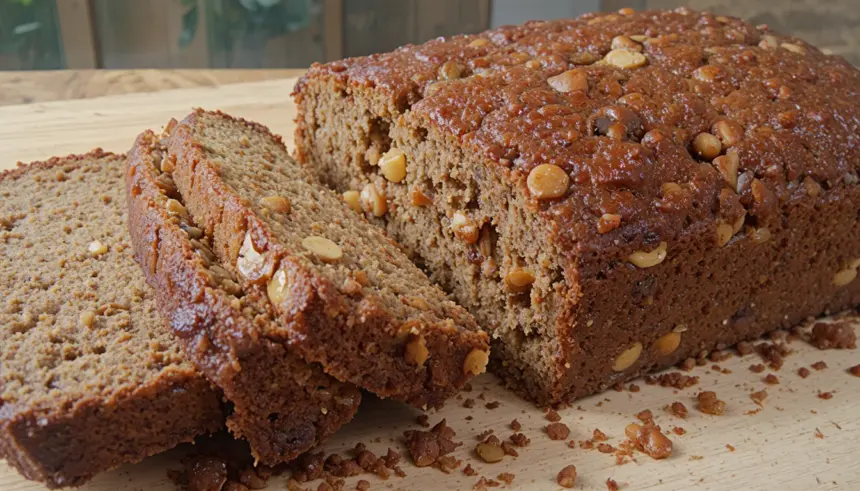
So you’re craving something tasty but too lazy to spend forever in the kitchen, huh? Same. But what if I told you we could whisk our taste buds straight to the sandy beaches of Hawaii, no passport required, with minimal effort? Get ready to channel your inner islander because we’re diving into the glorious world of Traditional Hawaiian Banana Bread! It’s sunshine in a loaf, folks.
Why This Recipe is Awesome
Okay, let’s be real. There are a million banana bread recipes out there. But *this* one? This one is different. It’s got that little extra something, a whisper of aloha, thanks to a few star ingredients. Think moist, sweet, and perfectly spiced, with a delightful tropical crunch. It’s so good, it’s practically illegal. Plus, it’s honestly pretty **idiot-proof** – even *I* didn’t mess it up, and that’s saying something.
It’s perfect for breakfast, a midday snack, or pretending you’re on vacation. And honestly, who doesn’t need more of that in their life? You’ll look like a culinary genius, and all you did was mash some bananas and mix stuff. Win-win, if you ask me!
Ingredients You’ll Need
Gather ’round, my future baking superstar. Here’s what you’ll need to conjure this tropical magic. Don’t worry, it’s mostly pantry staples with a couple of fun extras.
- 1 ½ cups All-Purpose Flour: The standard stuff. No need to get fancy unless you want to.
- 1 teaspoon Baking Soda: Our trusty leavening agent. Don’t skip it unless you want a banana brick.
- ½ teaspoon Salt: Just a pinch, because balance, darling, balance.
- ¾ cup Granulated Sugar: The sweet stuff. Adjust to your desired sweetness, but this is a good starting point.
- 3-4 Very Ripe Bananas: And I mean *very* ripe. Like, spotted, nearly black, “are these still good?” ripe. **The browner, the better!** This is where all the flavor comes from.
- 2 Large Eggs: Room temperature if you can swing it, but if not, no biggie.
- ½ cup Unsalted Butter: Melted and cooled slightly. Because everything’s better with butter, IMO.
- 1 teaspoon Vanilla Extract: A dash of fancy, a hug of warmth.
- ½ cup Shredded Coconut: (Sweetened or unsweetened, your call, but sweetened adds a lovely extra touch!) This is where the Hawaiian party really starts.
- ½ cup Chopped Macadamia Nuts: (Optional, but highly, highly recommended!) The ultimate tropical crunch. Seriously, don’t skip these if you can help it.
Step-by-Step Instructions
Alright, apron on (or not, we’re friends here, no judgment!), let’s get baking!
- Preheat & Prep: First things first, preheat your oven to **350°F (175°C)**. Grease and flour a 9×5 inch loaf pan. Or, if you’re lazy like me, use parchment paper. Easy peasy.
- Dry Mix Magic: In a medium bowl, whisk together the flour, baking soda, and salt. Set that aside for a hot minute.
- Mash Those Bananas: In a large bowl, mash your super-ripe bananas with a fork until they’re mostly smooth, with a few small lumps. We’re going for rustic, not baby food.
- Wet Ingredients Party: To the mashed bananas, add the sugar, eggs, melted butter, and vanilla extract. Stir it all together until just combined. Don’t overmix!
- Combine & Conquer: Pour the dry ingredient mixture into the wet banana mixture. Stir with a spoon or spatula until *just* combined. A few streaks of flour are totally fine; **overmixing leads to tough bread**, and nobody wants that.
- Tropical Add-ins: Gently fold in the shredded coconut and chopped macadamia nuts. Distribute them evenly, like you’re tucking them into bed.
- Bake It Up: Pour the batter into your prepared loaf pan. Pop it into the preheated oven and bake for **55-65 minutes**.
- Check for Doneness: The bread is done when a wooden skewer or toothpick inserted into the center comes out clean (or with a few moist crumbs, but no wet batter).
- Cool Down: Let the banana bread cool in the pan for about 10-15 minutes before transferring it to a wire rack to cool completely. Patience is a virtue, especially when warm banana bread is involved.
Common Mistakes to Avoid
We all make mistakes, but let’s try to avoid these rookie errors, shall we?
- Underripe Bananas: Seriously, don’t even think about it. Greenish or firm bananas will give you bland, less sweet bread. You want them practically screaming, “Eat me now!”
- Overmixing: This is the cardinal sin of baking quick breads. Stirring too much develops the gluten, making your bread tough and chewy instead of tender and moist. Stop when it’s just combined!
- Not Greasing Your Pan: Thinking you don’t need to preheat the oven and not greasing your pan are equally devastating. Rookie mistake! Unless you enjoy scraping delicious bread off metal, grease it.
- Cutting While Hot: I know, the smell is intoxicating. But cutting into hot banana bread will make it crumbly and difficult to slice neatly. Let it cool a bit; it’ll be worth it, promise.
Alternatives & Substitutions
Feeling adventurous? Or just missing an ingredient? No stress! We can totally play around here.
- Gluten-Free: Swap out the all-purpose flour for a 1:1 gluten-free baking blend. I’ve had good luck with brands that contain xanthan gum.
- Nut-Free: If macadamia nuts aren’t your jam (or you have allergies), simply omit them or swap them for chocolate chips! Because chocolate makes everything better, amirite?
- Different Nuts: Walnuts or pecans are also fantastic if you don’t have macadamia nuts on hand, though they won’t give you that specific Hawaiian vibe.
- Dairy-Free: Use a plant-based butter substitute or even vegetable oil in place of the melted butter. Coconut oil works great and enhances the tropical flavor!
- Less Sweet: If your bananas are super, super ripe, you can reduce the granulated sugar by ¼ cup. They’re naturally sweet, FYI!
FAQ (Frequently Asked Questions)
Got questions? I’ve got (casual) answers!
Do I *really* need overripe bananas? Yes, friend, you absolutely do. They are the secret sauce for sweetness and moisture. Think of them as the unsung heroes of this whole operation.
Can I add chocolate chips? You bet your sweet aloha you can! About ½ cup is perfect. They play wonderfully with the coconut and banana.
How should I store this amazing bread? Store it in an airtight container at room temperature for up to 3-4 days. If it lasts that long! You can also pop it in the fridge for up to a week.
Can I freeze Hawaiian Banana Bread? Absolutely! Wrap the cooled loaf (or slices) tightly in plastic wrap, then aluminum foil. It’ll keep in the freezer for up to 3 months. Thaw on the counter or give it a quick zap in the microwave.
What if I don’t have a loaf pan? Can I make muffins? Yep! Divide the batter into a greased muffin tin. Bake for about 20-25 minutes, or until a toothpick comes out clean. Smaller treats, same great taste!
Is this bread vegan-friendly? With a few tweaks, yes! Swap eggs for flax eggs (1 tbsp ground flaxseed + 3 tbsp water per egg, let sit for 5 mins), and use a plant-based butter. Easy peasy lemon squeezy!
Final Thoughts
There you have it! Your very own Traditional Hawaiian Banana Bread, ready to transport you to paradise with every bite. This recipe is a keeper, trust me. It’s simple, delicious, and brings a little bit of sunshine into your kitchen, no matter the weather outside.
Now go impress someone—or yourself—with your new culinary skills. You’ve earned it! Grab a slice, maybe put on some ukulele music, and just enjoy the moment. Aloha, and happy baking!

