So you’re staring at those spotty bananas on your counter, feeling the familiar pull of banana bread, but also feeling… a little too comfy on the couch to embark on a full-blown baking adventure? I get it. We’ve all been there. What if I told you there’s a way to get all that warm, comforting banana bread magic in a gloriously crunchy, incredibly snackable form? Say hello to your new obsession: Banana Bread Granola. Your breakfast game just got a massive upgrade, and your snack cravings are about to meet their delicious match. No complicated steps, just pure, unadulterated banana-y goodness.
Why This Recipe is Awesome
Okay, let’s be real. This isn’t just *any* granola. This is the granola that will make you question every other granola you’ve ever met. First off, it’s ridiculously easy. We’re talking idiot-proof easy. Even I, a person who once set off a smoke detector making toast (don’t ask), can nail this. It takes like 10 minutes of active prep, tops, and then the oven does all the heavy lifting. Plus, it fills your entire house with the most intoxicating aroma – seriously, forget those fancy candles, just make this. It’s also super versatile, perfect for sprinkling over yogurt, milk, smoothie bowls, or, let’s be honest, just shoveling into your face by the handful. It’s like banana bread had a baby with granola, and that baby is a genius.
Ingredients You’ll Need
Gather ’round, my fellow lazy foodies! Here’s your simple shopping list. Nothing too exotic, promise.
- 3 cups old-fashioned rolled oats: Not the instant kind! We want texture, not mush. Think of them as the sturdy foundation for our delicious empire.
- 2 ripe medium bananas: The browner, the better! We’re talking serious sweetness here. Those sad-looking, forgotten bananas are finally getting their moment to shine.
- 1/2 cup pure maple syrup: Or honey, if that’s your jam. This is our sticky, sweet glue.
- 1/4 cup melted coconut oil: Or any neutral oil like canola or vegetable oil. It’s the secret to that lovely crispiness.
- 1 teaspoon vanilla extract: Because everything is better with vanilla. It’s just a fact.
- 1 teaspoon ground cinnamon: The essential banana bread spice. Don’t skip it!
- 1/4 teaspoon ground nutmeg: Her equally important sidekick. Together, they’re a dream team.
- 1/2 teaspoon salt: Yes, salt! It actually makes everything taste sweeter and more complex. Trust the process.
- 1/2 cup chopped walnuts or pecans (optional): For that classic banana bread crunch. Or whatever nuts float your boat!
- 1/2 cup chocolate chips (optional, but highly recommended): Because why not? Life’s too short for plain granola, IMO. Add these *after* baking!
Step-by-Step Instructions
- Preheat & Prep: Preheat your oven to a cozy 300°F (150°C). Line a large baking sheet with parchment paper. This is key for easy cleanup and preventing stickage, my friend.
- Mash the Bananas: In a medium bowl, mash those ripe bananas with a fork until they’re mostly smooth with a few small chunks. Don’t go crazy, we’re not making baby food.
- Mix the Wet Stuff: Add the maple syrup, melted coconut oil, vanilla extract, cinnamon, nutmeg, and salt to the mashed bananas. Stir it all together until it’s beautifully combined and smells absolutely heavenly.
- Combine Wet & Dry: Pour the wet mixture over the rolled oats (and any nuts, if you’re using them) in a large bowl. Stir, stir, stir until every single oat flake is coated in that banana-y goodness. No dry spots allowed!
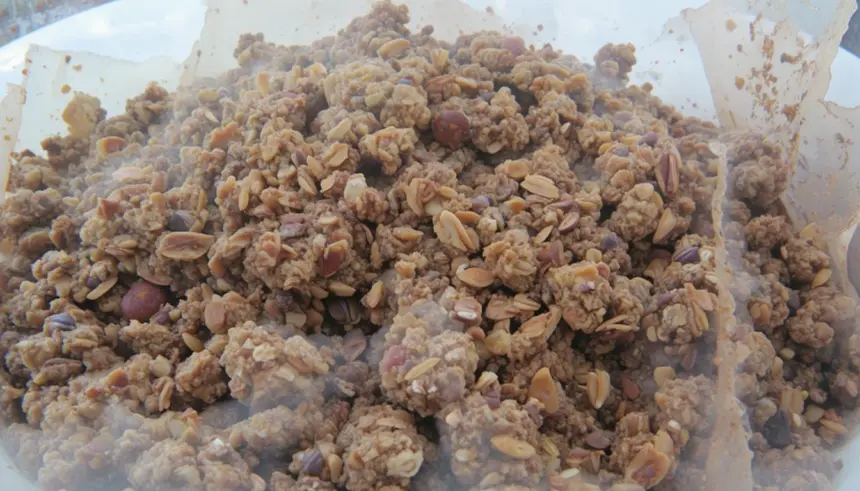
- Spread & Bake: Spread the granola mixture evenly in a single layer on your prepared baking sheet. Try not to overcrowd it – we want crunchy clusters, not soggy piles! Bake for 25 minutes.
- Stir & Bake More: After 25 minutes, pull the tray out and give the granola a good stir. Spread it back out and return it to the oven for another 15-25 minutes, or until it’s golden brown and delightfully crispy. Keep an eye on it! Ovens vary, and you don’t want burnt granola.
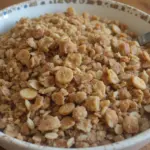
- Cool & Add Chocolate: Remove the granola from the oven and let it cool completely on the baking sheet. This is the hardest part because your kitchen smells like heaven, but cooling is crucial for maximum crunchiness and cluster formation! Once it’s totally cool, stir in your chocolate chips (if using).
- Enjoy! Break it into glorious clusters and try not to eat it all in one sitting. You’ve earned this.
Common Mistakes to Avoid
Nobody’s perfect, but we can at least avoid these common pitfalls that stand between you and granola greatness.
- Using Under-ripe Bananas: Seriously, don’t. Green bananas will give you sad, flavorless granola. We need those brown spots for natural sweetness and intense banana flavor. Patience, young padawan!
- Not Preheating the Oven: Thinking you don’t need to preheat? Rookie mistake! An even, hot oven is crucial for that perfect crisp.
- Overcrowding the Baking Sheet: If your granola is piled too high, it’ll steam instead of bake, leaving you with a soft, chewy (and not in a good way) mess. Give those oats some breathing room.
- Skipping the Cool-Down: Pulling it hot off the tray and immediately trying to eat it will result in a chewier texture. For those epic clusters, let it cool completely. Seriously, let it cool!
Alternatives & Substitutions
Feeling creative? This recipe is super flexible! Here are some ideas to make it your own:
- Sweeteners: Don’t have maple syrup? Honey, agave nectar, or even brown sugar (slightly packed) can work in a pinch. Just note that brown sugar might make it a bit crunchier.
- Oils: Coconut oil is great for flavor, but olive oil (light flavor), grapeseed oil, or vegetable oil work perfectly fine. Avoid super strong-flavored oils unless you want a *very* unique granola.
- Nuts: No walnuts? Pecans, almonds, cashews, or even pepitas (pumpkin seeds) are all fantastic. Mix and match!
- Add-ins: Get wild! After it’s cooled, you can add dried cranberries, raisins, chopped dried apricots, or even a sprinkle of shredded coconut. Just remember to add them after baking to prevent burning.
- Spice it Up: A tiny pinch of ginger or allspice can really amp up the banana bread vibes. Experiment!
FAQ (Frequently Asked Questions)
Got questions? I’ve got answers, delivered with a side of sass, of course.
- Can I use green bananas? No. Just no. Please reread the “Common Mistakes” section. For real though, you need ripe, spotty bananas for flavor and natural sweetness. Trust me on this.
- How long does this granola last? Stored in an airtight container at room temperature, it’ll stay fresh and crunchy for up to 2 weeks. If it lasts that long, that is.
- Is this granola vegan? Absolutely! Just ensure your maple syrup is pure (not “pancake syrup” which often contains corn syrup) and you’re good to go.
- What if I don’t have coconut oil? Any neutral-flavored oil like canola, vegetable, or even a light olive oil will work. The coconut oil adds a nice subtle flavor, but it’s not a deal-breaker.
- Can I add dried fruit before baking? Nope! Dried fruit tends to get super hard and burnt in the oven. Add any dried fruit *after* the granola has completely cooled.
- My granola isn’t clumpy! What did I do wrong? A few things could be at play: too much stirring while cooling, not letting it cool completely, or overcrowding the baking sheet. For big clusters, press it down slightly when you first spread it, don’t stir *too* much after the first bake, and let it cool undisturbed.
Final Thoughts
So there you have it, folks! Your new favorite breakfast, snack, or emergency “I need something delicious right now” solution. This Banana Bread Granola is literally a hug in a bowl (or a handful). It’s easy, it’s delicious, and it makes you look like a domestic god/goddess without breaking a sweat. Now go impress someone—or yourself, which is arguably more important—with your new culinary skills. You’ve earned it!
