So you’ve got those sad, spotty bananas sitting on your counter, practically begging for a glow-up? And you’re craving something warm, cozy, and ridiculously easy to make, but maybe also want to feel like a domestic goddess/god for an hour? My friend, you’ve come to the right place. Forget those complicated recipes; we’re about to make some banana bread that’s so good, it should probably be illegal. No fancy equipment, no culinary degree required, just pure, unadulterated comfort.
Why This Recipe is Awesome
Okay, let’s be real. There are a million banana bread recipes out there. But this one? This one is different. Why? Because it’s utterly **idiot-proof**. Seriously, if I can make it without setting off the smoke detector (which is a high bar, trust me), you can too. It’s that perfect balance of moist, sweet, and banana-y without being overly complicated. Plus, it makes your entire house smell like a warm hug, and who doesn’t need more of those? It’s the kind of recipe that makes you look like a kitchen wizard, even if your most complex culinary skill is boiling water. Win-win, right?
Ingredients You’ll Need
Alright, gather your troops! Most of this stuff is probably already lurking in your pantry, just waiting for its moment to shine.
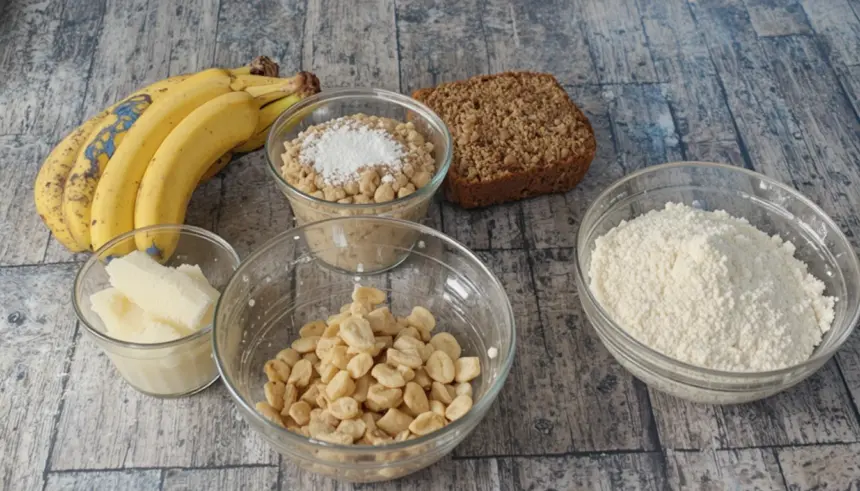
- **3-4 Ripe Bananas:** And by ripe, I mean super ripe. Like, so spotty you almost want to apologize to them. The browner, the better – that’s where all the magic banana flavor lives!
- **1/2 cup (113g) Unsalted Butter:** Melted. Don’t even think about substituting with margarine unless you want to hurt my feelings (and your taste buds).
- **1 Large Egg:** Room temperature if you can remember, but honestly, it’s banana bread, not a soufflé. Don’t stress.
- **1 tsp Vanilla Extract:** The good stuff. It makes everything taste better, IMO.
- **1 1/2 cups (190g) All-Purpose Flour:** Just regular old flour. No need to get fancy here.
- **1 tsp Baking Soda:** This is what makes it rise, so don’t skip it unless you like flat, sad banana bricks.
- **1/2 tsp Salt:** Balances out all that sweetness. A tiny pinch, but mighty!
- **3/4 cup (150g) Granulated Sugar:** Adjust to your sweet tooth. Got really sweet bananas? Maybe a little less.
- **Optional Add-ins (because life is short):** Chocolate chips (duh), chopped walnuts or pecans, a sprinkle of cinnamon. Go wild!
Step-by-Step Instructions
Ready to bake? Let’s get this party started!
- **Preheat Your Oven & Prep Your Pan:** Set your oven to **350°F (175°C)**. Grease and flour a 9×5-inch loaf pan. Trust me, you don’t want your masterpiece sticking to the pan.
- **Mash Those Bananas:** In a medium bowl, mash your ripe bananas with a fork until they’re mostly smooth but still have a few small lumps. We’re going for rustic, not baby food.
- **Wet Ingredients Unite!** Add the melted butter, egg, and vanilla extract to your mashed bananas. Stir it all together until just combined. Don’t overmix – we’re baking, not churning butter.
- **Dry Ingredients Get Their Turn:** In a separate, larger bowl, whisk together the flour, baking soda, salt, and granulated sugar. Give it a good whisk to make sure everything is evenly distributed.
- **Combine Wet & Dry:** Pour the wet banana mixture into the dry ingredients. **Gently fold** with a spatula until just combined. A few streaks of flour are totally fine! Overmixing is the enemy of moist banana bread. If you’re using chocolate chips or nuts, fold them in now.
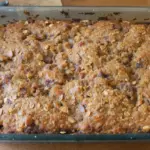
- **Into the Pan it Goes:** Pour your glorious batter into your prepared loaf pan. Give it a little tap on the counter to settle it, but don’t go crazy.
- **Bake Time!** Pop it into your preheated oven and bake for **50-65 minutes**. How do you know when it’s done? Insert a toothpick into the center. If it comes out clean (or with a few moist crumbs, but no wet batter), you’re golden!
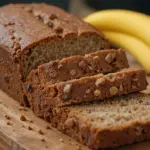
- **Cool Down:** Let your banana bread cool in the pan for about 10 minutes before carefully turning it out onto a wire rack to cool completely. This part is crucial, even though the smell will be tempting you to dive in immediately. **Patience, young grasshopper!**
Common Mistakes to Avoid
Even though this recipe is pretty foolproof, there are a few banana bread traps even the best of us fall into. Learn from my mistakes, because I’ve probably made them all.
- **Using under-ripe bananas:** Rookie mistake! Greenish-yellow bananas taste… well, green. You need those brown spots for maximum sweetness and flavor. **Embrace the brown!**
- **Overmixing the batter:** This is probably the biggest no-no. Overmixing develops the gluten in the flour, leading to tough, chewy banana bread instead of tender, moist goodness. Mix until *just* combined.
- **Not greasing your pan properly:** Nothing is sadder than a perfectly baked loaf stuck stubbornly to its pan. Grease it, flour it, maybe even line it with parchment paper for extra insurance.
- **Cutting into it too soon:** I know, I know, the smell is intoxicating. But cutting into hot banana bread can make it crumble. Let it cool for at least 10 minutes in the pan, then fully on a rack. Your patience will be rewarded.
- **Thinking you don’t need to preheat the oven:** The oven needs to be at the correct temperature from the start for proper rising and baking. Don’t rush it!
Alternatives & Substitutions
Feeling a little rebellious? Want to make this recipe even more “you”? Here are some ideas:
- **Flour Power:** Want to go whole grain? You can swap up to half of the all-purpose flour for whole wheat flour. It’ll be a bit denser, but still delicious. Gluten-free? Use a 1:1 gluten-free baking blend.
- **Sweetener Swap:** Brown sugar can replace granulated sugar for a deeper, more caramel-y flavor. Maple syrup or honey could work too, but you might need to slightly reduce other liquids.
- **Butter vs. Oil:** Ran out of butter? You can use 1/2 cup of a neutral oil (like vegetable or canola) instead. It’ll make the bread super moist, almost fudgy. **Pro tip:** Coconut oil (melted) adds a nice subtle flavor!
- **Spice it Up:** A teaspoon of cinnamon, a pinch of nutmeg, or even a dash of pumpkin pie spice can elevate your banana bread to new aromatic heights.
- **Load ‘er Up!** Beyond chocolate chips and nuts, try shredded coconut, dried cranberries, or even a swirl of cream cheese frosting on top once it’s cooled. The world is your oyster… or, well, your banana bread!
FAQ (Frequently Asked Questions)
Got questions? I probably have snarky-yet-helpful answers!
- **Can I use frozen bananas?** Absolutely! Just thaw them completely and drain any excess liquid before mashing. They’ll be super mushy, which is perfect for this recipe. **Bonus:** Freezing bananas for future banana bread is a pro move.
- **My banana bread is raw in the middle! What happened?** Uh oh! Likely culprits: oven not hot enough, too much moisture in the batter (did you drain those thawed bananas?), or you took it out too soon. Next time, give it a few extra minutes and test with that trusty toothpick again.
- **How do I store banana bread?** Keep it at room temperature in an airtight container for up to 3-4 days. For longer storage, wrap it tightly in plastic wrap and then foil, and pop it in the freezer for up to 3 months. It thaws beautifully!
- **Can I add less sugar?** You can, especially if your bananas are super ripe. I wouldn’t go below 1/2 cup, though, as sugar also contributes to moisture and texture. Taste as you go (of the batter, before the egg goes in, obvs!).
- **Is this recipe healthy?** Look, it has fruit in it, so… yes? In spirit? It’s definitely healthier than, say, a deep-fried candy bar. It’s all about balance, right? Treat yo’ self!
- **My banana bread turned out dry. Help!** Did you overbake it? Or perhaps overmix the batter? Remember, **don’t overmix** and bake only until the toothpick comes out clean.
Final Thoughts
And there you have it, folks! Your very own, incredibly delicious, ridiculously easy banana bread. You’ve tamed those overly ripe bananas and turned them into something truly spectacular. Now go impress someone—or yourself—with your new culinary skills. Slice it thick, slather on some butter (or cream cheese, if you’re feeling extra fancy), and enjoy the sweet, sweet taste of success. You’ve earned it! Happy baking!
