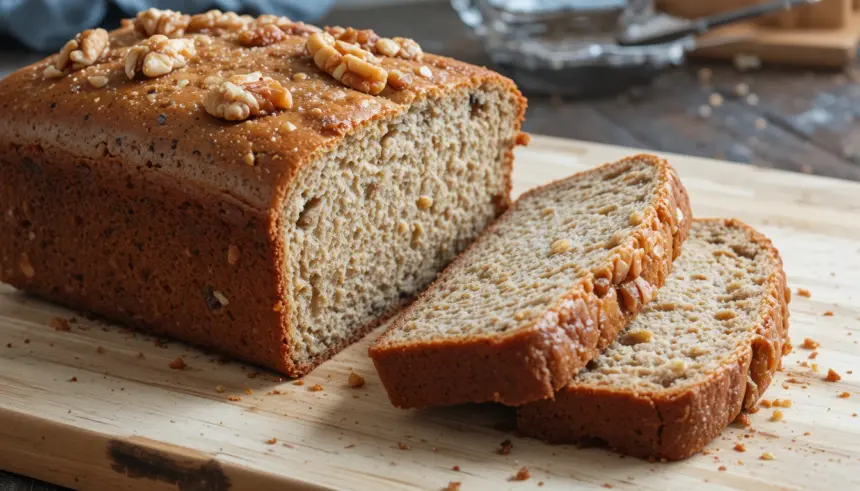
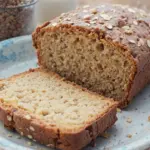
Got those sad, spotty bananas sitting on your counter, practically begging for a glow-up? And you’re craving something warm, comforting, and *seriously* delicious, but without turning your kitchen into a disaster zone? My friend, you’ve come to the right place. Because today, we’re making Maple Walnut Banana Bread that’s so good, you’ll wonder why you ever let a banana go to waste.
Why This Recipe is Awesome
Alright, let’s be real. We all want to feel like a culinary genius without actually *being* one. This recipe? It’s your secret weapon. It’s practically **idiot-proof** – and trust me, I’ve tested its limits. It’s got that perfect balance of sweet maple, crunchy walnuts, and moist banana goodness. Plus, your house will smell like a dream, which is basically a free aromatherapy session. **Bonus points** for using up those bananas that are looking a little… experienced. You’re basically a superhero saving fruit from the compost bin.
Ingredients You’ll Need
- Overripe Bananas (3-4 medium): The spottier, the better! We’re talking banana mob boss status, not fresh-from-the-farm yellow.
- All-Purpose Flour (1 ½ cups): The backbone of our bread. No fancy stuff needed.
- Granulated Sugar (½ cup): Just enough sweetness. Maple takes care of the rest!
- Brown Sugar (¼ cup, packed): Adds depth and that lovely caramel-y vibe.
- Large Egg (1): Our binder, helping everything stick together like glue.
- Unsalted Butter (½ cup, melted): Melted magic. Because butter makes everything better, IMO.
- Baking Soda (1 teaspoon): Our lift-off agent. Don’t skip it, unless you want banana bricks.
- Salt (½ teaspoon): Balances all the sweetness and brings out flavors. Essential!
- Vanilla Extract (1 teaspoon): A dash of warmth and sophistication.
- Ground Cinnamon (½ teaspoon): Optional, but highly recommended for that cozy feel.
- Chopped Walnuts (1 cup): The “walnut” in “maple walnut.” Toasted, if you’re feeling extra fancy.
- Pure Maple Syrup (¼ cup): The star of the show! Make sure it’s *pure* maple, not that pancake-syrup-imposter stuff. Your tastebuds will thank you.
Step-by-Step Instructions
- **Preheat & Prep:** First things first, get that oven screaming hot to **350°F (175°C)**. Grease and flour a 9×5-inch loaf pan, or line with parchment paper for easy removal. You’ll thank me later when your loaf slides out like a dream.
- **Banana Mash-up:** In a medium bowl, mash those gloriously overripe bananas with a fork. Leave a few small lumps if you like a little texture – **BTW**, it adds character! This isn’t baby food, after all.
- **Wet Mix Wonders:** Add the melted butter, granulated sugar, brown sugar, egg, vanilla extract, and maple syrup to the mashed bananas. Whisk it all together until it’s just combined. Don’t go crazy; we’re not making meringue here.
- **Dry Mix Fun:** In a separate, larger bowl, whisk together the flour, baking soda, salt, and cinnamon (if using). This ensures everything is evenly distributed and your bread rises beautifully.
- **Combine & Conquer:** Pour the wet ingredients into the dry ingredients. Stir *just* until everything is combined. **Overmixing is the enemy of tender banana bread**, so stop as soon as you don’t see any dry streaks of flour. Gently fold in those chopped walnuts.
- **Into the Pan:** Pour the batter into your prepared loaf pan. You can sprinkle a few extra walnuts on top if you’re feeling artistic (or just really love walnuts).
- **Bake It Up:** Bake for **50-60 minutes**. The exact time depends on your oven’s personality. You’ll know it’s done when a wooden skewer or toothpick inserted into the center comes out clean or with just a few moist crumbs.
- **Cool Down:** Let your masterpiece cool in the pan for about 10 minutes. Then, carefully transfer it to a wire rack to cool completely. Or, if you’re like me, cut a slice while it’s still warm and burn your mouth slightly. Worth it. Every. Single. Time.
Common Mistakes to Avoid
- **Under-ripe Bananas:** Using yellow bananas with green tips? No, no, no. They won’t mash well, and your bread won’t have that deep banana flavor. **Wait for the spots, people!** It’s non-negotiable for true banana bread bliss.
- **Overmixing the Batter:** This is a biggie! Overmixing develops the gluten in the flour, resulting in tough, chewy bread instead of light and tender. **Mix until *just* combined.** Seriously, stop when you see no more dry flour.
- **Not Greasing Your Pan Properly:** Ever had your perfect loaf stick to the pan and crumble? The horror! Make sure it’s generously greased and floured, or use parchment paper. Your future self will thank you.
- **Impatience:** Pulling it out of the oven too soon. Stick that skewer in! If it’s gooey, give it more time. Nobody likes a raw center, even if it tastes good on the outside.
Alternatives & Substitutions
- **Nuts:** Not a walnut fan? No problem! Pecans, almonds, or even chocolate chips (if you’re feeling rebellious) work beautifully. Or skip the nuts entirely, your bread, your rules!
- **Sweeteners:** You can play with the sugar. All brown sugar for a deeper flavor, or reduce slightly if your bananas are *really* sweet. For a touch more maple, you could drizzle some over the top when serving. Heaven!
- **Dairy-Free:** Swap the butter for a neutral oil (like vegetable or canola) or a plant-based butter alternative. It’ll still be delicious, promise.
- **Gluten-Free:** Use a 1:1 gluten-free baking flour blend. I haven’t personally tested it with this specific recipe, but generally, it works pretty well! Just follow the package instructions for ratios.
FAQ (Frequently Asked Questions)
- **”My bananas aren’t ripe enough! What do I do?”** Ah, the age-old banana dilemma! You can try baking them on a baking sheet at 300°F (150°C) for 15-30 minutes until their skins are black and shiny. Or, just wait. Patience is a virtue, especially for banana bread.
- **”Can I add chocolate chips to this recipe?”** Um, is that even a question?! Absolutely! **Chocolate chips are always a welcome addition**, IMO. White chocolate, dark chocolate, milk chocolate – go wild!
- **”How do I store this deliciousness?”** Once cooled, wrap it tightly in plastic wrap or foil. It’ll stay fresh at room temperature for 2-3 days, or in the fridge for up to a week. If it lasts that long, you’re stronger than I am.
- **”Can I freeze banana bread?”** You bet! Wrap the cooled loaf (or individual slices) tightly in plastic wrap, then again in foil. It freezes beautifully for up to 3 months. Perfect for future cravings and emergency deliciousness.
- **”My bread is too dense/dry. Help!”** Sounds like overmixing or not enough moisture. Make sure your bananas are *super* ripe, don’t overmix the batter, and measure your flour accurately (too much flour makes it dry).
- **”What if I don’t have maple syrup?”** Gasp! While it’s a key flavor here, you *could* technically just use more brown sugar (increase to ¾ cup total brown sugar, reducing granulated to ¼ cup, or omit granulated). But seriously, get some pure maple syrup! It’s worth it for this recipe.
Final Thoughts
There you have it, folks! Your very own, absolutely divine, Maple Walnut Banana Bread. You just took some sad, spotty fruit and turned it into a masterpiece. Pat yourself on the back, grab a warm slice, maybe even a cup of coffee or tea, and bask in your baking glory. **You’re basically a kitchen wizard now.** Now go impress someone—or yourself—with your new culinary skills. You’ve earned it!
