So, you’re craving something ridiculously tasty but also kinda want to pretend you’re still on vacation, chilling out, not stressing over complicated recipes, huh? Same, friend, same.
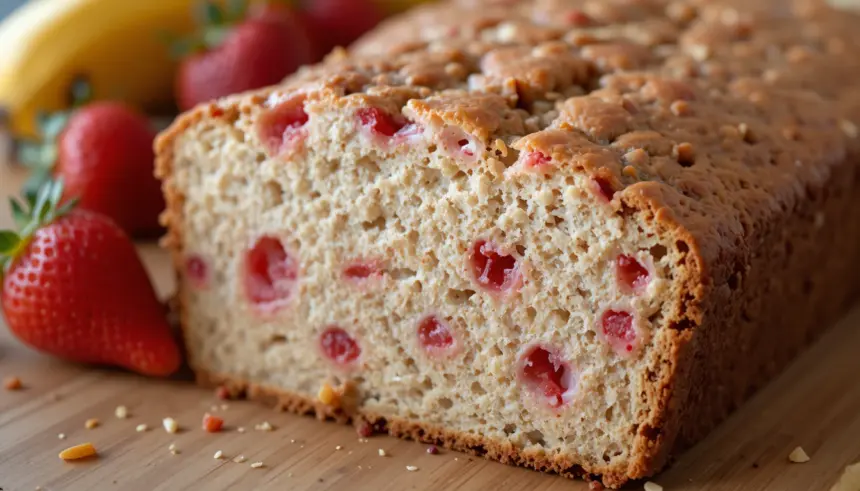
I get it. Life’s busy, and sometimes you just need a hug in bread form that doesn’t require a culinary degree. That’s where this *Strawberry Banana Bread Snook* recipe swoops in like a superhero in an apron. It’s the kind of bake that makes your house smell like pure joy and your taste buds do a happy dance. Trust me on this one.
Why This Recipe is Awesome
Alright, let’s cut to the chase. Why this particular recipe? Because it’s practically a one-bowl wonder that screams “I tried… but not *too* hard.” It’s so forgiving, it practically bakes itself. Seriously, even if your previous baking attempts have resulted in something resembling a hockey puck, you’re golden with this one. It’s got that classic banana bread comfort, but then BAM! Strawberries crash the party, making it feel fancy without any extra effort. Plus, it’s a brilliant way to use up those sad, spotty bananas sitting on your counter, judging you. No waste, just deliciousness. Win-win, IMO!
Ingredients You’ll Need
Gather ’round, my future baking superstar. Here’s your shopping list for happiness:
- The Bananas: 3-4 ripe bananas. We’re talking brown spots, maybe even a little squishy. The uglier, the better for flavor, trust me.
- Flour Power: 1 ½ cups all-purpose flour. The basic white stuff. Don’t overthink it.
- Sugar Rush: ½ cup granulated sugar. Just enough sweetness to make it sing.
- Brown Sugar Bonanza: ¼ cup light brown sugar, packed. Adds that delicious molasses-y depth.
- Egg-cellent Idea: 1 large egg. Room temperature is ideal, but don’t sweat it if you forget.
- Melted Goodness: ¼ cup unsalted butter, melted. Because everything’s better with butter, right?
- Creamy Concoction: ¼ cup milk (any kind works!). Adds a bit of moisture.
- Vanilla Vibes: 1 teaspoon vanilla extract. The secret to making everything taste a little more “homemade.”
- Leavening Agents: 1 teaspoon baking soda and ½ teaspoon salt. These are the unsung heroes giving your bread lift and balancing the flavors.
- Star of the Show: 1 cup fresh strawberries, chopped. Make them roughly the same size, please.
- Optional Fun: ½ cup chocolate chips (milk, semi-sweet, dark—your choice!). Because, why not?
Step-by-Step Instructions
Ready to get your bake on? Let’s do this!
- First things first: Preheat your oven to 350°F (175°C). Then, grease and flour a standard loaf pan (9×5 inches). You don’t want your masterpiece sticking!
- In a large bowl, grab a fork or a potato masher and go to town on those ripe bananas. Mash them until they’re mostly smooth but still have a few little lumps for texture.
- Add the melted butter, egg, milk, granulated sugar, and brown sugar to your mashed bananas. Stir it all together until just combined. Don’t overmix; we’re aiming for moist bread, not tough bread.
- In a separate, smaller bowl (or just sprinkle them over the wet ingredients if you’re feeling rebellious), whisk together the flour, baking soda, and salt.
- Now, gently fold the dry ingredients into the wet ingredients. Mix just until no streaks of flour remain. Seriously, stop as soon as it looks combined. Overmixing is the enemy of tender banana bread!
- Time for the stars! Fold in your chopped strawberries and, if you’re using them, the chocolate chips. Be gentle, we don’t want bruised berries.
- Pour the glorious batter into your prepared loaf pan. Give it a little wiggle to spread evenly.
- Pop it into your preheated oven and bake for 50-65 minutes. The exact time depends on your oven, so keep an eye on it. You’ll know it’s done when a toothpick inserted into the center comes out clean or with just a few moist crumbs attached.
- Once baked, let it cool in the pan for about 10-15 minutes. This helps it set up nicely. Then, carefully transfer it to a wire rack to cool completely. Or, if you’re like me, cut a slice while it’s still warm and enjoy that gooey goodness!
Common Mistakes to Avoid
Even the pros make mistakes, but you can avoid these rookie blunders:
- Using unripe bananas: If your bananas aren’t spotty, they’re not ready. Unripe bananas mean less sweetness and less banana-y flavor. Patience, young padawan!
- Overmixing the batter: We already covered this, but it bears repeating. Overmixing develops the gluten in the flour, leading to a tough, dense loaf instead of a light, fluffy one. Mix until *just* combined.
- Not preheating the oven: Thinking you can just shove it in there and hope for the best? Nah. A properly preheated oven ensures even baking and the perfect rise.
- Cutting it too soon: I know, the smell is intoxicating! But let it cool a bit in the pan and then on a wire rack. This prevents it from falling apart and allows the flavors to settle.
- Forgetting to grease the pan: Unless you want a loaf that’s permanently attached to its pan, a little grease and flour goes a long way.
Alternatives & Substitutions
Feeling creative? Here are some ways to shake things up:
- No Strawberries? No problem! Blueberries, raspberries, or even chopped peaches would be fantastic here. Or skip the berries entirely and go for nuts like walnuts or pecans.
- Dairy-Free? Use your favorite plant-based milk (almond, soy, oat) and swap the butter for melted coconut oil or a dairy-free butter alternative.
- Chocolate Hater? (Gasp!) If chocolate isn’t your jam, feel free to leave out the chocolate chips. The bread is still stellar on its own.
- Add a Little Spice: A pinch of cinnamon or nutmeg can add a lovely warmth. Just a little, don’t go crazy!
- Make Muffins: This recipe works beautifully as muffins! Just reduce the baking time to about 20-25 minutes. So cute!
FAQ (Frequently Asked Questions)
- My bananas aren’t *super* ripe. Can I still use them? Well, technically yes, but why shortchange yourself on flavor? Riper bananas are sweeter and easier to mash. If you’re desperate, you can roast slightly green bananas in their skins on a baking sheet at 300°F (150°C) for 15-20 minutes until black. Magic!
- Can I use frozen strawberries? You can, but make sure they’re thawed and drained really well. Extra moisture can make your bread soggy. Fresh is always best for this recipe if you can swing it.
- How long does this bread last? In my house? About 24 hours, if I’m lucky. Realistically, it’s good for 3-4 days at room temperature (covered) or up to a week in the fridge. It also freezes wonderfully for up to 3 months.
- Do I *have* to use both white and brown sugar? You could get away with just one, but using both gives a more complex flavor and texture. The brown sugar adds moisture and a lovely caramel note. Don’t skip it if you want the best results!
- Can I make this gluten-free? Absolutely! Just swap the all-purpose flour for a 1:1 gluten-free baking flour blend. Your taste buds won’t even know the difference.
Final Thoughts
And there you have it, folks! Your very own Strawberry Banana Bread Snook. You’ve navigated the tricky waters of baking and emerged victorious, smelling of warm bananas and sweet strawberries. Now, go impress someone—or yourself—with your new culinary skills. Share a slice (or five), pour a cuppa, and bask in the glory of your delicious creation. You totally earned it! Happy baking, my friend!

