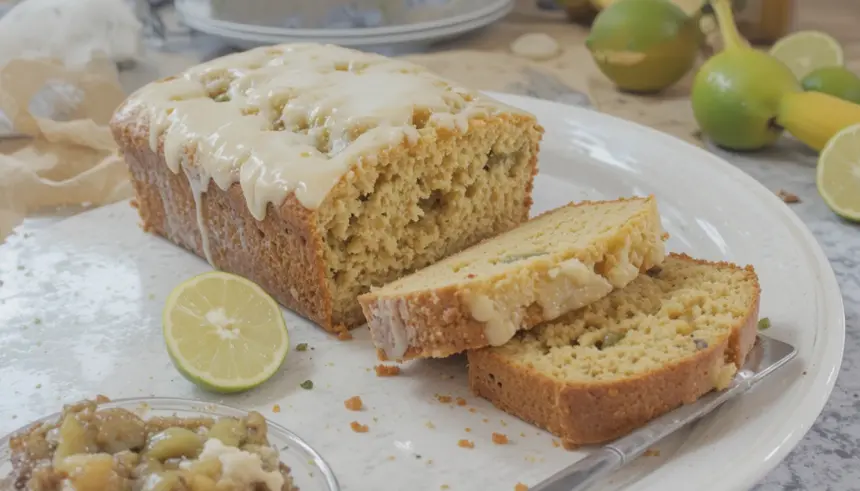
So you’re scrolling, probably procrastinating, and suddenly a craving hits: something sweet, something comforting, but also… zesty? And ideally, something that doesn’t require you to consult a culinary degree? My friend, you’ve stumbled into the right corner of the internet. Because today, we’re making Lime Banana Bread, and trust me, it’s a game-changer.
Why This Recipe is Awesome
Let’s be real, you’re not trying to win MasterChef here, you just want deliciousness with minimal fuss. And this, my friend, is your ticket. First off, it’s banana bread – the OG comfort food that practically bakes itself. But we’re not basic, no sir! We’re adding LIME. It cuts through the sweetness, adds a ridiculously fresh zing, and makes people go, “Ooh, what’s *that* delightful twist?” Plus, it’s pretty much idiot-proof. Seriously, if I can do it without setting off the smoke detector, you’re golden.
Ingredients You’ll Need
- Ripe Bananas (3-4 medium): The ones looking suspiciously spotty on your counter? Perfect. The spottier, the sweeter, the better. Don’t throw them away, that’s practically a crime!
- All-Purpose Flour (1 ½ cups): The basic building block of all things yummy.
- Granulated Sugar (¾ cup): For that sweet, sweet goodness. Adjust if your bananas are basically dessert on their own.
- Baking Soda (1 teaspoon): Our little leavening hero. Don’t skip it, unless you want a banana brick.
- Salt (½ teaspoon): Just a pinch to make everything else taste *more*. Science, amirite?
- Large Egg (1): The binder. Happy little egg.
- Melted Unsalted Butter (½ cup, or 1 stick): Unsalted because we control the salt! And melted because it’s easier to mix, obviously.
- Vanilla Extract (1 teaspoon): Because vanilla makes everything smell and taste like a warm hug.
- Fresh Limes (2 medium): The stars of our show! We need both zest and juice, so get squeezing and grating, champ.
Step-by-Step Instructions
- Get That Oven Hot & Ready: Preheat your oven to 350°F (175°C). Grease and flour a 9×5 inch loaf pan. Or line it with parchment paper if you’re feeling fancy and hate scrubbing.
- Mash Those Bananas: In a medium bowl, mash the ripe bananas with a fork until they’re mostly smooth but still have a few delightful lumps. Set aside.
- Whisk the Dry Stuff: In a separate, larger bowl, whisk together the flour, sugar, baking soda, and salt. Make sure there are no clumpy bits.
- Combine the Wet Stuff (Mostly): To your mashed bananas, add the melted butter, egg, and vanilla extract. Stir until just combined.
- Introduce Wet to Dry: Pour the banana mixture into the dry ingredients. Stir *just* until combined. Do not overmix! Lumps are good, people, lumps are good. Overmixing leads to tough bread, and nobody wants that.
- The Zesty Twist: Add the zest of both limes and the juice of one lime to the batter. Gently fold it in. Smell that? That’s happiness.
- Bake It Up: Pour the batter into your prepared loaf pan. Pop it into the preheated oven.
- The Waiting Game (aka Baking Time): Bake for 50-60 minutes, or until a wooden skewer or toothpick inserted into the center comes out clean. If the top starts browning too quickly, you can loosely tent it with foil.
- Cool Down: Let the bread cool in the pan for about 10 minutes before transferring it to a wire rack to cool completely. Resist the urge to cut into it immediately – it needs to set!
Common Mistakes to Avoid
- Not Preheating the Oven: Rookie move! Your bread won’t bake evenly, and you’ll just stare at it sadly.
- Overmixing the Batter: Remember what I said? Tough bread. Stop stirring when the flour streaks *just* disappear.
- Underripe Bananas: Green bananas taste great in smoothies, but for banana bread? No sweetness, no moisture. Just…meh. Wait for the spots!
- Ignoring the Toothpick Test: Pulling it out too early means a gooey, uncooked center. Pulling it out too late means dry bread. Aim for perfection, my friend.
- Cutting It Hot: I know, the smell is intoxicating. But warm bread crumbles. Let it cool a bit; patience is a virtue (especially in baking).
Alternatives & Substitutions
Feeling rebellious? Or just ran out of something? No stress!
- No Limes? Lemon works! It’ll give a slightly different, but equally delicious, citrusy vibe.
- Out of Butter? You *could* use an equal amount of vegetable oil. The texture will be a little different (maybe a bit more dense), but still tasty. Margarine? Well, let’s talk about that in the FAQ, shall we? 😉
- Want More Texture? Throw in a handful of chopped walnuts or pecans. Or chocolate chips! Because chocolate chips make everything better, that’s just science.
- Less Sugar? If your bananas are super ripe (like, practically liquid), you can absolutely reduce the sugar by a quarter cup. They’ll carry the sweetness.
FAQ (Frequently Asked Questions)
- “Can I use frozen bananas?” Absolutely! Just thaw them completely and drain any excess liquid before mashing. They’ll be extra watery, but that’s fine.
- “My bread top is burning, but the inside isn’t done! Help!” Ah, the classic dilemma. Loosely tent some aluminum foil over the top of the loaf pan. It’ll protect the crust while the inside finishes baking.
- “Can I make this into muffins?” YES! Divide the batter into a greased muffin tin (or use liners). Bake for about 20-25 minutes. Keep an eye on them!
- “How long does it last?” On the counter, wrapped tightly, it’s good for 3-4 days. In the fridge, maybe up to a week. If it lasts that long, you’re stronger than I am.
- “Can I freeze it?” You bet! Wrap the cooled loaf (or slices) tightly in plastic wrap, then foil. It’ll last for up to 3 months. Thaw on the counter or gently in the microwave.
- “Can I use margarine instead of butter?” Well, technically yes, you *can* swap it 1:1. But IMO, butter gives a much richer flavor and better texture. Margarine is often higher in water content and can lead to a slightly different result. If you must, you must, but butter is where the magic happens.
Final Thoughts
And there you have it, folks! Your very own, not-so-basic, utterly delicious Lime Banana Bread. It’s perfect for breakfast, a midday snack, or just because you deserve something wonderful. Now go impress someone – or, more importantly, yourself – with your new culinary skills. You’ve earned it! Don’t forget to snap a pic and send it my way. Happy baking, superstar!

