Okay, spill the beans. You’re trying to figure out how to conjure up one of those jaw-dropping, kid-friendly rainbow cakes without, you know, needing an actual magic wand, right? And maybe you want to impress someone, or just yourself, with something that looks impossibly complicated but is secretly super easy? Welcome to the club, my friend. Let’s make some colorful edible art!
Why This Recipe is Awesome
Because it’s basically a cheat code to looking like a baking genius! Seriously, this rainbow cake isn’t just a cake; it’s a **mood enhancer**. It screams “party!” and makes every kid (and most adults, let’s be honest) gasp with delight. Plus, it’s surprisingly forgiving. We’re talking “even I didn’t mess it up, and I once set off a smoke detector making toast” levels of idiot-proof. You get maximum visual impact for minimal actual effort. What’s not to love?
Ingredients You’ll Need
Gather your supplies, culinary wizard! Most of these you probably have lurking in your pantry already. No obscure potions required!
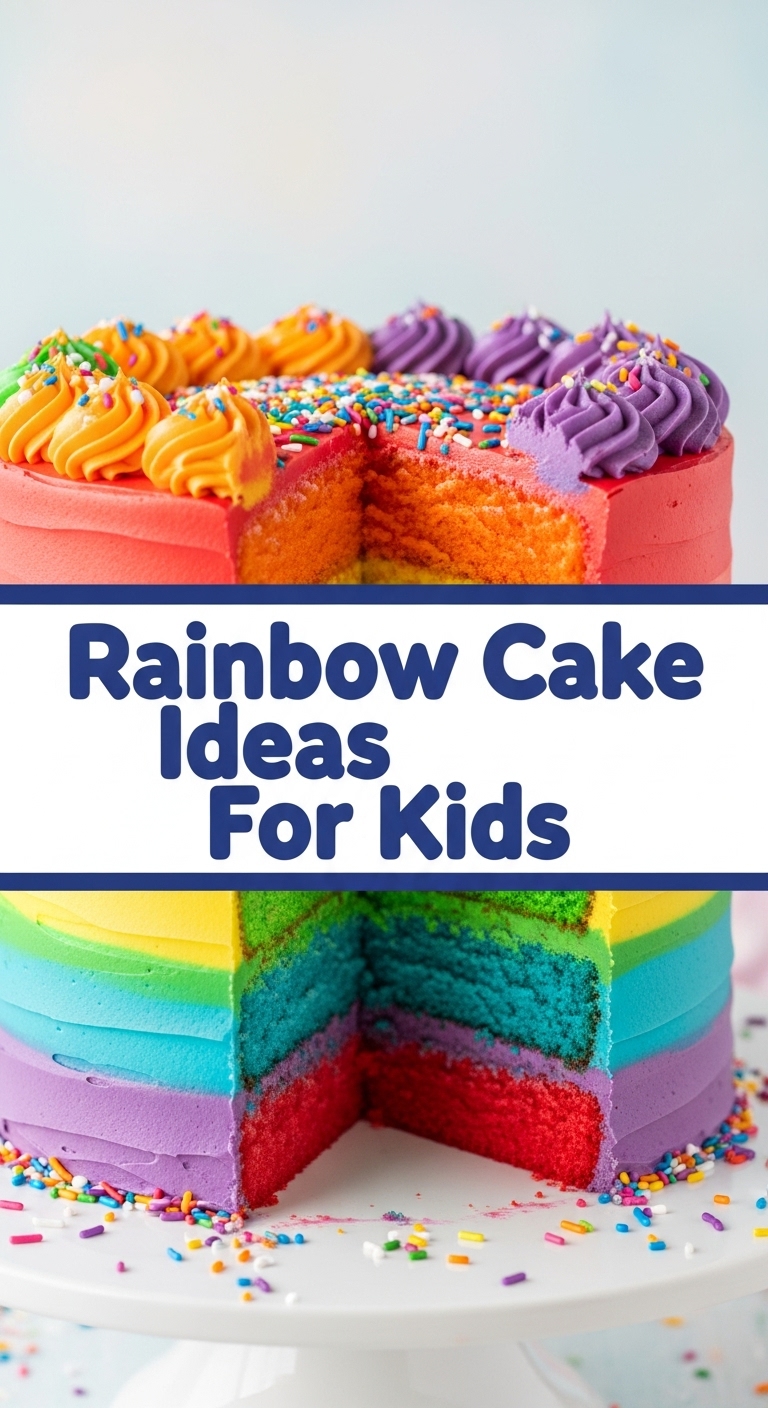
- **Two boxes of white cake mix:** Yes, *white*. Yellow cake mix will give you murky colors, and we’re aiming for vibrant, baby!
- The usual suspects from your cake mix instructions: eggs, vegetable oil, water. Don’t go rogue here.
- **Gel food coloring:** This is where the magic happens! Think red, orange, yellow, green, blue, purple. Gel gives you those intense, Instagram-worthy hues. Trust me, liquid food coloring is like trying to paint with watery juice – disappointing.
- **Two containers of white frosting:** Vanilla buttercream, cream cheese frosting, whatever floats your boat. We need a neutral canvas for our rainbow masterpiece.
- **Sprinkles!** Rainbow sprinkles, obviously. A cake without sprinkles is just… a cake. And we’re making a *celebration*.
Step-by-Step Instructions
- **Prep the Batter (the easy way):** Follow the directions on your cake mix boxes to prepare the batter. Do both boxes in one big bowl if you have one large enough. We need plenty of batter for all those colors!
- **Divide and Conquer (the fun part):** Grab 6-7 medium-sized bowls. Eyeball it and divide your glorious white batter as evenly as you can among them. Don’t stress too much, it’s baking, not rocket science!
- **Color Me Impressed:** Add a different gel food coloring to each bowl. Start with a small amount (like a toothpick tip) and mix until you get your desired vibrant shade. **Pro tip:** Colors deepen as they bake, so don’t overdo it.
- **Layer Up (the artistic bit):** Grease and flour two 8-inch or 9-inch round cake pans. Now, for the layering! Start with purple, dollop a spoonful into the center of each pan. Then blue, then green, yellow, orange, and finally red. Gently pour each color directly into the center of the previous color. The batter will spread out, creating those beautiful concentric rings. **Don’t swirl!** Just let gravity do its job.
- **Bake to Perfection:** Pop those colorful beauties into your preheated oven (check your cake mix box for temperature and time, usually around 350°F / 175°C for 25-30 minutes). Bake until a toothpick inserted into the center comes out clean.
- **Cool Down, Buttercup:** Let the cakes cool in the pans for about 10-15 minutes. Then, carefully invert them onto a wire rack to cool completely. **This part is crucial!** Trying to frost warm cakes is a recipe for a frosting disaster (and nobody wants that).
- **Frost and Decorate (the grand finale!):** Once your cakes are totally cool, level them if needed. Put one layer on your serving plate, spread a generous amount of frosting, then top with the second layer. Frost the top and sides, then go wild with those sprinkles!
Common Mistakes to Avoid
Listen, we all make mistakes. It’s how we learn. But here are a few shortcuts to avoiding unnecessary cake-related meltdowns:
- **Using liquid food coloring:** We already covered this, but it’s worth repeating. Your colors will look like they took a long bath in dull-ville. Gel or paste food coloring is your best friend here.
- **Frosting warm cakes:** You’ll end up with a sliding, melting mess. Patience, grasshopper. Let them cool. **Completely.**
- **Overmixing the batter:** This applies to pretty much any cake recipe. Overmixing develops too much gluten, resulting in a dense, tough cake. Mix just until combined.
- **Not preheating the oven:** Rookie mistake! An oven that isn’t up to temp will mess with your baking time and texture. Your cake will thank you for being patient.
Alternatives & Substitutions
Feeling adventurous? Or maybe you just ran out of something key? No worries, we’ve got options!
- **From-Scratch Cake:** If you’re a baking purist (or just feeling extra ambitious), absolutely use your favorite white cake recipe instead of a mix. Just be prepared for a bit more measuring!
- **Cupcakes:** Instead of a full cake, divide your colored batter among cupcake liners. You’ll have adorable mini rainbow cakes! Bake time will be shorter, so keep an eye on them. IMO, this is even easier for kids’ parties.
- **Natural Food Dyes:** If artificial colors aren’t your jam, you can try natural alternatives like beet powder (for pink/red), spirulina (blue/green), turmeric (yellow), or purple sweet potato powder. Just be aware the colors might be a bit more subdued.
- **Different Frosting Flavors:** Vanilla is classic, but a lemon cream cheese frosting or even a strawberry buttercream would be divine! Just make sure it’s a light color so it doesn’t clash with your rainbow.
- **Decoration Alternatives:** No sprinkles? No problem! Use colorful candies (M&Ms, Skittles), fresh berries, or even edible glitter.
FAQ (Frequently Asked Questions)
Got questions? I’ve got answers (mostly humorous, of course).
Can I use yellow cake mix instead of white?
Well, you *can*, but why would you want to dull your beautiful rainbow? White cake mix is the key to those bright, popping colors. Don’t compromise your rainbow dreams!
How do I get really distinct layers and not a swirly mess?
The trick is to pour gently and directly into the center of the previous color. The batter will naturally spread. **Resist the urge to swirl or poke!** Seriously, hands off, buddy.
How far in advance can I make this cake?
You can bake the cake layers a day or two in advance and store them well-wrapped at room temp, or even freeze them for up to a month! Just thaw completely before frosting. This is a game-changer, FYI.
Is this cake just for kids?
Excuse me?! Last time I checked, joy and rainbows weren’t exclusive to the under-12 crowd. This cake is for anyone who appreciates fun, color, and deliciousness. Period.
My colors look dull after baking, what gives?
You probably used liquid food coloring or didn’t use enough gel. Remember, gel food coloring is more concentrated and holds its color better during baking. Go bolder with the gel next time!
Do I *have* to put sprinkles on it?
Is the sky blue? Is water wet? A rainbow cake without sprinkles is like a party without music. It’s just… missing something essential. Live a little!
Final Thoughts
And there you have it, folks! Your very own guide to creating a show-stopping rainbow cake that’s bound to bring smiles (and maybe a few envious stares). It’s bright, it’s fun, and it proves you don’t need to be a Michelin-star chef to make something truly special. Now go forth and conquer that kitchen! Impress your kids, your friends, your dog – or just yourself. You’ve earned every colorful bite!


