So you’re craving something tasty but too lazy to spend forever in the kitchen, huh? Same. What if I told you that you could whip up a warm, comforting apple crumble, just for *you*, without turning your kitchen into a war zone? Yep, that’s right. Ditch the giant baking dish and say hello to your new best friend: The Single-Serve Apple Crumble. It’s ridiculously easy, minimal cleanup, and tastes like a warm hug. Let’s get cozy!
Why This Recipe is Awesome
Honestly, this isn’t just a recipe; it’s a lifestyle choice. Here’s why it’s about to become your new go-to:
- It’s ridiculously easy. Seriously, if you can peel an apple, you’re halfway there. It’s practically **idiot-proof**; even I didn’t mess it up!
- Perfect for those “treat yourself” moments. No sharing required, *score!*
- Minimal cleanup. You’re welcome. Your sink won’t look like a disaster zone.
- Tastes like a hug from grandma, but you made it yourself. Take a bow, culinary genius.
- No more sad, stale leftover crumble in the fridge. This one’s perfectly portioned.
Ingredients You’ll Need
Gather your troops, because we’re about to make magic. These are pretty standard pantry items, so no wild goose chases to exotic stores, promise!
- 1 medium apple: Your hero for this tale. Granny Smith is great for tartness, but whatever you have on hand works. Just not bruised, c’mon now.
- 1 tbsp unsalted butter (for filling): Melty goodness for your apples.
- 1 tsp granulated sugar (for filling): Just a touch to sweeten the deal.
- Pinch of cinnamon: Because, crumble. It’s non-negotiable, IMO.
- 2 tbsp all-purpose flour: The binder.
- 1 tbsp granulated sugar (for crumble): More sweetness!
- 1 tbsp packed brown sugar: This adds that gorgeous caramel note. Don’t skip it!
- 1.5 tbsp unsalted butter (cold, cubed, for crumble): The secret to that perfect crumbly texture. **Seriously, keep it cold!**
- Pinch of salt: Enhances all the other flavors. Don’t forget this unsung hero!
Step-by-Step Instructions
Okay, pay attention! These steps are so easy, you could probably do them in your sleep. But don’t, because fire hazard and stuff.
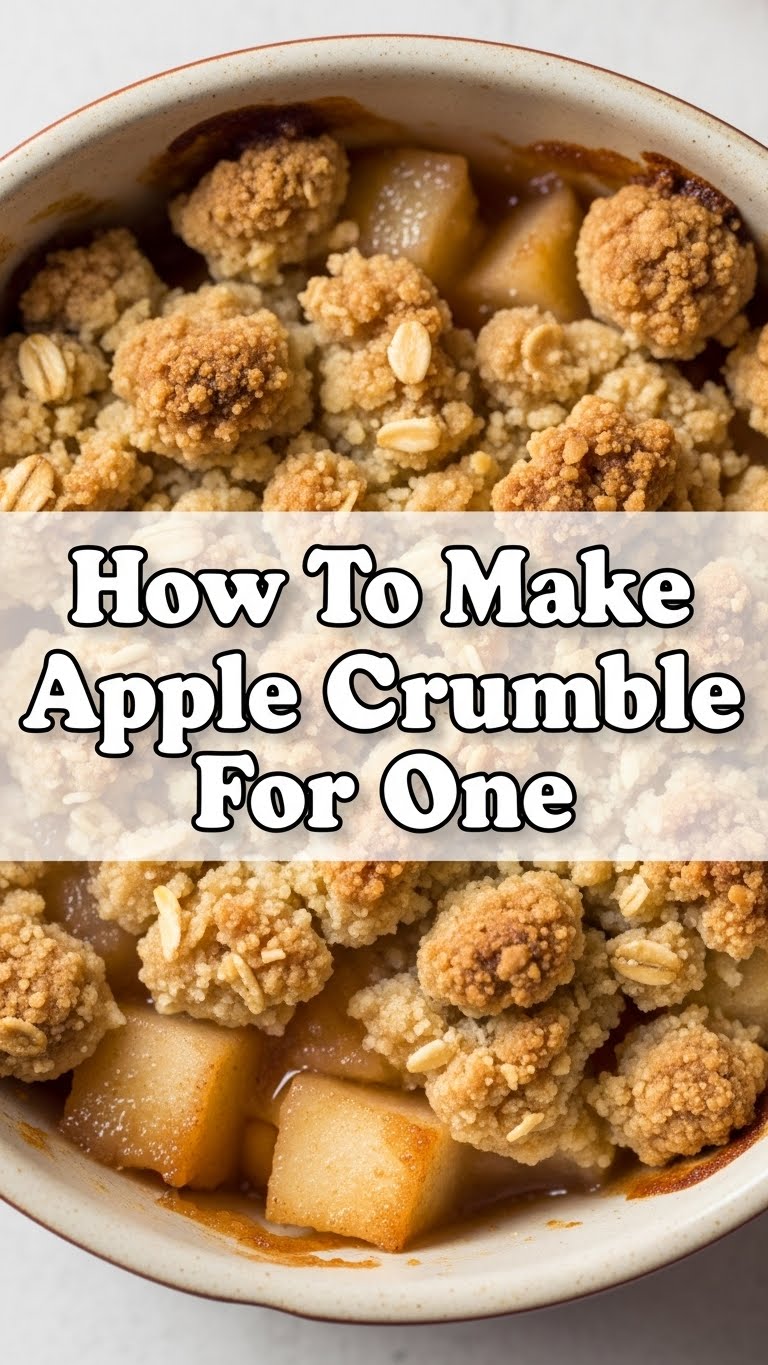
- Preheat & Prep: First things first, get your oven ready. Preheat it to **180°C (350°F)**. While it’s warming up, peel, core, and dice your apple into small, bite-sized pieces. We’re talking little nuggets of joy here.
- Cook the Apples: In a small saucepan, melt 1 tbsp butter over medium heat. Add your diced apples, 1 tsp granulated sugar, and that crucial pinch of cinnamon. Sauté for about 5-7 minutes until the apples are slightly softened but still holding their shape. We’re aiming for tender, not mushy.
- Transfer: Spoon those beautifully fragrant apples into a small ramekin (about 4-inch) or an oven-safe mug. Make sure it’s oven-safe, folks!
- Make the Crumble Topping: Grab a small bowl. Combine the all-purpose flour, 1 tbsp granulated sugar, brown sugar, and that pinch of salt. Give it a quick stir.
- Add Butter: Now for the fun part! Add the cold, cubed 1.5 tbsp butter to the dry crumble mix. Use your fingertips or a fork to cut the butter into the flour mixture. You want it to resemble coarse crumbs, like dry sand with some pea-sized lumps. **The key here is not to overmix!**
- Top it Off: Sprinkle the crumble mixture evenly over the apples in your ramekin. Get every last crumb!
- Bake It: Pop your crumble into the preheated oven for 20-25 minutes, or until the topping is beautifully golden brown and the apples underneath are bubbly and smelling divine.
- Cool & Enjoy: The hardest part. Let it cool for a few glorious minutes before diving in. Trust me, molten apple lava is no joke. Serve with a scoop of vanilla ice cream or a dollop of custard if you’re feeling extra fancy.
Common Mistakes to Avoid
Nobody’s perfect, but we can avoid some classic blunders. Learn from my past kitchen mishaps!
- Thinking you don’t need to preheat the oven: Rookie mistake. Your crumble wants a warm welcome, not a cold shock.
- Overmixing the crumble: You want glorious, distinct crumbs, not a sticky dough. Gentle hands, my friend.
- Under-cooking the apples: Nobody wants crunchy apples in their crumble. Give ’em some love on the stove first to soften them up.
- Overfilling the ramekin: It’ll bubble over and create a sticky, burnt mess on your oven floor. Leave a little room for delicious expansion!
- **Forgetting the salt:** A tiny pinch of salt in both the filling and the crumble really helps to balance and enhance all those sweet flavors. Don’t skip it!
Alternatives & Substitutions
Feeling creative? Or just missing an ingredient? No worries, we’ve got options!
- Fruit: Pears work beautifully instead of apples! Or a mix of berries (fresh or frozen, but frozen might need a tad longer baking). You could even do a mix of apple and blackberry for a classic combo.
- Flour: Gluten-free all-purpose flour blends work well for the crumble if you’re avoiding gluten.
- Sugar: Honey or maple syrup can substitute for some of the granulated sugar in the apple filling, but stick to granulated and brown sugar for the crumble for the best texture.
- Butter: You *could* use margarine, but why dim your sparkle? Butter truly makes the crumble. For a vegan version, use a solid plant-based butter, but the texture might be slightly different.
- Add-ins: A sprinkle of rolled oats (1 tbsp) in the crumble adds extra crunch and a nutty flavor. A handful of chopped nuts (pecans, walnuts) would also be divine. A tiny grating of fresh ginger with the apples is also a game-changer, FYI.
FAQ (Frequently Asked Questions)
Got questions? I’ve got (casual and hopefully helpful) answers!
- Can I make this ahead of time? You bet! Assemble everything, cover the ramekin, and chill for up to a day. Bake when the craving strikes. It might just need a few extra minutes in the oven.
- What if I don’t have a ramekin? An oven-safe mug or small bowl will work perfectly. Just ensure it’s truly oven-safe, okay? We don’t want any melting plastic disasters.
- Can I use unpeeled apples? Technically yes, if you like a bit of chewiness and extra fiber. But for a classic, smooth crumble experience, peeled is the way to go.
- Is this healthy? Uh, it’s apple crumble. It has fruit, so… it’s *healthier* than not having fruit? Let’s just say it’s good for your soul. Everything in moderation, right?
- My crumble topping isn’t crumbly enough, what gives? Probably overmixed, or your butter wasn’t cold enough. **Cold butter is the absolute key for crumbles!** It helps create those flaky pockets.
- Can I double the recipe? Absolutely! Just use two ramekins. Or one giant one if you’re feeling ambitious and very, very hungry. This recipe is super scalable.
Final Thoughts
See? Wasn’t that gloriously simple? You just transformed a humble apple into a warm, bubbly, crumbly masterpiece, all for *you*. Go ahead, pat yourself on the back. You’ve earned this moment of pure, unadulterated dessert bliss. Now go impress someone—or yourself—with your new culinary skills. You’ve earned it! And remember, life’s too short for bad crumble. Enjoy!

