Ever feel like celebrating someone awesome (maybe yourself?) but the thought of baking a fancy, elegant cake makes you want to just order pizza instead? Been there, bought the pepperoni. But what if I told you we could whip up a stunning two-tier birthday cake that screams ‘elegant’ without, you know, screaming *at* you in the kitchen? Yep, grab your apron, buttercup – we’re making magic!
Why This Recipe is Awesome
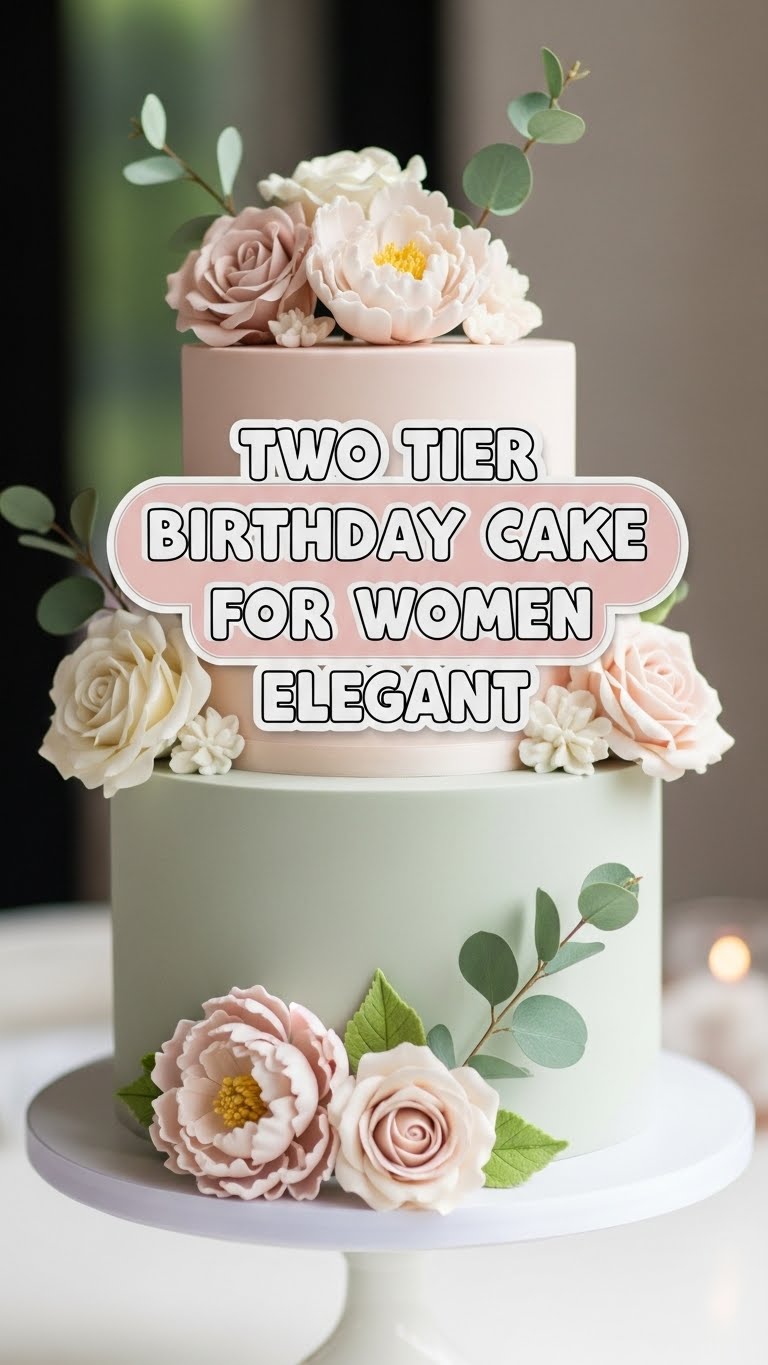
First off, this isn’t just a cake; it’s a statement. It looks like you hired a professional pâtissier, but your wallet will tell a gloriously different story. It’s surprisingly manageable, even if your baking skills usually stop at toast (no judgment here!). Plus, the compliments you’ll rake in? Priceless. Seriously, prepare for adoration. We’re talking classic flavors, smooth frosting, and simple decor that just oozes sophistication. No wild, complex techniques, just pure elegant yumminess. It’s practically idiot-proof, and I say that with love.
Ingredients You’ll Need
Time to gather your baking arsenal! Make sure your butter and eggs are at room temperature – this is **non-negotiable** for a smooth batter, trust me.
For the Elegant Vanilla Bean Cake (Two Tiers: 8-inch and 6-inch)
- 3 cups All-Purpose Flour: The basic building block of dreams.
- 2 teaspoons Baking Powder: For lift-off!
- 1/2 teaspoon Salt: Because flavor’s best friend is a little bit of salt.
- 1 cup (2 sticks) Unsalted Butter: Room temp, please! We want creamy, not clumpy.
- 2 cups Granulated Sugar: Sweetness, darling, pure sweetness.
- 4 Large Eggs: Room temp, cracked and ready for action.
- 1 tablespoon Vanilla Extract: The good stuff. Invest in quality; it makes a difference!
- 1 cup Whole Milk: For richness and moisture.
For the Dreamy Vanilla Buttercream
- 2 cups (4 sticks) Unsalted Butter: You guessed it, room temp!
- 6-8 cups Powdered Sugar: Sifted, unless you enjoy lumpy frosting (you don’t).
- 2 teaspoons Vanilla Extract: More vanilla, because why not?
- 4-6 tablespoons Heavy Cream: Add gradually until you reach your desired dreamy consistency.
- Pinch of Salt: To balance all that glorious sweetness.
For the Chic Decoration (Optional, but highly recommended!)
- Fresh Flowers: Edible ones, or well-cleaned non-toxic flowers like roses (stems wrapped in floral tape). Think delicate and feminine.
- Gold Edible Glitter or Sprinkles: A little sparkle goes a long way.
- Elegant Cake Topper: ‘Happy Birthday’ or a simple initial.
Step-by-Step Instructions
Follow these steps, and you’ll be a cake boss in no time. Precision is key, but don’t stress too much – it’s just cake!
- Preheat & Prep! Preheat your oven to 350°F (175°C). Grease and flour an 8-inch round cake pan and a 6-inch round cake pan. You can line the bottoms with parchment paper too, for extra non-stick insurance.
- The Dry Stuff: In a medium bowl, whisk together the flour, baking powder, and salt. Set aside.
- The Wet Magic: In a large bowl, using an electric mixer, cream together the room temperature butter and sugar until light and fluffy (about 3-5 minutes).
- Egg-cellent Addition: Beat in the eggs, one at a time, mixing well after each addition. Stir in the vanilla extract.
- Combine Forces: With the mixer on low speed, gradually add about a third of the dry ingredient mixture to the wet mixture, then half of the milk. Repeat, ending with the dry ingredients. **Do not overmix!** Mix just until combined.
- Bake It Up: Divide the batter evenly between your two prepared cake pans. Bake the 8-inch cake for 30-35 minutes and the 6-inch cake for 25-30 minutes, or until a wooden skewer inserted into the center comes out clean.
- Cool Down, Buttercup: Let the cakes cool in their pans for about 10-15 minutes before inverting them onto wire racks to cool completely. This part is **crucial** – a warm cake and frosting are frenemies, and your frosting will lose.
- Buttercream Bliss: While the cakes cool, make your buttercream! In a large bowl, beat the room temperature butter with an electric mixer until light and fluffy. Gradually add the sifted powdered sugar, vanilla extract, and a pinch of salt. Slowly add heavy cream, one tablespoon at a time, until the buttercream reaches a smooth, spreadable, yet firm consistency.
- Level Up: Once completely cool, use a serrated knife to level the tops of your cakes if they have domes. This creates a flat surface for stacking.
- The Crumb Coat: Apply a thin layer of buttercream to all surfaces of both cakes. This is your “crumb coat” and it traps any loose crumbs. Chill the cakes in the fridge for 15-20 minutes until the crumb coat is firm.
- The Final Frosting: Once chilled, apply a thicker, smooth layer of buttercream to both cakes. Get those edges sharp and beautiful!
- Stack It Smart (and Safe!): For the two-tier effect, you’ll need support. Insert 3-4 food-safe dowels (or thick straws) into the center of the 8-inch cake, forming a circle slightly smaller than your 6-inch top tier. Trim the dowels so they are flush with the top of the 8-inch cake.
- Gentle Stacking: Carefully place the 6-inch cake on top of the dowel-supported 8-inch cake. This helps prevent the top tier from sinking.
- Decorate with Flair: Now for the fun part! Arrange your fresh flowers on and around the cakes. Sprinkle with gold edible glitter or sprinkles. Add your cake topper. Step back and admire your masterpiece!
Common Mistakes to Avoid
We’ve all been there – baking disasters are part of the journey. But here are a few rookie errors you can totally bypass.
- Warm Cakes + Frosting = Meltdown: Frosting a warm cake is a one-way ticket to a melted, gooey mess. **Be patient.**
- Skipping the Crumb Coat: You *think* you can skip it, but then you’ll have crumbs embedded in your pristine final layer of frosting. Just do it.
- Overmixing the Batter: When combining wet and dry ingredients, mix just until incorporated. Overmixing develops too much gluten, leading to a tough, dense cake. No one wants a brick cake.
- Ignoring Dowels for Tiered Cakes: Think your top tier will just float elegantly on the bottom one? Think again. Without proper support (dowels!), your top tier will sink, and your beautiful creation will look defeated. **FYI**, dowels are your friends!
- Not Leveling Your Cakes: If your cake layers have domes, level them before frosting. Otherwise, your tiers will lean like the Tower of Pisa, and that’s not the elegant look we’re going for.
Alternatives & Substitutions
Feel free to get creative! This is your cake, after all!
- Cake Flavor Swap: Instead of vanilla, try adding a teaspoon of almond extract for an extra elegant touch, or lemon zest for a bright, fresh flavor. You could even do one vanilla tier and one lemon!
- Buttercream Boost: While vanilla is divine, you could make a cream cheese frosting for one of the tiers (or both!), or a luscious white chocolate ganache buttercream. For the chocoholics, chocolate buttercream is always an option, though maybe less “elegant woman” and more “dessert barbarian” (in the best way!).
- Dairy-Free Friends: Most standard baking ingredients have decent dairy-free alternatives now. Just make sure to use good quality plant-based butter and milk that are suitable for baking.
- Decoration Diversions: No fresh flowers? No problem! Use fresh berries (strawberries, raspberries), a delicate chocolate ganache drip, or even pretty macarons. IMO, simple is often best for elegance.
FAQ (Frequently Asked Questions)
Got questions? I’ve got answers (and maybe some sass).
- Can I make this dairy-free? Absolutely! Just use good quality dairy-free butter, milk, and heavy cream substitutes. They work surprisingly well!
- How far in advance can I bake the cakes? You can bake the cake layers up to 2-3 days in advance. Once cooled, wrap them tightly in plastic wrap and refrigerate. You can even freeze them for a couple of weeks!
- My buttercream is too stiff/runny! Help! Stiff? Add more heavy cream, a tablespoon at a time, until it loosens up. Runny? Add more sifted powdered sugar until it firms up. It’s a delicate dance!
- Do I *really* need dowels for a two-tier cake? If you want your cake to stand tall, proud, and structurally sound without collapsing under its own weight, then **YES, you really do.** Don’t skip this step unless you enjoy cake avalanches.
- Can I use a cake mix to save time? *Sigh.* You *can*, technically. But where’s the fun in that? We’re going for “I made this from scratch, aren’t I amazing?” not “I opened a box and added eggs.” Your call, but freshly baked is always superior.
- What if I don’t have different sized pans? You could make two cakes of the same size and just stack them (though it won’t be “tiered”). Or, just make a single glorious cake! This recipe scales pretty easily.
- How do I transport such an elegant masterpiece? In a sturdy box, on a flat surface in your car (like the trunk or floorboard). Drive like you’re carrying a priceless artifact – slow turns, no sudden stops, please!
Final Thoughts
There you have it! A show-stopping, elegant two-tier cake that proves you’re not just a pretty face, but a culinary wizard too. You’ve navigated the tricky waters of baking, layering, and frosting, and emerged victorious. Go on, pat yourself on the back, and then maybe grab a slice (or two). You absolutely earned it! Now go forth and conquer the dessert world with your new baking prowess!


