So you’re craving something tasty but too lazy to spend forever in the kitchen, huh? Same, friend, same. We’ve all been there: scrolling through endless food blogs, drooling, then realizing every recipe makes enough to feed a small army. Who needs that kind of commitment on a Tuesday night? Certainly not you. Or me. That’s why we’re diving headfirst into the glorious world of a **Pineapple Upside Down Cake For One**. Get ready to have your mind (and your tiny ramekin) blown!
Why This Recipe is Awesome
Let’s be real, most single-serving desserts are either sad, microwaved mugs of disappointment, or they require you to buy a gazillion ingredients you’ll never use again. Not this beauty! This recipe is a game-changer because:
- It’s legitimately **idiot-proof**. Even I, the queen of kitchen mishaps, haven’t messed this one up.
- It’s ridiculously fast. From zero to hero (aka, cake in your face) in under 30 minutes.
- It’s perfectly portioned. No more guilt-tripping yourself for eating “just one more slice” when there are no more slices to be had! Success!
- It uses super basic ingredients you probably already have lurking in your pantry.
- It delivers all the sticky, sweet, caramelized goodness of a full-sized cake without the effort. Win-win-win!
Ingredients You’ll Need
Gather ’round, my fellow solo dessert enthusiasts! Here’s your tiny shopping list. Don’t worry, nothing fancy here!
- **For the Topping:**
- **1 tablespoon unsalted butter**, melted (the good stuff, obviously)
- **1-2 tablespoons light brown sugar**, packed (for that irresistible caramel)
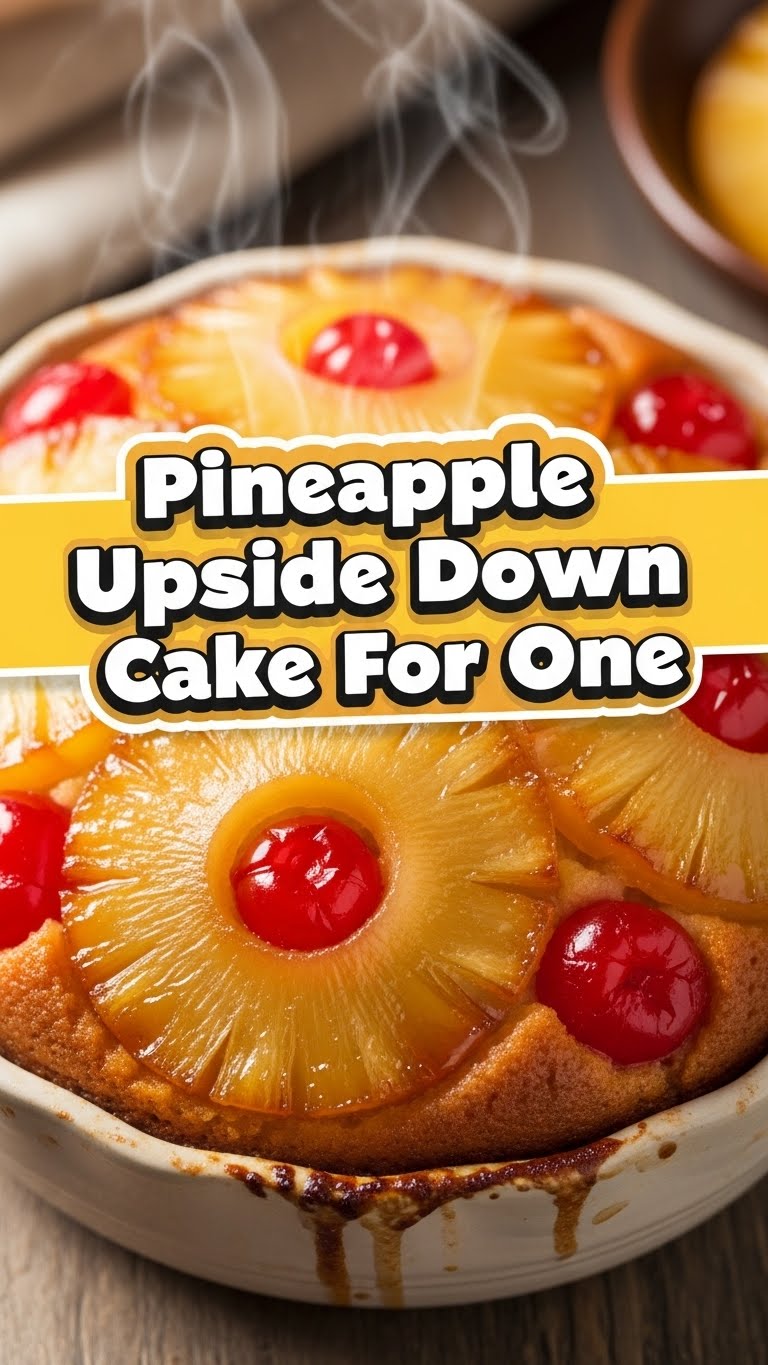
- **1 pineapple ring**, canned (drained, please – nobody likes soggy cake)
- **1 maraschino cherry** (because, aesthetics, darling!)
- **For the Cake Batter:**
- **2 tablespoons all-purpose flour** (the backbone of our tiny cake)
- **1 tablespoon granulated sugar** (just enough sweetness)
- **¼ teaspoon baking powder** (for that fluffy lift!)
- **Pinch of salt** (enhances all the flavors, don’t skip it!)
- **1 tablespoon milk** (any kind will do, even almond if you’re feeling fancy)
- **1 tablespoon neutral oil** (like vegetable or canola, or go wild with another tablespoon of melted butter!)
- **¼ teaspoon vanilla extract** (non-negotiable for flavor)
- **You’ll also need:** A small oven-safe ramekin (about 4-6 oz capacity) or a similar small dish.
Step-by-Step Instructions
Alright, apron on, spatula ready (or maybe just a spoon, this is easy!), let’s do this!
- **Preheat Your Oven:** Set your oven to a cozy **350°F (175°C)**. While it’s warming up, lightly grease your ramekin.
- **Caramel Time!** In your ramekin, melt the tablespoon of butter (you can do this in the microwave for a few seconds). Swirl it around, then sprinkle the brown sugar evenly over the melted butter.
- **Pineapple Party:** Place your drained pineapple ring right in the center of the brown sugar mixture. Pop that maraschino cherry in the middle of the pineapple ring. Looking good already, right?
- **Mix the Dry Stuff:** In a small bowl, whisk together the flour, granulated sugar, baking powder, and salt. Make sure there are no lumpy surprises!
- **Add the Wet Stuff:** Pour in the milk, oil (or melted butter), and vanilla extract into the dry ingredients. Stir just until everything is combined and smooth. **Don’t overmix!** A few small lumps are okay, but overmixing makes for tough cake. Nobody wants tough cake.
- **Top it Off:** Carefully spoon the cake batter over the pineapple and cherry in your ramekin. Spread it gently to cover the fruit.
- **Bake It Up:** Place your ramekin on a baking sheet (just in case of any enthusiastic bubbling) and bake for **15-20 minutes**. The cake is done when a toothpick inserted into the center comes out clean.
- **The Grand Reveal:** This is the most exciting part! Let the cake cool in the ramekin for just 5 minutes. Then, using oven mitts, carefully place a small plate upside down over the ramekin and **flip it!** Give it a gentle tap, and lift the ramekin. Behold your masterpiece!
- **Devour:** Let it cool for another minute or two if you can resist, then grab a spoon and dig in! You’ve earned this.
Common Mistakes to Avoid
Listen, we’re all about learning here, but let’s learn from *my* mistakes, okay? Here are a few pitfalls to dodge:
- **Not Greasing Your Ramekin:** Oh, the horror of a beautiful cake stuck to the bottom. Don’t be that person. Grease it, my friend.
- **Thinking You Don’t Need to Preheat:** Rookie mistake! An oven that’s not up to temp will mess with your baking time and texture. Be patient, it’s worth it.
- **Overmixing the Batter:** We talked about this! Stiff cake is a sad cake. Mix until just combined, no more.
- **Flipping Too Soon:** If you flip it immediately out of the oven, that delicious caramel might stick to the ramekin and not your cake. Give it those crucial 5 minutes to set a little.
- **Flipping Too Late:** If it cools completely in the ramekin, the caramel might harden too much, making it impossible to release cleanly. The sweet spot is **5 minutes**.
Alternatives & Substitutions
Feeling adventurous? Or just out of something? Here are some quick swaps and twists:
- **Other Fruits:** No pineapple? Try a slice of apple (thinly sliced), peach, or even a few berries. Adjust baking time if using very juicy fruits.
- **Dairy-Free:** Use a plant-based milk (almond, soy, oat work great) and a dairy-free butter alternative or just stick with oil for the batter and topping.
- **Spice It Up:** A tiny pinch of cinnamon or nutmeg in the batter can add a lovely warmth, especially if you’re using apples.
- **Gluten-Free:** Swap out the all-purpose flour for a 1:1 gluten-free baking blend.
FAQ (Frequently Asked Questions)
Got questions? I’ve got answers! (Mostly.)
- **Q: Can I use fresh pineapple instead of canned?**
A: Technically, yes, but make sure it’s thinly sliced and patted super dry. Canned is just easier and usually softer, IMO, for this quick treat. - **Q: My cake didn’t release cleanly! What happened?**
A: Did you grease the ramekin well? Did you wait exactly 5 minutes before flipping? These are usually the culprits! Sometimes a gentle run of a knife around the edge helps too, but be careful! - **Q: Can I double the recipe for two people?**
A: Absolutely! Just use two ramekins and double all the ingredients. Or, if you have a slightly larger oven-safe dish, you could scale it up a bit. - **Q: What if I don’t have a ramekin?**
A: No ramekin, no problem! Any small oven-safe dish (like a custard cup, a small oven-safe mug, or even a mini cast-iron skillet) will work. Just ensure it’s oven-safe, FYA. - **Q: Can I use margarine instead of butter?**
A: Well, technically yes, but why hurt your soul like that? Butter just tastes better and gives that glorious caramelization. Treat yourself! - **Q: How long does it keep?**
A: Keep it? What is this “keep it” you speak of? It’s for one person, it’s meant to be devoured immediately! But if by some miracle there’s a tiny bit left, cover it and eat it within a day.
Final Thoughts
And there you have it! Your very own, perfectly portioned, incredibly delicious Pineapple Upside Down Cake. No stress, no mess (well, minimal mess), just pure, unadulterated dessert bliss. This little cake is proof that you don’t need a massive kitchen or hours of free time to create something truly special. So go impress someone—or yourself—with your new culinary skills. You’ve earned it!


