So you’re craving something tasty but too lazy to spend forever in the kitchen, huh? Same. And what if I told you we could satisfy that sweet tooth *without* the guilt trip or a sugar crash that makes you question all your life choices? Yeah, I know. Sounds like a magic trick. But brace yourself, because we’re about to dive into the wonderful world of **Healthy-ish Rice Krispie Treats**. Your inner child (and your adult metabolism) will totally thank you.
Why This Recipe is Awesome
Alright, let’s be real. Most Rice Krispie Treats are basically sugar and butter cemented together with more sugar. Delicious, yes. Good for you? Not so much. But *this* version? It’s like their cooler, more responsible older sibling who still knows how to party, but with kombucha instead of cheap fizz. It’s **seriously quick** – we’re talking less than 15 minutes of active kitchen time. It requires **zero baking skills** (my cat could probably make these, no offense to him, he’s not very good in the kitchen). And guess what? It’s actually good for you. Well, good-ish. We’re swapping refined sugars for natural sweeteners, ditching the artificial stuff, and maybe even sneaking in some healthy fats or a protein boost if you’re feeling fancy. It’s truly idiot-proof, IMO. Even I didn’t mess it up, and I once burned frozen pizza.
Ingredients You’ll Need
Gather ’round, my sweet-toothed friends. Here’s what you’ll need to whip up these guilt-free(ish) delights:
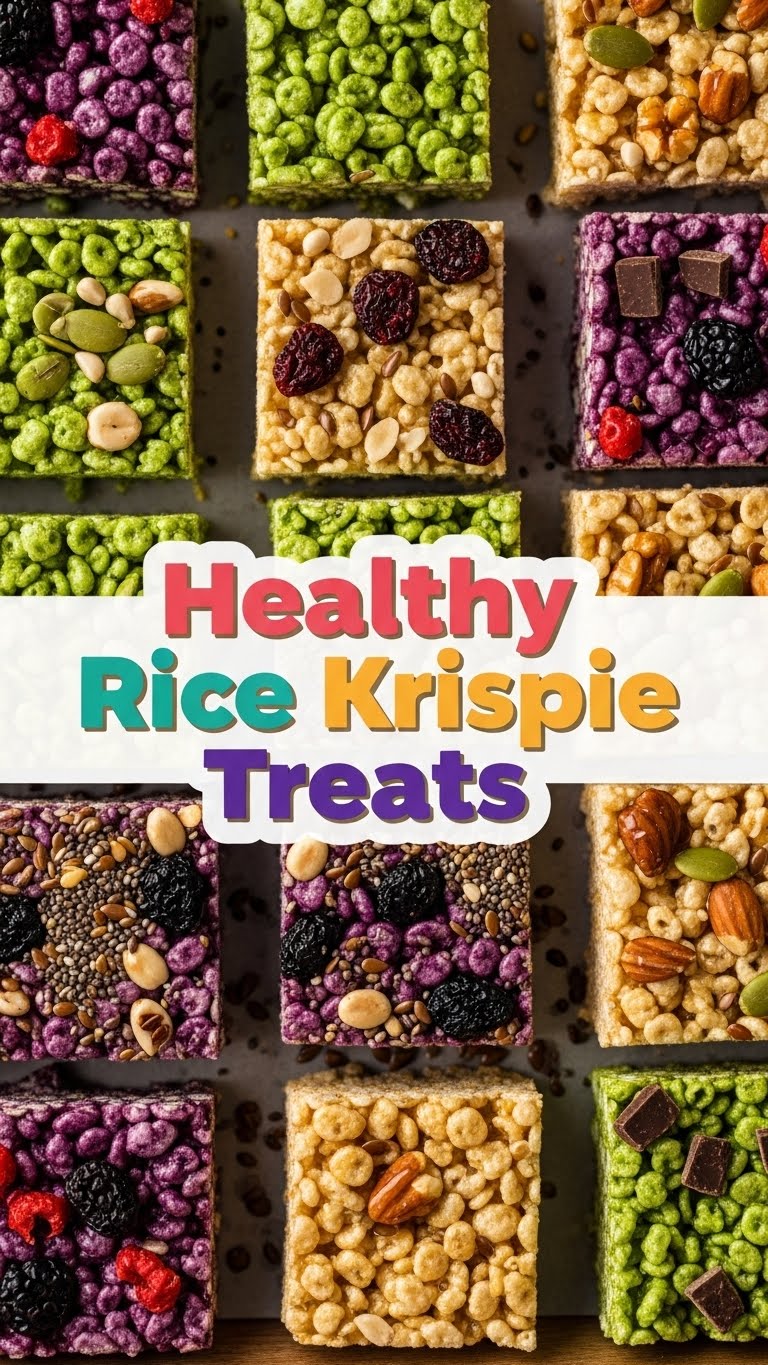
- 6 cups Puffed Rice Cereal: The classic! Just try to find one with minimal added sugar. We’re going for healthy, remember?
- ½ cup Natural Nut Butter: Almond, cashew, peanut – your pick! Just make sure it’s the kind where the ingredients list is just “peanuts” or “almonds” (maybe salt). No weird oils or added sugars, please!
- ½ cup Sticky Sweetener: Maple syrup or honey. Both are natural, both are delicious. Pick your poison… er, I mean, natural nectar.
- ¼ cup Coconut Oil: Our healthy fat hero. It helps everything stick together and adds a lovely richness. Plus, it solidifies nicely in the fridge.
- 1 teaspoon Vanilla Extract: Because everything is better with a splash of vanilla. It’s just science.
- Pinch of Sea Salt: Balances the sweetness and makes all the flavors pop. Don’t skip it!
- Optional Mix-ins (choose one or two, don’t go wild):
- 2 tablespoons Chia Seeds or Flax Seeds: Hello, omega-3s and fiber!
- ¼ cup Mini Dark Chocolate Chips: Because sometimes you just *need* a little chocolate. The darker, the better for that antioxidant kick!
- 1 scoop Protein Powder (vanilla or unflavored): Turn it into a post-workout snack! Just be aware it might make the mixture a little thicker.
Step-by-Step Instructions
Alright, let’s make some magic happen. No fancy equipment needed, just a bowl and a pan!
- Prep Your Pan: Grab an 8×8 inch baking dish (or anything similar). Line it with parchment paper, leaving an overhang on the sides. This is your future self’s best friend for easy removal. You’ll thank me.
- Melt the Gooey Goodness: In a large, microwave-safe bowl (or a saucepan over low heat), combine the nut butter, maple syrup/honey, coconut oil, and sea salt. Heat in 30-second intervals in the microwave, stirring well after each, until it’s totally smooth and melted. If you’re using a stovetop, stir constantly until it’s all one glorious, bubbly mixture.
- Stir in Vanilla (and Optional Protein): Once melted, remove from heat. Stir in the vanilla extract. If you’re adding protein powder, whisk it in now until fully combined. It might get a bit thick, but that’s okay!
- Combine with Cereal: Pour the puffed rice cereal into the wet mixture. Now, gently but thoroughly fold it all together with a spatula until every single little puffed rice bit is coated in that sticky, sweet goodness. This part is oddly satisfying. If you’re adding chia/flax seeds or chocolate chips, toss them in now too.
- Press into Pan: Transfer the mixture into your prepared pan. Use the back of your spatula or a piece of parchment paper to press it down *very firmly* and evenly. The firmer you press, the better they’ll hold together. Think of it as therapy.
- Chill Out: Pop the pan into the fridge for at least 1-2 hours, or until completely firm. Patience is a virtue, especially when deliciousness is involved.
- Slice and Devour: Once firm, lift the treats out of the pan using the parchment paper overhang. Slice them into squares (or whatever fun shapes you like, you rebel!). Store any leftovers in an airtight container in the fridge for up to a week. If they last that long. (Spoiler: they won’t.)
Common Mistakes to Avoid
Even though this recipe is practically foolproof, there are a few little pitfalls to sidestep. Learn from my past kitchen mishaps, friends!
- Not Lining the Pan: Seriously, this is a rookie mistake. Trying to pry these sticky delights from an unlined pan is a workout you don’t need. Parchment paper is your hero.
- Overheating the Wet Mixture: Don’t let your nut butter concoction burn! Keep an eye on it, especially in the microwave. We want melted and smooth, not scorched and sad.
- Not Pressing Firmly Enough: If your treats are crumbly, it’s probably because you didn’t give them a good enough squash into the pan. Get in there! Apply some pressure!
- Impatience is NOT a Virtue Here: Cutting into them before they’re fully chilled will result in a messy, sticky pile rather than neat, delicious squares. Give them their full fridge time, okay? They’ll be worth the wait, promise.
Alternatives & Substitutions
Feeling creative? This recipe is super flexible! Here are some ideas to mix things up:
- Nut Butter Swap: Peanut butter gives a classic, strong flavor. Almond butter is milder. Cashew butter is wonderfully creamy. Feel free to experiment based on what you have or what your taste buds crave! Just stick to natural, no-sugar-added varieties, FYI.
- Sweetener Shenanigans: Can’t find maple syrup or honey? Agave nectar could work, but I find maple and honey give a richer flavor. Avoid artificial sweeteners here; they can mess with the texture and taste a bit…off.
- Cereal Switch-Up: While puffed rice is the OG, you could try puffed quinoa for extra protein, or even cornflakes (check for sugar content!) for a different texture. It’s your kitchen, your rules!
- Spice it Up: A tiny dash of cinnamon or even a pinch of cardamom with the wet ingredients can add a lovely warmth and complexity.
- The Vegan Question: To make these 100% vegan, simply use maple syrup instead of honey. Easy peasy!
FAQ (Frequently Asked Questions)
Got questions? I’ve got answers! (Mostly.)
- Can I use regular marshmallows instead of the sticky sweetener/nut butter combo? Well, technically yes, but why hurt your “healthy-ish” soul like that? Marshmallows are mostly sugar and gelatin, which kinda defeats the purpose of this recipe. If you want classic, go for classic! But if you’re here, you want the good stuff.
- How long do these healthy treats last? Stored in an airtight container in the fridge, they’ll happily hang out for about a week. But honestly, they’re usually gone within 2-3 days in my house.
- Do I *have* to chill them? Can’t I just eat them immediately? You *can* eat them immediately, but they’ll be a warm, sticky, delicious mess. Chilling them helps them set up perfectly, making them easy to cut and less sticky to handle. Worth the wait!
- Can I add protein powder to this? Absolutely! I mentioned it in the ingredients. Vanilla or unflavored works best. It might make the mixture a tad thicker, so you might need to press a little harder. Great way to sneak in some extra gains!
- Are these truly “healthy”? Look, they’re “healthier” than your average Rice Krispie Treat. They use natural sweeteners, healthy fats, and you can boost them with fiber and protein. They’re still a treat, but definitely a more mindful one! It’s all about balance, right?
- What if my nut butter is super stiff? If your natural nut butter is extra thick, warm it slightly by itself before adding other ingredients. This will make it easier to mix.
Final Thoughts
And there you have it! A super simple, ridiculously tasty, and surprisingly healthy-ish snack that will fool even the most discerning sweet tooth. These are perfect for meal prep, a quick dessert craving, or just because you deserve a little something nice. Now go impress someone—or yourself—with your new culinary skills. You’ve earned it!


