So, your kitchen counter has a bunch of bananas that have seen better days, huh? You know, the ones that are more brown than yellow, practically begging for a purpose beyond the fruit bowl abyss? Excellent! Because that, my friend, is a sign from the universe (or just your fruit flies) that it’s time for some seriously good, seriously moist, and ridiculously easy banana nut bread. And guess what? We’re gonna make it together, sans stress and with maximum deliciousness. You ready? Let’s dive in!
Why This Recipe is Awesome
Look, I get it. Life’s busy. Sometimes you want to bake something amazing without feeling like you need a culinary degree and a small army of prep cooks. This recipe? It’s basically the equivalent of a warm hug in food form, but without all the effort. It’s **idiot-proof**, I swear. Even if your baking skills usually stop at “toasting bread without burning it,” you’ll nail this. It’s super moist (no dry crumbly sadness here!), packed with flavor, and comes together faster than you can say, “Oops, I bought too many bananas again.” Plus, it makes your house smell like a bakery, which is always a win, IMO.
Ingredients You’ll Need
Gather your troops! Here’s what we’re wrangling for this epic loaf. Don’t worry, nothing too fancy, just good old pantry staples.
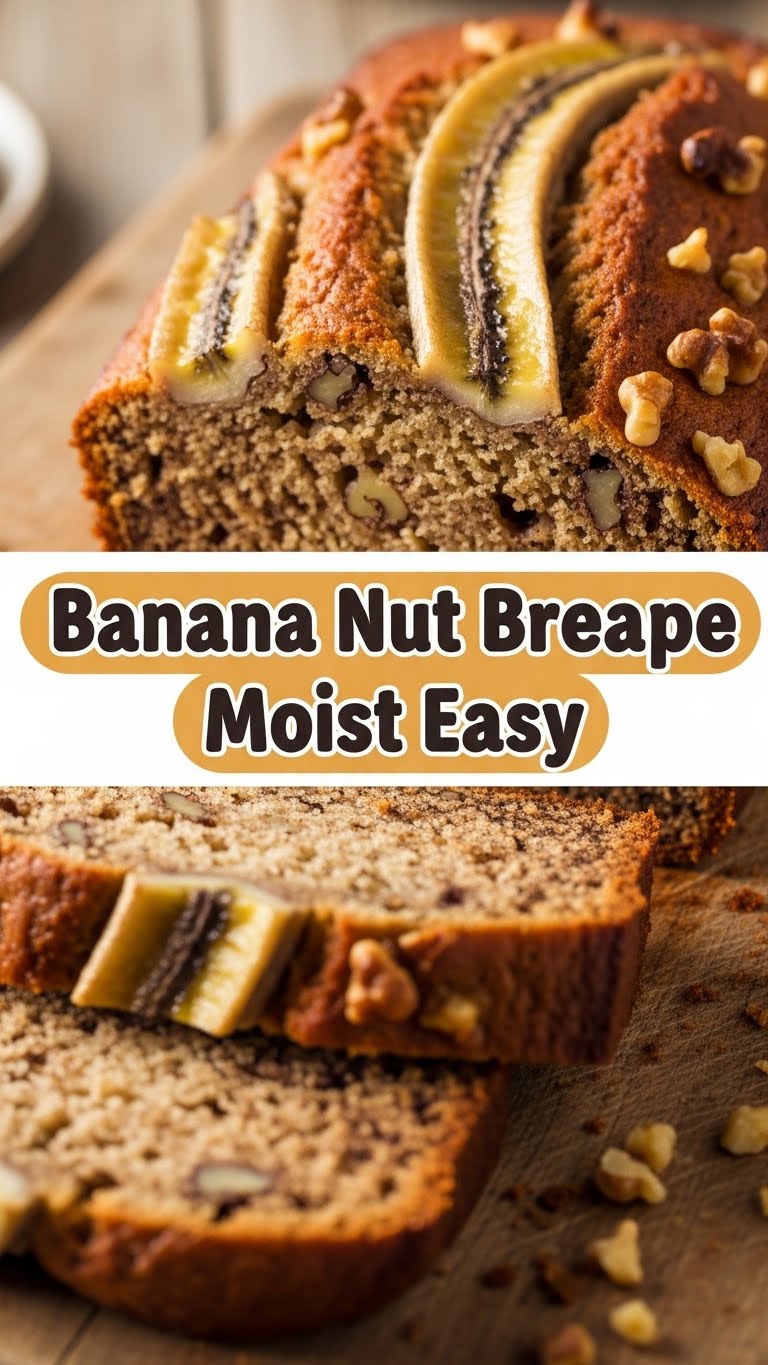
- Really Ripe Bananas (3 medium-sized): Think spotted, almost black, mushy-looking ones. These are your flavor bombs. Green bananas need not apply.
- All-Purpose Flour (1 ½ cups): The backbone of our bread. Nothing groundbreaking, just regular flour.
- Granulated Sugar (¾ cup): For that perfect touch of sweetness. Unless you’re a monster, don’t skip it.
- Unsalted Butter (½ cup or 1 stick), melted: Because butter makes everything better, period.
- Large Egg (1): Our binder, our glue, our structural integrity.
- Baking Soda (1 teaspoon): The magic fluff-maker. Don’t confuse it with baking powder, unless you want a flat banana brick.
- Salt (½ teaspoon): Just a pinch to enhance all those lovely flavors.
- Vanilla Extract (1 teaspoon): A little splash of liquid gold for extra aroma and yumminess.
- Chopped Nuts (½ cup, walnuts or pecans preferred): Totally optional, but they add a fantastic crunch and, well, it is *nut* bread, isn’t it?
Step-by-Step Instructions
Alright, apron on (or not, I’m not your boss), let’s get baking!
- Preheat & Prep: First things first, get that oven nice and toasty. Preheat it to **350°F (175°C)**. Then, grab a standard loaf pan (9×5 inches is perfect) and either grease it or line it with parchment paper. Trust me, you don’t want your masterpiece stuck to the pan.
- Mash Those Bananas: In a medium bowl, mash your super ripe bananas with a fork. You want some lumps, so don’t go full baby food puree on them. Leave a little texture.
- Wet Ingredients Unite: To the mashed bananas, add the melted butter, egg, and vanilla extract. Whisk ’em all together until they’re just combined. No need to go crazy, just a happy mix.
- Dry Ingredients Go In: In a separate, larger bowl, whisk together the flour, sugar, baking soda, and salt. Make sure there are no lumpy bits of baking soda chilling out.
- Combine (Gently!): Now, pour your wet banana mixture into the dry ingredients. Stir them together with a spatula or wooden spoon **just until combined**. A few streaks of flour are totally fine. This is **key to moist bread**, FYI. If you’re adding nuts, fold them in now.
- Into the Pan: Pour your glorious batter into your prepared loaf pan. Give the pan a gentle tap on the counter to settle the batter and release any giant air bubbles.
- Bake It Up: Slide that pan into your preheated oven. Bake for about **50-60 minutes**. You’ll know it’s done when a toothpick inserted into the center comes out clean or with just a few moist crumbs. If it’s browning too fast on top, you can loosely tent it with foil for the last 15-20 minutes.
- Cool Down: Once baked, let the bread cool in the pan for about 10-15 minutes before carefully turning it out onto a wire rack to cool completely. This prevents it from getting soggy. **Patience is a virtue here!**
Common Mistakes to Avoid
Nobody’s perfect, but we can definitely sidestep some common blunders.
- Under-ripe Bananas: Seriously, don’t even try it. Green bananas make bland, less sweet bread. Wait for those glorious brown spots!
- Overmixing: This is the cardinal sin of quick breads. Mixing too much develops the gluten, leading to tough, chewy bread instead of tender, moist goodness. **Mix just until combined!**
- Not Preheating the Oven: Rookie mistake. A cold oven will mess with your bake time and texture. Hot oven, happy bread.
- Opening the Oven Door Too Often: Resist the urge to peek every five minutes! You’re letting heat out, which can cause your bread to sink.
- Ignoring the Toothpick Test: Don’t just guess if it’s done based on color. That toothpick is your best friend.
Alternatives & Substitutions
Feeling a little wild? Or just out of an ingredient? Here are some ideas.
- Nuts: Not a nut fan? Omit them! Or swap walnuts for pecans, almonds, or even macadamia nuts if you’re feeling fancy.
- Chocolate Chips: Who doesn’t love chocolate? Stir in ½ to 1 cup of semi-sweet, milk, or even white chocolate chips with the nuts. Pure decadence!
- Spices: A pinch of cinnamon (½ tsp) or nutmeg (¼ tsp) can add a lovely warm depth.
- Dairy-Free? You can totally use a plant-based butter alternative and an egg replacer (like a flax egg – 1 tbsp ground flaxseed + 3 tbsp water, let sit for 5 mins). Just make sure your banana’s flavor still shines.
- Sugar Swap: Brown sugar can be used instead of granulated for a slightly deeper, more caramel-y flavor.
FAQ (Frequently Asked Questions)
- “Can I use margarine instead of butter?” Well, technically yes, but why hurt your soul like that? Butter just tastes better and gives a richer texture. If you must, make sure it’s a good quality stick margarine.
- “How do I store this masterpiece?” Keep it wrapped tightly in plastic wrap or foil at room temperature for up to 3-4 days. It actually gets even moister the next day!
- “Can I freeze banana bread?” Absolutely! Wrap a cooled loaf (or slices) tightly in plastic wrap, then again in foil. It’ll keep in the freezer for up to 2-3 months. Just thaw at room temp when cravings strike.
- “My bananas aren’t super ripe, help!” Desperate times, desperate measures: bake them in their peels on a baking sheet at 300°F (150°C) for 15-20 minutes until they’re black. Let cool, then peel. Voila! Instant ripe bananas.
- “Can I make muffins instead?” You bet! Pour the batter into a greased 12-cup muffin tin. Bake for 20-25 minutes at the same temperature. Less baking time, more portable yumminess!
- “What if I don’t have a loaf pan?” Get creative! You can use a smaller bundt pan (adjust baking time), or even an 8×8 square pan for a denser ‘cake’ style (again, adjust baking time and watch closely).
Final Thoughts
There you have it, folks! Your new go-to recipe for the moistest, easiest banana nut bread that will make you feel like a domestic goddess (or god, or deity of choice). Seriously, it’s that good. It’s perfect for breakfast, a snack, dessert, or just because it’s Tuesday. So go on, conquer those brown bananas, and fill your home with that incredible aroma. Now go impress someone—or yourself—with your new culinary skills. You’ve earned it! Happy baking!


