Heard whispers about sourdough being a mythical beast only ancient bakers can tame? Or maybe you’ve seen those gorgeous loaves online and thought, “Nah, that’s too much magic for *my* kitchen.” Pfft. Lies! You’re about to embark on the simplest, most rewarding culinary adventure that requires literally two ingredients. Yes, you read that right. Two!
Why This Recipe is Awesome
Because it’s a gateway drug to baking nirvana, that’s why! Seriously though, this isn’t some super-secret, ancient, complicated ritual. It’s flour. It’s water. That’s it. You mix them, you wait, you feed them, and boom—you’ve got a bubbly, living, breathing creature ready to make the most epic bread, pancakes, or even crackers you’ve ever tasted.
It’s practically idiot-proof. Even *I* managed not to mess it up, and my track record with anything requiring “patience” is… questionable. Plus, imagine the bragging rights! “Oh, this sourdough? Yeah, I made the starter myself.” Instant culinary street cred, my friend.
Ingredients You’ll Need
- Flour: About 500g (roughly 4 cups) of unbleached all-purpose or whole wheat flour. All-purpose is the easygoing friend, while whole wheat gives your starter a bit more oomph and sometimes a quicker start. Mix ’em, match ’em, whatever tickles your fancy!
- Water: About 500g (roughly 2 cups) of non-chlorinated water. Filtered water is ideal. If you’re stuck with tap water, just let it sit out in an open container for an hour or so. Those pesky chlorine chemicals will evaporate, leaving you with happy water for your future starter.
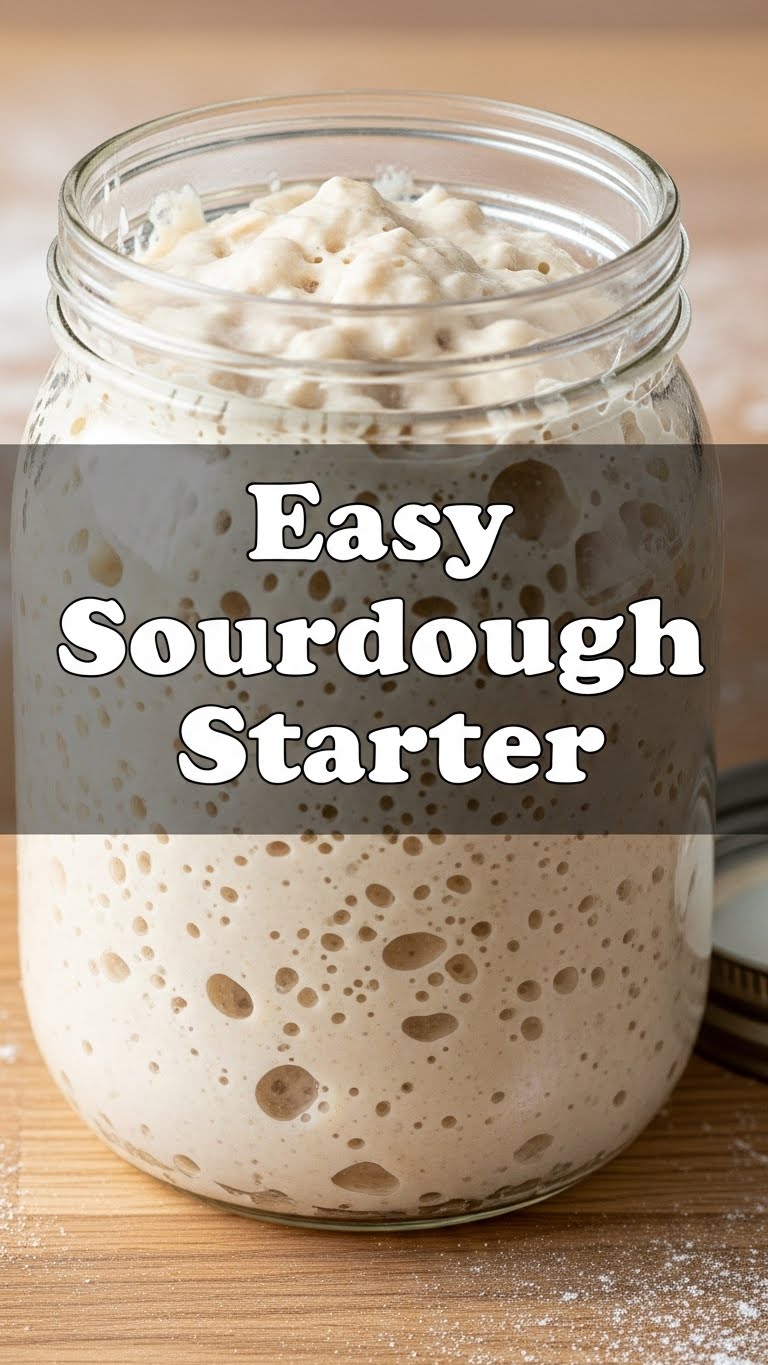
- A clean, glass jar: Think spacious spa for your future bubbly friend. A 1-liter (quart) wide-mouth jar is perfect. No lid, just something to cover it loosely.
- Digital kitchen scale: This is your new BFF. Weighing your ingredients ensures accuracy, which is super important when you’re growing a living thing. Eyeballing? We’re not making soup, friend.
- Rubber spatula or spoon: For mixing.
Step-by-Step Instructions
Day 1: The First Kiss
- Grab your clean jar and your trusty digital scale. Place the jar on the scale and hit tare (zero it out).
- Measure in 50g of flour.
- Now, measure in 50g of non-chlorinated water.
- Stir them together really well with your spatula or spoon until there are no dry spots. It’ll look like a thick paste or pancake batter. Scrape down the sides of the jar.
- Cover the jar loosely. A piece of plastic wrap, a tea towel, or even just the jar’s lid placed gently on top (not sealed!) works great. This lets air in but keeps crud out.
- Leave your new baby somewhere warmish (around 70-75°F or 21-24°C) for 24 hours. Don’t touch it. Don’t look at it too hard. Just let it be.
Day 2: The Waiting Game
- Nothing much will happen, and that’s totally okay. You might see a tiny bubble or two. Resist the urge to poke it!
- Cover it loosely again and let it chill in its warm spot for another 24 hours.
Day 3 onwards: Feed Me, Seymour!
This is where the magic (and commitment) happens. From today on, you’ll be feeding your starter every 24 hours.
- By now, you might see some tiny bubbles, maybe even a faint, yeasty smell. Awesome! If not, don’t panic, just keep going.
- Discard half of your starter. Yes, really! This sounds harsh, but it keeps your starter from getting too huge and ensures there’s enough food for the good bacteria and yeast to thrive. Aim to leave about 50g-75g in the jar.
- Add another 50g of flour and 50g of non-chlorinated water to the remaining starter.
- Stir thoroughly until everything is combined and smooth. Scrape down the sides.
- Cover loosely and place it back in its warm spot.
- Repeat this “discard and feed” process every 24 hours.
When Is It Ready?
Your starter is officially “active” and ready to make bread when it consistently:
- Doubles (or even triples!) in size a few hours after feeding.
- Is full of visible bubbles, especially after a fresh feed.
- Smells pleasantly yeasty, slightly sour, like beer or fruit.
- Passes the “float test” (if you’re feeling fancy): Drop a small spoonful into a glass of water. If it floats, it’s ready!
This whole process usually takes anywhere from 5 to 14 days, depending on your environment. **Patience is a virtue here, my friend.**
Common Mistakes to Avoid
- Using chlorinated water: Those chemicals are antibacterial, which is the exact opposite of what your starter needs. **Stick to filtered or aerated tap water.**
- Not feeding regularly: Your starter is a pet. A hungry pet. If you don’t feed it, it’ll starve and get grumpy (or moldy).
- Sealing it airtight: Your starter produces gas. If you seal it tight, you’re building a tiny flour-and-water bomb. Not recommended. Loose cover, remember?
- Giving up too soon: Some starters are slow starters (pun intended!). Don’t toss it after Day 3 if you don’t see massive bubbles. Keep feeding. It often just needs more time to wake up.
- Too cold or too hot: Extreme temperatures can slow it down or kill it. Aim for that sweet spot of 70-75°F.
Alternatives & Substitutions
Honestly, for a starter, there aren’t many “substitutions” you can make for the core ingredients. It’s flour and water. That’s the magic sauce!
- Flour: While I recommend all-purpose or whole wheat to start, you can absolutely experiment once your starter is established. Rye flour creates a very vigorous, tangy starter. Spelt, einkorn, or even bread flour can be used. Each will give your starter a slightly different personality. IMO, whole wheat is a great booster if your starter seems sluggish.
- Water: The main alternative here is making sure it’s unchlorinated. If you’re out of filtered water, remember the tap-water-sitting-out trick. Easy peasy.
- No digital scale? Okay, fine, you *can* try using volumetric measurements (cups), but be warned: they are far less accurate. For every 50g of flour/water, that’s roughly 1/4 cup flour and 1/4 cup water. But seriously, **invest in a cheap kitchen scale**; it’ll save you a ton of headaches in baking.
FAQ (Frequently Asked Questions)
- What if nothing is happening after a few days?
Don’t panic! Is your kitchen warm enough? Are you using unchlorinated water? Just keep feeding it. Sometimes it takes a week or more for the wild yeast to really get going. **Patience is your best friend here.**
- What’s that weird liquid on top of my starter? Is it bad?
Ah, that’s “hooch”! It’s a sign your starter is hungry and producing alcohol. It can range from clear to dark brown/black. It means “FEED ME!” You can pour it off before feeding, or just stir it back in for a tangier flavor. Dark hooch often means it’s super hungry, so don’t let it get that far too often, okay?
- Does my starter need to smell like a flower garden?
Nope! It should smell yeasty, slightly sour, maybe a bit like beer or fermented fruit. If it smells really bad, like nail polish remover, rotten garbage, or moldy, something might be off. Check for mold (anything fuzzy or colored). If it’s just a strong acidic smell, it’s probably just extra hungry.
- Can I use self-rising flour or bread flour?
Self-rising? Absolutely NOT! It has leavening agents that will mess with your starter’s natural development. Bread flour? Yes, you can, especially if you want a really strong gluten network in your eventual bread, but unbleached all-purpose or whole wheat is perfect to start.
- How long until my starter is ready for baking?
Typically 5-14 days. You’re looking for consistent doubling in size after feeding and lots of bubbles. Once it’s reliably doing that for a few days in a row, you’re golden!
- Do I have to feed it every single day once it’s active?
Not if you refrigerate it! Once your starter is mature and active, you can pop it in the fridge. It goes into a hibernation state, and you only need to feed it about once a week. Just pull it out, feed it, let it get bubbly on the counter for a few hours, then use what you need and pop it back in the fridge.
Final Thoughts
See? That wasn’t so scary, was it? You’ve just created life! Well, microscopic life that will make incredibly delicious bread, but still! Take a bow, you culinary wizard, you. Your kitchen is now home to a bubbling, thriving ecosystem, and you’re officially a sourdough parent. Now go impress someone—or yourself—with your new culinary skills. You’ve earned it!


