So, you want to impress someone (or just yourself) with something incredibly chic and delicious, but the thought of actual cooking makes you want to curl up with a bag of chips and Netflix, huh? Same, friend, same. That’s where the glorious, effortless, and utterly delightful charcuterie board swoops in like a superhero in a fancy cape. Get ready to embrace your inner food artist, no chef’s hat required!
Why This Recipe is Awesome
Let’s be real, this isn’t really a “recipe” in the traditional sense. It’s more of a “guide to looking incredibly sophisticated with minimal effort.” And that, my dear friends, is the best kind of guide! This charcuterie board isn’t just easy; it’s practically idiot-proof. I’ve personally made these when sleep-deprived and still managed to make it look like I actually tried. Plus, it’s a total crowd-pleaser, super customizable, and requires exactly zero oven time. Your kitchen will stay clean, your sanity intact, and your guests utterly wowed. It’s a win-win-win situation, IMO.
Ingredients You’ll Need
Think of this as your “choose your own adventure” ingredient list. Pick a few from each category, and you’re golden!
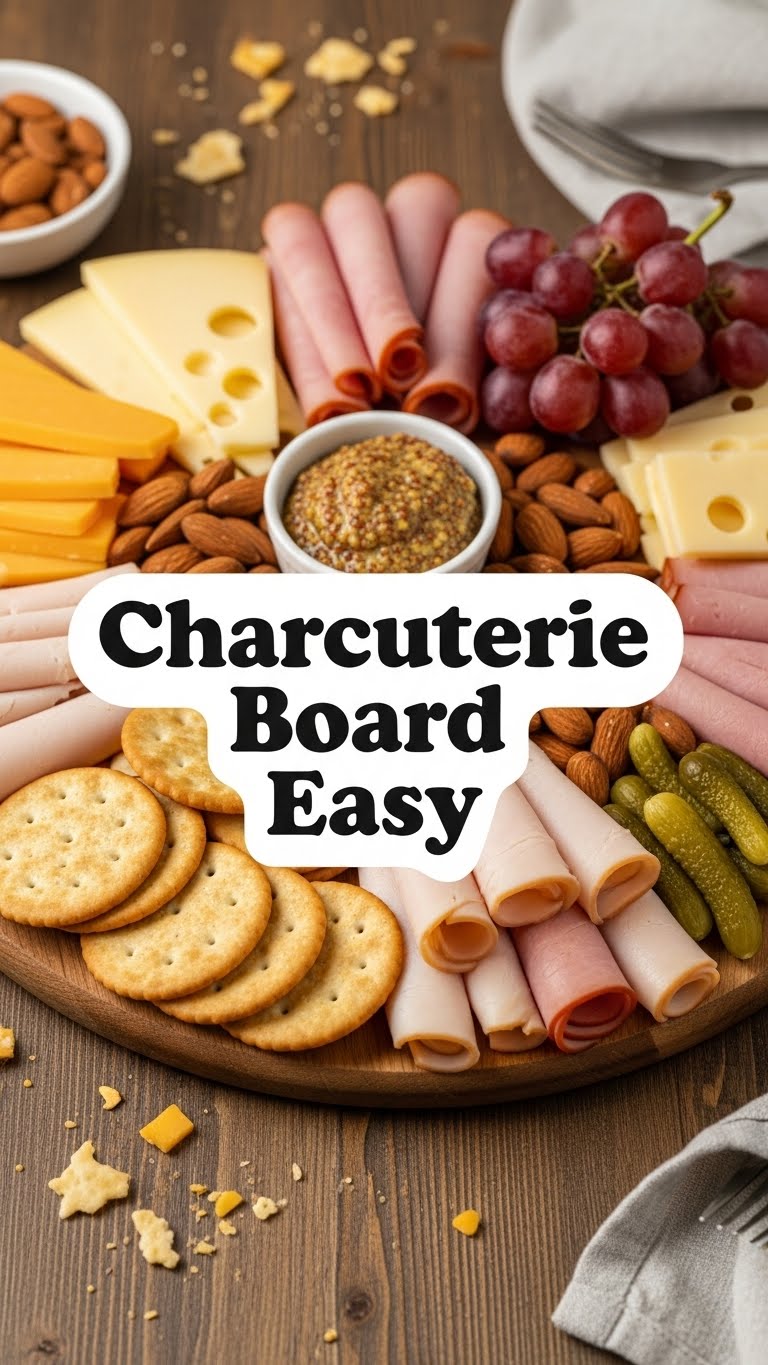
- Meats (2-3 types):
- Salami: The OG. Peppered, spicy, mild – whatever floats your boat.
- Prosciutto: That salty, delicate goodness. Looks super fancy draped artfully.
- Serrano Ham or Coppa: More cured meat deliciousness. Don’t be shy!
- Cheeses (2-4 types):
- Soft & Creamy: Brie, Goat Cheese (maybe honey-flavored?), or Camembert. Heavenly.
- Hard & Nutty: Aged Cheddar, Parmesan (shave some shards!), or Gruyere. Slice ’em up!
- Semi-Soft & Tangy: Gouda, Havarti, or a good old Monterey Jack.
- Optional: Bold & Crumbly: Blue cheese (for the adventurous souls among us).
- Crackers & Bread (2-3 types):
- Assorted Crackers: Get a variety box, or pick your faves: water crackers, seeded crackers, whole grain.
- Crusty Baguette: Slice it thin and maybe lightly toast it, or not!
- Breadsticks: For that extra crunch and dip-ability.
- Fruits (2-3 types):
- Grapes: Red and green! A classic for a reason.
- Berries: Strawberries, raspberries, blueberries. Colorful and sweet.
- Sliced Apples/Pears: A crisp contrast. Drizzle with a little lemon juice to prevent browning.
- Dried Fruits: Apricots, figs, dates. A chewy, sweet bite.
- Something Briny (1-2 types):
- Olives: Kalamata, Castelvetrano, or a fancy olive mix.
- Pickles or Cornichons: That tangy kick is a game-changer.
- Something Sweet & Jammy (1-2 types):
- Fig Jam or Apricot Preserves: Pairs magically with cheese.
- Honey: A drizzle over brie? Yes, please!
- Nuts (1-2 types):
- Almonds, Walnuts, Pistachios, Pecans: Toasted or raw, for that satisfying crunch.
- Garnish (Optional, but makes it pretty):
- Fresh Rosemary or Thyme Sprigs: Adds a pop of green and a lovely aroma.
Step-by-Step Instructions
Alright, let’s assemble this masterpiece. Remember, there’s no “wrong” way, only your way!
Grab Your Canvas: First things first, get yourself a gorgeous board! Could be a wooden cutting board, a slate platter, or even just a large pretty plate. Don’t overthink it. Make sure it’s clean and dry.
Anchor with Bowls: Place any small bowls you’re using first (for olives, jams, honey). These are your anchors and help break up the space. It’s like setting the stage for your edible art.
Cheese Please: Arrange your cheeses. Slice some, leave others in wedges or blocks for guests to cut themselves. Spread them out across the board to create visual interest. Pro tip: leave a little space around each for easier slicing!
Meat It Up: Next, the meats! Fold slices of prosciutto loosely, fan out salami, or roll up your cured ham. Place them near the cheeses they pair well with, or just scatter them around, creating little edible rivers of meaty goodness.
Cracker Corner: Fan out your crackers and bread slices. Don’t feel like you need to put all of them on the board at once; you can always refill! Sometimes it’s nice to have a separate basket of bread.
Fruity Fillers: Now for the colorful stuff! Tuck grapes into empty spots, scatter berries, and arrange apple slices around the cheeses. This adds vibrancy and freshness.
Nuts & Briny Bits: Fill in the remaining gaps with your nuts, olives, and pickles. They add texture, flavor, and make the board look abundant and inviting.
Drizzle & Garnish: If using honey or jam, give a little artistic drizzle or place a small spoon next to the bowl. Tuck in your rosemary or thyme sprigs for that final touch of fancy. You’re basically a professional now, just FYI.
Serve It Up: Add a few small knives or spreaders for the cheese and jam. Stand back, admire your handiwork, and accept all the compliments that are about to come your way!
Common Mistakes to Avoid
Even though this is super easy, there are a few little pitfalls that can turn your masterpiece into… well, less of a masterpiece. Learn from my (and others’) mistakes!
- Overcrowding the Board: You want it to look abundant, not like a food avalanche. Leave a *little* breathing room, especially for cheese knives.
- Forgetting Cheese Knives/Spreaders: Seriously, this is a rookie mistake. No one wants to fight with a block of cheddar using their bare hands.
- Lack of Variety: All hard cheeses? All salami? Boring! Mix textures, colors, and flavors for maximum impact.
- Serving Everything Ice Cold: Cheese tastes best at room temperature. Take it out of the fridge about 30 minutes before serving for optimal flavor and texture.
- Ignoring Dietary Needs: If you know someone is vegetarian or gluten-free, a small labeled section or separate plate can go a long way.
- Leaving It Out Too Long: Perishable items shouldn’t be left at room temperature for more than two hours. Food safety first, people!
Alternatives & Substitutions
Don’t have everything on the list? No stress! This board is all about flexibility.
- Meat-Free Marvel: Skip the cured meats entirely! Load up on roasted red peppers, hummus, sun-dried tomatoes, marinated artichoke hearts, and veggie sticks.
- Cheese Swaps: Can’t find Brie? A good triple-cream cheese works wonders. No Parmesan? A sharp Pecorino Romano will do the trick.
- Budget-Friendly Board: Hit up your local grocery store’s deli counter for less expensive cheese ends and pre-sliced meats. Use seasonal fruits, which are often cheaper, and stick to basic crackers.
- Sweet Tooth Special: Ditch some of the savory and add more chocolate-covered pretzels, small cookies, candied nuts, and fruit dips.
- Gluten-Free Goodness: Easily swap regular crackers for a variety of GF options. Rice crackers, almond flour crackers, or even just crunchy veggie sticks work perfectly.
- Kid-Friendly Fun: Add some mini pepperoni, cheese sticks, pretzels, grapes, and apple slices. Maybe some goldfish crackers for extra fun!
FAQ (Frequently Asked Questions)
Got questions? I’ve got answers. Sort of.
- How much should I make for X number of people?
A good rule of thumb is about 2-3 ounces of total ingredients (meat, cheese, etc.) per person if it’s an appetizer, and 5-6 ounces if it’s the main event. Better to have too much than too little, right?
- Can I make this ahead of time?
Partially! You can slice cheeses, wash and dry fruits, and prep your bowls. But for best freshness and presentation, assemble it no more than 30-60 minutes before serving. Nobody likes soggy crackers or warm cheese!
- What if I’m on a budget?
Go for fewer types of items, but good quality. Focus on one amazing cheese, a dependable salami, and plenty of seasonal fruits and crackers. Bulk nuts are also cheaper. You don’t need a million fancy things to make it look great!
- Do I need special equipment?
Nope! A regular cutting board, some knives, and maybe a few small bowls are all you truly need. Fancy boards and cheese tools are fun, but not essential. Don’t let gear hold you back!
- I don’t like a specific item (e.g., blue cheese). Do I have to include it?
Absolutely not! This is YOUR board. Only put things on it that you (and your guests) will actually enjoy. This isn’t a culinary exam; it’s a delicious party!
Final Thoughts
See? That wasn’t scary at all, was it? You just created something gorgeous, delicious, and utterly impressive without breaking a sweat (or a single cooking rule). This charcuterie board isn’t just food; it’s an experience, a conversation starter, and proof that you *can* adult beautifully with minimal effort. Now go impress someone—or yourself—with your new culinary “skills.” You’ve earned it!


