So, you’re scrolling through Instagram, drooling over those perfectly aesthetic sushi rolls, and thinking, “Ugh, I wish I could make that… but also, I want to wear my pajamas and not spend a fortune.” Been there, friend, many, many times. Good news! Today, we’re making sushi happen right in your cozy kitchen. No fancy chef skills required, just a willingness to embrace a little delicious chaos. Ready to become a sushi sensei (of the chill, pajama-clad variety)? Let’s roll!
Why This Recipe is Awesome
Because it’s basically the culinary equivalent of a high-five from your future self. Seriously. This isn’t one of those recipes that pretends to be easy then makes you cry into a mountain of failed rice. This is genuinely, ridiculously simple sushi. It’s **idiot-proof**, and yes, that’s a compliment. You’ll impress your friends, maybe even yourself, and definitely save enough cash for that extra large boba tea later. Plus, no more awkwardly trying to pick up tiny pieces with chopsticks in a fancy restaurant while pretending you know what you’re doing. Now, you’ll *actually* know what you’re doing!
Ingredients You’ll Need
Don’t panic! It looks like a lot, but most of these are pantry staples or super easy to find. Think of it as a grocery store treasure hunt, but the treasure is deliciousness.
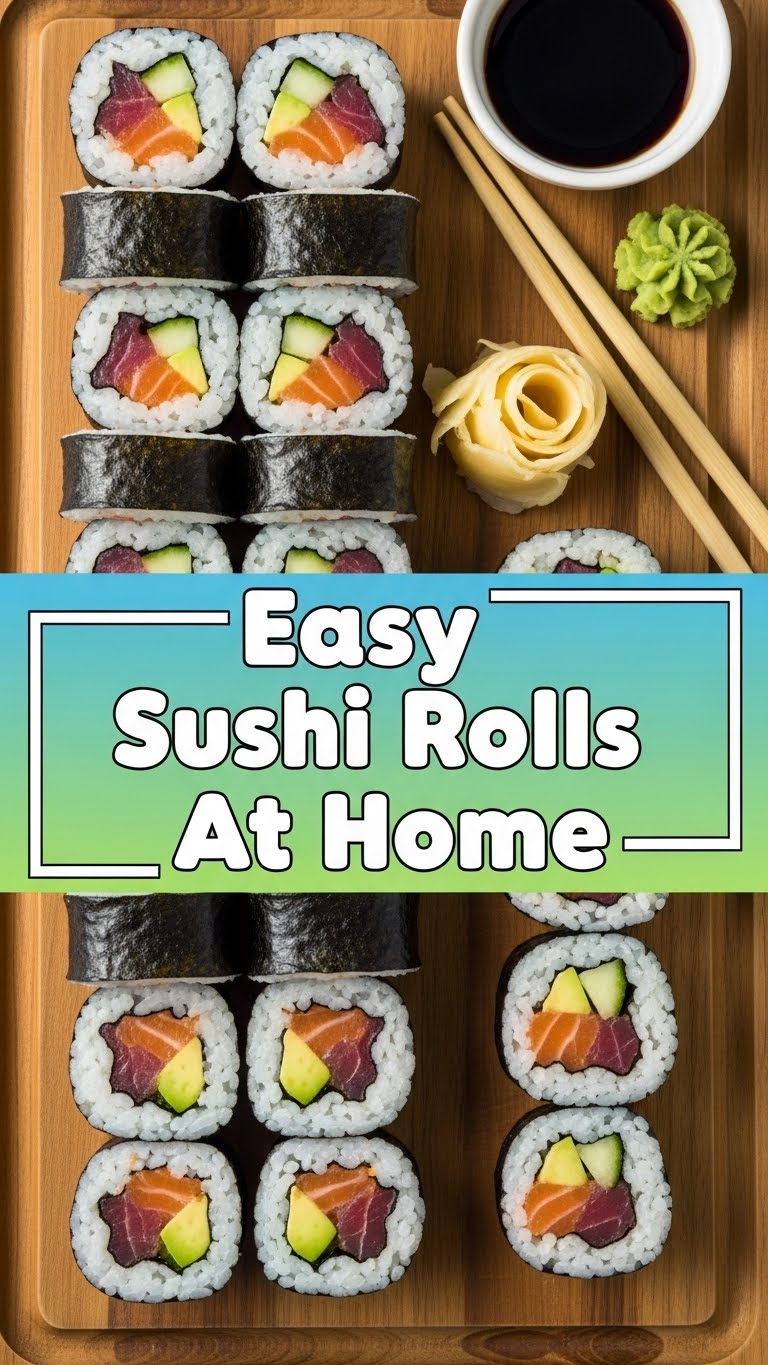
- Sushi Rice: Not just any rice, okay? Get the short-grain stuff. It’s sticky and holds together. Trust me, long-grain rice will betray you.
- Nori (Seaweed Sheets): The green wrappers! Make sure they’re meant for sushi.
- Rice Vinegar: This is what gives sushi rice its signature zing. Don’t skip it!
- Sugar & Salt: For seasoning that rice like a pro.
- Your Favorite Fillings: This is where the fun begins!
- Cucumber: Julienne it, baby! Fresh, crunchy, classic.
- Avocado: Ripe but firm, sliced thin. The creamy dream.
- Crab Sticks (Surimi): The OG of “easy sushi.” Super convenient.
- Smoked Salmon: For a fancy-ish touch without any cooking.
- Cream Cheese: Because Philadelphia rolls are a thing, and they’re delicious.
- Anything else your heart desires: Cooked shrimp, bell peppers, even leftover grilled chicken (weird, but you do you!).
- Soy Sauce, Wasabi, Pickled Ginger: For serving, obviously. Don’t forget ’em!
Step-by-Step Instructions
- Get That Rice Right: First things first, rinse your sushi rice in a sieve under cold water until the water runs clear. This gets rid of excess starch. Then, cook it according to package directions. Usually, it’s 1 part rice to 1.25 parts water. Once cooked, let it sit covered for 10-15 minutes.
- Season the Star: While the rice is still warm, gently transfer it to a large, non-metallic bowl. In a small bowl, whisk together 2 tbsp rice vinegar, 1 tsp sugar, and ½ tsp salt until dissolved. Pour this magical concoction over your rice and gently fold it in with a rice paddle or wooden spoon. Don’t mash it! Let it cool to room temperature.
- Prep Your Fillings: While the rice is doing its thing, slice all your chosen fillings into thin, even strips. Think “matchsticks” for most things. This makes them easy to roll and ensures even bites.
- Set Up Your Sushi Station: Lay out a bamboo sushi mat (makisu) on a clean surface. Cover it with plastic wrap – **trust me on this**, it makes cleanup a breeze and prevents sticking. Have a small bowl of water handy for wetting your hands.
- The Nori & Rice Affair: Place one sheet of nori, shiny-side down, on your plastic-wrapped bamboo mat. Dip your hands in the water and grab about ¾ cup of seasoned sushi rice. Spread the rice evenly over the nori, leaving about a 1-inch strip bare at the top edge. **Don’t press too hard!** You want a gentle, even layer.
- Fill ‘Er Up!: Arrange your chosen fillings in a neat line horizontally across the rice, about a third of the way up from the bottom edge. Don’t overdo it with the fillings, or your roll will explode (and nobody wants that).
- Time to Roll! (The Fun Part): Grasp the bottom edge of the mat and nori, bringing it up and over the fillings. Press down firmly but gently, tucking the edge under. Continue to roll, applying light pressure, until you reach the bare strip of nori. Use a tiny bit of water on that bare edge to seal the roll. Voila!
- Slice & Serve: Gently remove the roll from the mat. To slice, use a very sharp, damp knife. Cut the roll in half, then cut each half into 3-4 pieces. **Pro tip:** Wipe your knife with a damp cloth between cuts for clean slices. Serve with soy sauce, wasabi, and ginger.
Common Mistakes to Avoid
- Using the Wrong Rice: Seriously, I warned you. Arborio rice is for risotto, jasmine is for stir-fries. Sushi rice is for sushi. It’s not being snobby, it’s just how it works.
- Over-Saturating the Rice with Vinegar Mix: A little goes a long way. Too much, and your rice will be soggy and sad.
- Packing Too Much Rice: Think thin, even layer. If your rice is too thick, your roll will be a giant rice log, not a delicate sushi piece.
- Overstuffing Your Rolls: Greed is not your friend here. A moderate amount of filling is key for a well-formed roll. You’ll learn the perfect amount after a roll or two.
- Not Wetting Your Knife: This is a biggie! A dry knife will tear your beautiful rolls. A damp, sharp knife glides through like butter.
- Impatience: Let the rice cool! Rolling hot rice is a sticky, difficult mess. Also, give yourself grace on the first roll. It’s a learning curve!
Alternatives & Substitutions
This is where you can really flex your culinary muscles (or just your fridge contents). Don’t have smoked salmon? No problem!
- Rice Alternatives: While short-grain sushi rice is king, you can experiment. For a healthier twist, try brown sushi rice (adjust cooking time!). If you’re really feeling wild, some people even use quinoa, but IMO, that’s pushing the definition of sushi a bit far.
- Nori-less Rolls (Narutomaki-style): Instead of nori, use thin slices of cucumber or even soy paper wraps (they come in fun colors!).
- Filling Free-for-All:
- Veggies: Bell peppers, carrots, sprouts, blanched asparagus, pickled radishes, mango… the world is your oyster!
- Protein: Canned tuna (drained and mixed with a little mayo/sriracha), cooked chicken breast, leftover steak (thinly sliced), tofu (marinated and pan-fried). Cooked prawns are also an easy win!
- Sauces: Drizzle sriracha mayo, eel sauce, or a spicy sesame dressing *inside* your roll before rolling for an extra flavor bomb.
- The “No-Roll” Roll: Too lazy to roll? Make a sushi bowl! Layer rice, your fillings, and toppings in a bowl. Boom, deconstructed sushi, same great taste, zero rolling stress.
FAQ (Frequently Asked Asked Questions)
Got questions? I’ve got answers. Probably. Let’s see…
- **Do I really need a sushi mat?** Yes, kinda. Can you roll without one? Technically, with cling film and mad skills, maybe. But a mat makes it so much easier and gives you a much better, tighter roll. It’s worth the €5 investment, trust me.
- **My rice is too sticky/dry, what gives?** Sounds like a water ratio issue or you didn’t rinse enough. **Rinsing is key!** For stickiness, try less water next time. For dryness, a tiny bit more. Practice makes perfect, and also, rice is finicky.
- **Can I make these ahead of time?** You can prep all your fillings and rice a few hours in advance, keeping them separate and covered in the fridge. But for optimal deliciousness and texture, it’s best to roll and eat sushi fresh. Soggy nori is a sad nori.
- **My rolls are falling apart! Help!** Ah, the classic sushi tragedy. You either didn’t press firmly enough while rolling, or you overstuffed it. Remember that gentle but firm pressure throughout the rolling process. Less filling, tighter roll.
- **Is raw fish safe for homemade sushi?** Unless you’re buying “sushi-grade” fish from a reputable fishmonger who knows what they’re talking about, I’d stick to cooked proteins or veggies for home sushi. Better safe than, well, sorry!
- **What if I don’t like wasabi?** Totally fine! It’s not a mandatory ingredient. Skip it, or try a tiny dab just to see if you like the kick. No judgment here.
Final Thoughts
So there you have it, folks! Your very own guide to making easy, delicious sushi rolls at home. This isn’t just about food; it’s about the joy of creating something tasty and knowing you didn’t have to break the bank or sweat through a complicated recipe. Now go forth and conquer that kitchen! Impress your significant other, dazzle your roommates, or simply treat yourself to a glorious, homemade sushi feast. You’ve earned it, you culinary genius, you!


