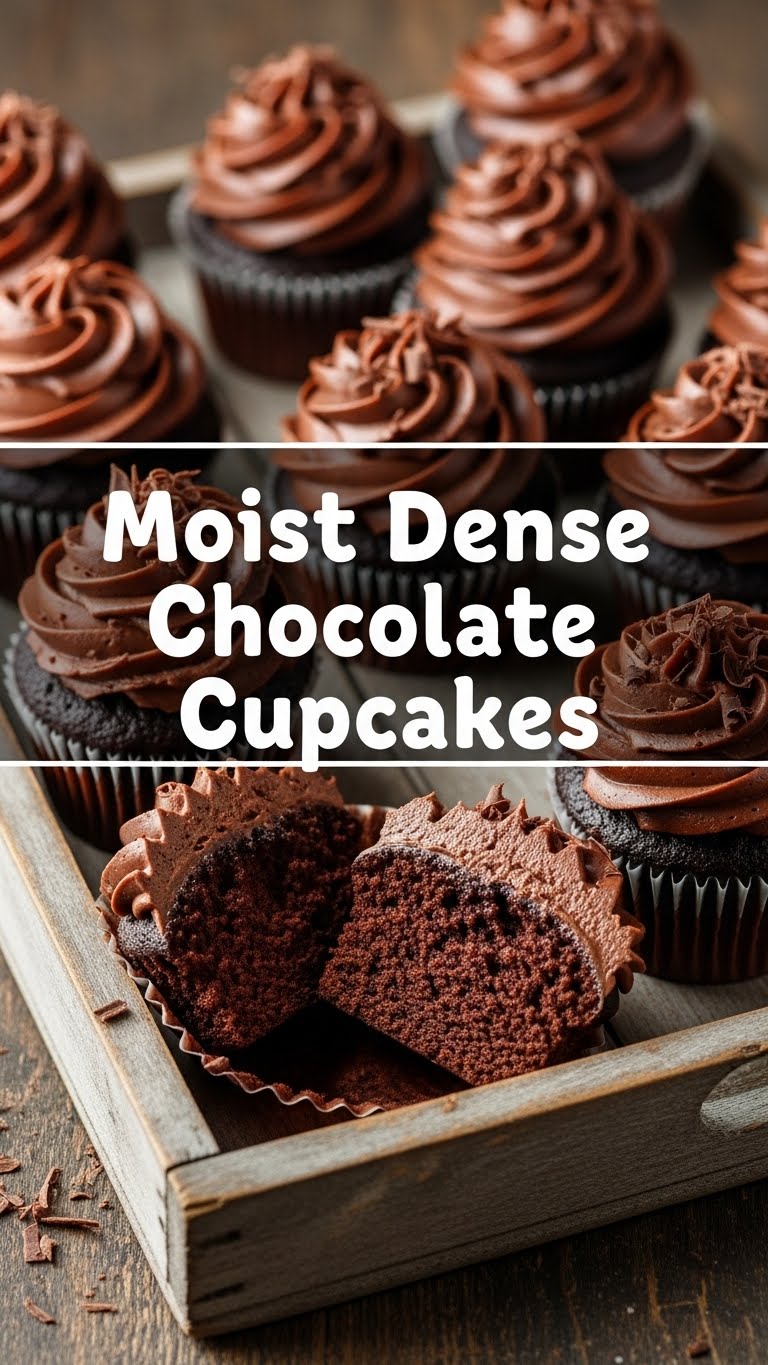
So you’re craving something tasty but too lazy to spend forever in the kitchen, huh? Same. High five! We’ve all been there, staring into the abyss of an empty snack cupboard, dreaming of something rich, chocolatey, and utterly decadent. But who wants to get all fancy and use a gazillion bowls? Not us. That’s why I’m about to drop a recipe bomb on you: the Moist Dense Chocolate Cupcakes that are so easy, you’ll wonder if you accidentally missed a step. Spoiler: you didn’t. They’re just *that* simple.
Why This Recipe Is Awesome
Let’s be real. Most “easy” recipes require a secret ingredient or a kitchen gadget you don’t own. Not this one. This recipe is awesome because it’s practically **idiot-proof** – and trust me, I’ve put that to the test. It comes together faster than you can decide what to watch on Netflix, uses super basic ingredients you probably already have, and the result? A cupcake so moist and densely chocolatey, it’s practically a brownie in a wrapper. Plus, no fancy mixers required, just a whisk and some elbow grease. Your dishwashing future self will thank you.
Ingredients You’ll Need
Gather ’round, my fellow lazy gourmands! Here’s the line-up for your chocolatey conquest:
- All-purpose flour: 1 ½ cups. Your standard white stuff. Nothing fancy.
- Granulated sugar: 1 ½ cups. The sweet stuff that makes everything better.
- Unsweetened cocoa powder: ¾ cup. Go dark or go home. This is where the *chocolate* magic happens.
- Baking soda: 1 ½ teaspoons. Our main lift-off crew.
- Baking powder: 1 teaspoon. Backup lift-off crew, because we want maximum fluff.
- Salt: 1 teaspoon. Just a pinch, to balance all that sweetness and deepen the flavor.
- Large eggs: 2, at room temperature. They play nicer when they’re not shivering.
- Milk: 1 cup. Any kind works, but whole milk makes ’em extra luscious.
- Vegetable oil: ½ cup. The secret to supreme moistness. Butter is great, but oil keeps things from drying out.
- Vanilla extract: 2 teaspoons. Liquid magic in a bottle. Don’t skip it!
- Hot water or hot coffee: 1 cup. This is the **secret weapon** for intensely deep chocolate flavor. Coffee doesn’t make it taste like coffee, just makes the chocolate sing!
Step-by-Step Instructions
- Preheat & Prep: Preheat your oven to a cozy 350°F (175°C). Line a 12-cup muffin tin with paper liners. Do yourself a favor and spray a little non-stick spray inside the liners too – helps prevent sticking!
- Whisk the Dry Squad: In a large bowl, whisk together the flour, sugar, cocoa powder, baking soda, baking powder, and salt. Make sure there are no lumps. You want a smooth, sandy mix.
- Mix the Wet Crew: In a separate medium bowl, whisk together the room temperature eggs, milk, vegetable oil, and vanilla extract until they’re well combined.
- Combine Forces: Pour the wet ingredients into the dry ingredients. Stir them together with a spatula or whisk until *just* combined. A few lumps are totally fine – **do not overmix!** Overmixing is the enemy of tender cupcakes.
- Add the Secret Sauce: Now, carefully pour the hot water (or hot coffee, for an extra kick!) into the batter. Stir until the batter is smooth and a bit thin. Yes, it will look runny, don’t panic! This is what makes them so moist and dense.
- Fill ‘Em Up: Divide the batter evenly among the 12 prepared muffin cups. I like to use an ice cream scoop for this, it keeps things tidy and consistent. Fill each liner about two-thirds full.
- Bake It ‘Til You Make It: Pop that tin into your preheated oven and bake for 18-22 minutes, or until a wooden skewer or toothpick inserted into the center of a cupcake comes out with only moist crumbs attached (no wet batter!).
- Cool Down: Let the cupcakes cool in the muffin tin for about 5 minutes before transferring them to a wire rack to cool completely. Patience, young padawan! Frost them once they’re completely cool, or just eat them warm with a spoon. No judgment here.
Common Mistakes to Avoid
Nobody’s perfect, but we can avoid some common cupcake blunders, right?
- Overmixing: Seriously, I cannot stress this enough. If you keep stirring past “just combined,” you’re heading for a tough, chewy cupcake. Stop when you see no more streaks of flour.
- Overfilling the Liners: Thinking you can get 14 cupcakes out of a 12-cup recipe is admirable, but you’ll end up with mushroom-top cupcakes that spill over the sides and make a mess. Stick to two-thirds full.
- Not Preheating the Oven: Rookie mistake! A cold oven won’t give your baking soda and powder the hot kickstart they need, leading to flat, sad cupcakes. **Always preheat!**
- Opening the Oven Door Early: Resist the urge to peek during the first 15 minutes of baking. A sudden change in temperature can make your cupcakes deflate faster than your hopes on a Monday morning.
- Baking Too Long: This is the number one culprit for dry cupcakes. Keep an eye on them towards the end of the baking time. A few moist crumbs on a toothpick are perfect; a clean toothpick means you might have overdone it.
Alternatives & Substitutions
Feeling adventurous or missing an ingredient? No stress, we can totally improvise!
- Buttermilk Bonanza: Don’t have regular milk? You can make your own “buttermilk” substitute! Just pour 1 tablespoon of white vinegar or lemon juice into a 1-cup measuring cup, then fill the rest with regular milk. Let it sit for 5 minutes until it curdles slightly. Voila! Instant tangy goodness that adds even more moisture.
- Butter vs. Oil: If you’re really committed to butter, you can melt ½ cup of unsalted butter and use that instead of oil. It adds a lovely buttery flavor, but oil typically makes for a moister crumb that stays soft longer. Your call, chef!
- The Coffee Swap: If you’re not a coffee fan (gasp!) or just don’t have any on hand, hot water works perfectly fine. The coffee simply amplifies the chocolate flavor, but it won’t taste like coffee, promise!
- Add-ins for Fun: Want to jazz them up? Fold in ½ cup of chocolate chips, mini chocolate chips, or even some sprinkles at the end of the mixing process. Because why not?
FAQ (Frequently Asked Questions)
Got questions? I’ve got (casual) answers!
- Can I use margarine instead of butter/oil? Well, technically yes, but why hurt your soul like that? Margarine is just not the same. Stick to oil or real butter for the best texture and flavor.
- Why do you recommend room temperature eggs? What’s the big deal? Ah, the room temp egg mystery! They emulsify better with other ingredients, creating a smoother, more uniform batter. This leads to a finer crumb and a better rise. Trust me, it’s worth taking them out of the fridge a bit early.
- My cupcakes turned out dry! What did I do wrong? Chances are, you either overbaked them (common!) or maybe overmixed the batter, which develops too much gluten. Stick to the baking time and **test for doneness** with a toothpick!
- Can I make these into a full cake instead of cupcakes? Absolutely! This recipe scales beautifully. Just pour the batter into a greased and floured 9×13 inch baking pan and bake for 30-35 minutes, or until a toothpick comes out clean.
- How long do these moist dense chocolate cupcakes last? If they even survive that long, they’ll stay fresh and delicious at room temperature in an airtight container for 3-4 days. You can also freeze them (unfrosted) for up to 3 months.
- Do I *really* need the hot water/coffee? Can’t I just use cold? Nope! The hot liquid helps “bloom” the cocoa powder, which means it activates its full flavor potential, making your chocolate even richer and more intense. Plus, it helps thin the batter to that perfect moist consistency. Don’t skip the hot part!
Final Thoughts
So there you have it, your new go-to recipe for the most satisfying, moist, and dense chocolate cupcakes that will make you look like a baking genius with minimal effort. Go forth and impress someone – or, more realistically, yourself – with your new culinary skills. You’ve earned it, and a giant chocolate cupcake. Now, what are you waiting for? Get baking!

