So you’re craving something tasty but too lazy to spend forever in the kitchen, huh? Same. High five! We’ve all been there, staring into the abyss of a fruit bowl filled with bananas that have clearly seen better days, wondering if they’re a lost cause or a golden opportunity. Spoiler alert: they’re a golden opportunity! Today, we’re not just making banana bread; we’re crafting a legend. We’re talking *Very Moist* Banana Nut Bread that’ll make your taste buds sing and your friends think you’re some kind of culinary wizard. Let’s get to it!
Why This Recipe is Awesome
Okay, let’s be real. There are a million banana bread recipes out there. But this one? This one is different. It’s not just “moist”; it’s **”so moist it practically melts in your mouth”** moist. We’re talking next-level deliciousness here. It’s also practically idiot-proof. Seriously, even I, someone who once tried to microwave a metal bowl (don’t ask), have mastered this. You won’t mess it up, promise!
Plus, it’s a fantastic way to salvage those tragically overripe bananas on your counter. You know, the ones that look like they’ve been through a fight and lost? Those are your secret weapon for ultimate moisture and intense banana flavor. It’s quick, it’s comforting, and it makes your whole house smell like a bakery. What’s not to love?
Ingredients You’ll Need
Gather ’round, my fellow kitchen adventurers! Here’s your treasure map of ingredients. Don’t sweat it if you’re missing one or two small things, we can be flexible (mostly).
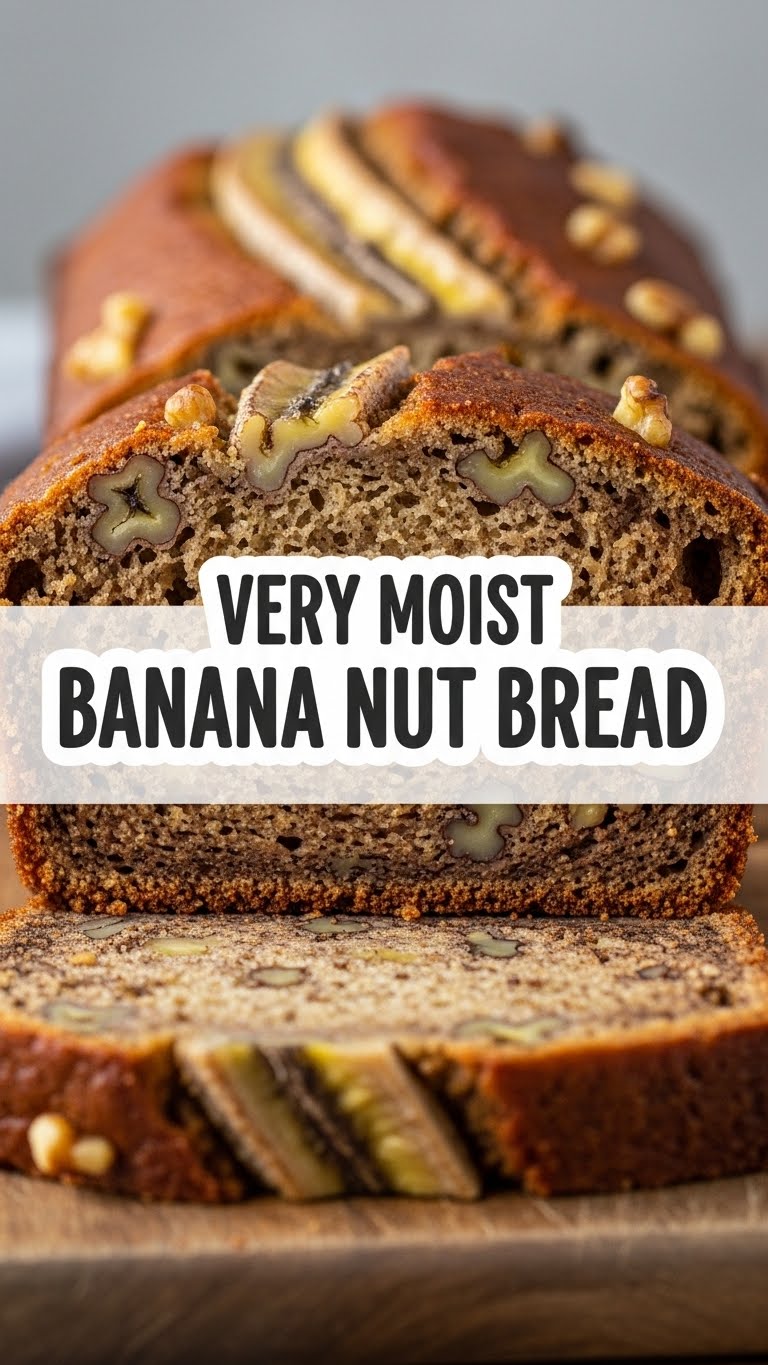
- **3-4 very ripe bananas:** These are the superstars! We’re talking brown spots, almost black, soft to the touch. The riper, the sweeter, the moister. Trust me on this.
- **1/2 cup (1 stick) unsalted butter:** Softened, please. Not melted, not rock-hard. Just perfectly pliable.
- **1 cup granulated sugar:** Because sweetness makes everything better, right?
- **2 large eggs:** Room temperature, if you can remember to take them out. If not, don’t stress.
- **1 teaspoon vanilla extract:** Don’t skimp on the good stuff!
- **1 1/2 cups all-purpose flour:** The backbone of our bread.
- **1 teaspoon baking soda:** Our leavening agent, making sure things rise nicely.
- **1/4 teaspoon salt:** Just a pinch to balance all that sweetness.
- **1 cup chopped nuts:** Walnuts or pecans are classic, but honestly, use what you like or skip ’em if you’re not a nut person. It’s your bread party!
Step-by-Step Instructions
Alright, apron on (or not, no judgment here), let’s bake some magic!
- **Get Prepped:** First things first, preheat your oven to 350°F (175°C). Then, lightly grease and flour a 9×5 inch loaf pan. Or line it with parchment paper if you’re feeling fancy and hate sticking.
- **Mash Those Bananas:** In a medium bowl, take those gloriously ripe bananas and mash them up with a fork. You want some lumps for texture, but mostly smooth. Think chunky applesauce.
- **Cream it Up:** In a large bowl, cream together the softened butter and granulated sugar until light and fluffy. A hand mixer makes this super easy, but arm power works too!
- **Egg-cellent Addition:** Beat in the eggs one at a time, mixing well after each. Then stir in the vanilla extract. Your wet ingredients are looking good!
- **Dry Mix Magic:** In a separate, smaller bowl, whisk together the flour, baking soda, and salt. This ensures everything is evenly distributed.
- **Combine and Conquer:** Now, gradually add the dry ingredients to the wet ingredients, mixing until just combined. **Do not overmix!** A few streaks of flour are totally fine. Overmixing leads to tough bread, and we don’t want tough bread.
- **Fold in the Goodies:** Gently fold in your mashed bananas and chopped nuts. Again, mix just enough to incorporate.
- **Into the Pan:** Pour the batter into your prepared loaf pan, spreading it evenly. Give it a gentle tap on the counter to settle.
- **Bake Away!** Pop it in the preheated oven and bake for 55-65 minutes, or until a wooden skewer or toothpick inserted into the center comes out clean (or with just a few moist crumbs).
- **Cool Down:** Let your glorious creation cool in the pan for about 10-15 minutes before carefully removing it to a wire rack to cool completely. Or, if you’re impatient like me, cut into it warm. Just be warned, it’s a bit messier but oh-so-worth-it.
Common Mistakes to Avoid
We’ve all been there, made a few culinary blunders. Here’s how to steer clear of the most common banana bread pitfalls:
- **Using Underripe Bananas:** This is the cardinal sin! Green or yellow bananas won’t give you that intense flavor or, more importantly, that heavenly moist texture. Be patient, let them ripen.
- **Overmixing the Batter:** I know it’s tempting to get every lump out, but **seriously, don’t overmix!** It develops the gluten too much, leading to a dense, tough bread. Gentle is key.
- **Not Preheating Your Oven:** Rookie mistake! A cold oven won’t bake evenly, and your bread might not rise correctly. Give it time to get to temperature.
- **Opening the Oven Door Constantly:** Resist the urge! Every time you open the door, the temperature drops, affecting the baking process and potentially making your bread sink. Patience, grasshopper.
- **Ignoring the Toothpick Test:** Just because the timer says it’s done, doesn’t mean it’s done. Always double-check with a toothpick.
Alternatives & Substitutions
Feeling adventurous? Or just missing an ingredient? No worries, we’ve got options!
- **No Nuts? No Problem!** If you’re not a nut fan (or have an allergy), simply omit them. Or, if you want some extra indulgence, swap them for **1 cup of chocolate chips** (semi-sweet or milk chocolate work great!). Why not add both? IMO, chocolate + banana = heaven.
- **Brown Sugar vs. White Sugar:** You can totally use 1 cup of light brown sugar instead of granulated for a slightly deeper, more caramel-like flavor. Delicious!
- **Add Some Spice:** A teaspoon of ground cinnamon or a pinch of nutmeg can add a wonderful warmth to your bread.
- **Make it Muffins!** This recipe works perfectly for muffins. Just reduce the baking time to about 20-25 minutes. Fill muffin liners about two-thirds full.
FAQ (Frequently Asked Questions)
Got questions? I’ve got (casual) answers!
- **Can I use margarine instead of butter?** Well, technically yes, but why hurt your soul like that? Butter adds so much flavor and richness that margarine just can’t replicate. Stick with butter for the best results, trust me.
- **How ripe do the bananas *really* need to be?** As ripe as a banana can get without actively rotting. Think dark brown to almost black peel, very soft flesh. The sugar content increases as they ripen, making for a sweeter, moister bread.
- **Can I freeze banana bread?** Heck yes! Once completely cooled, wrap individual slices or the whole loaf tightly in plastic wrap, then again in foil. It’ll keep for up to 3 months. Just thaw at room temp when you’re ready to devour it.
- **How long does this moist banana bread last?** On the counter, tightly wrapped, about 3-4 days. In the fridge, it might last up to a week. In *my* house? About 24 hours, if I’m lucky.
- **My banana bread turned out dry, what happened?** Oh no! Most likely culprits are not using ripe enough bananas, overbaking, or overmixing the batter. Remember: ripe bananas, gentle mixing, and the toothpick test are your best friends.
Final Thoughts
And there you have it, folks! Your very own, incredibly moist, absolutely delicious Banana Nut Bread. You’ve taken some sad-looking bananas and turned them into a culinary masterpiece. Give yourself a pat on the back, you deserve it!
This bread is perfect for breakfast, a midday snack, or even a late-night indulgence. It pairs wonderfully with a cup of coffee, tea, or just a big glass of milk. Now go impress someone—or yourself—with your new culinary skills. You’ve earned it!


