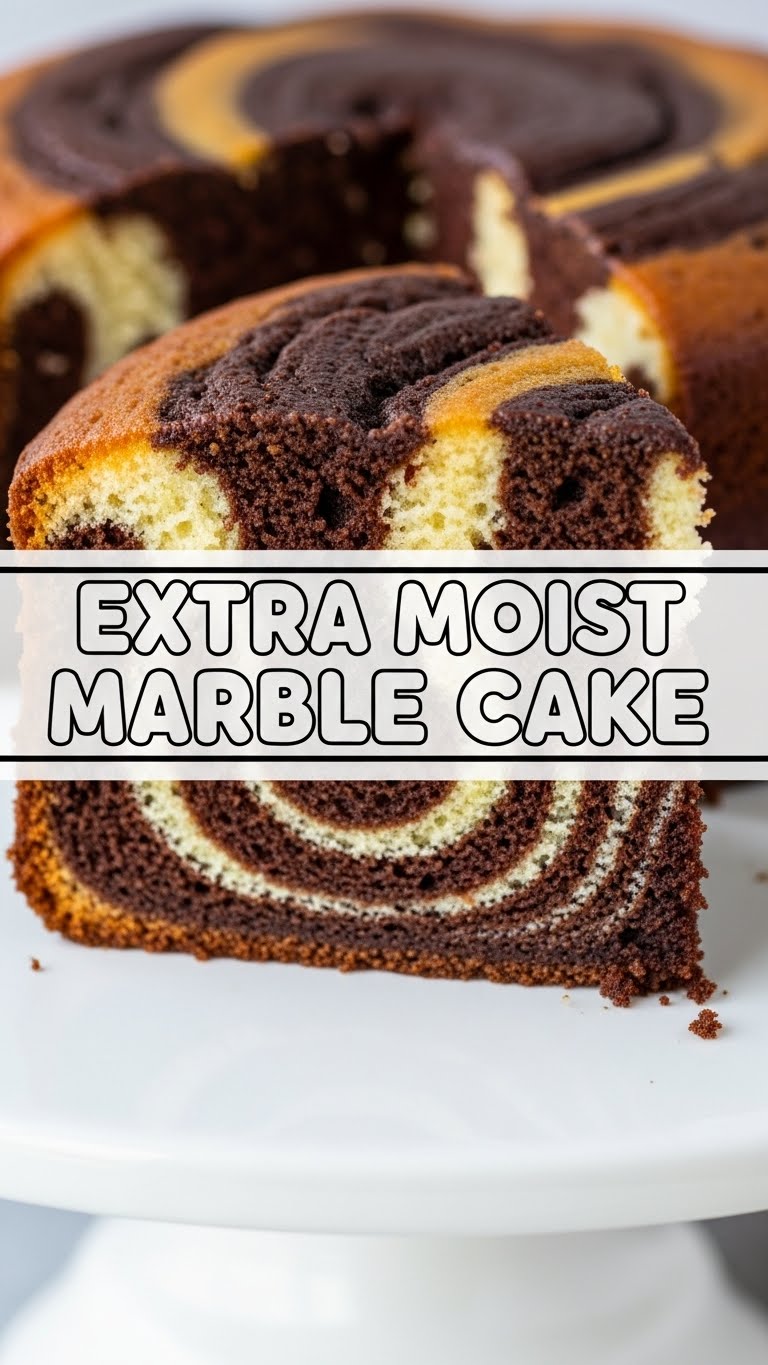
So, you’ve got that craving, right? The one that whispers “CAKE” but also screams “don’t make me work for it!” My friend, I hear you. And I’ve got your back with a recipe so good, it’ll make you wonder if you secretly hired a pastry chef. Forget dry, crumbly imposters; we’re talking about an **Extra Moist Marble Cake** that’s so easy, you’ll barely break a sweat. Unless you’re me, and just thinking about cake makes you a little flushed. Let’s get baking!
Why This Recipe is Awesome
Let’s be real, most “moist” cakes are lying. This one? It’s so moist, it practically needs a towel to dab its forehead. Plus, the marble effect looks super fancy, but shhh, it’s practically accidental. **No fancy tools, no hours in the kitchen, just pure cake magic.** It’s the kind of recipe that makes you look like a baking genius without actually having to be one. And trust me, if I can do it without setting off the smoke alarm (a rare feat, TBH), you totally can too. It’s practically idiot-proof. Seriously, I didn’t even mess it up!
Ingredients You’ll Need
Gather your troops! These are the heroes of our moist cake saga:
- All-Purpose Flour: 2 ½ cups. The backbone of our operation. All-purpose, just like your life skills.
- Granulated Sugar: 1 ½ cups. Because we like things sweet, obviously.
- Baking Powder: 1 tablespoon. Our trusty leavening agent. Gives it that glorious lift!
- Baking Soda: ½ teaspoon. Another lift-giver, but also plays nice with the buttermilk.
- Salt: ½ teaspoon. Don’t skip it! It actually makes everything taste *more* like itself. Magic, I tell ya.
- Unsalted Butter: 1 cup (2 sticks), softened. Unsalted, because we control the salt, thank you very much. Make sure it’s soft enough to indent with a finger, but not melted.
- Large Eggs: 3, at room temperature. They just mix better, trust me. Cold eggs are mood killers.
- Vanilla Extract: 2 teaspoons. The OG flavor enhancer. Don’t skimp!
- Buttermilk: 1 cup. The secret sauce for ultimate moistness. **Do not substitute with regular milk if you want that extra moistness!**
- Unsweetened Cocoa Powder: ¼ cup. For that beautiful chocolate swirl.
- Hot Water or Coffee: ¼ cup. To bloom that cocoa powder and make it extra chocolatey.
Step-by-Step Instructions
- Prep Your Pan: Preheat your oven to 350°F (175°C). Grease and flour a 9×13 inch baking pan. Or, if you’re fancy, line it with parchment paper and then grease/flour. Whatever floats your boat.
- Whisk the Dry Stuff: In a medium bowl, whisk together the flour, granulated sugar, baking powder, baking soda, and salt. Give it a good whisk to make sure everything’s evenly distributed. No lumps allowed!
- Cream the Butter & Sugar (Oops, just butter first!): In a large bowl, using an electric mixer, beat the softened butter until it’s light and fluffy. This usually takes about 2-3 minutes.
- Add Sweetness: Gradually add the sugar to the butter, beating on medium-high speed until the mixture is pale and super fluffy, about another 3-5 minutes. This is where you incorporate air for that light texture.
- Egg-cellent Addition: Beat in the eggs one at a time, making sure each is fully incorporated before adding the next. Then stir in the vanilla extract. Scrape down the sides of the bowl to ensure everything’s mixed.
- Alternate Wet & Dry: With the mixer on low speed, add about one-third of the flour mixture to the butter mixture, beating just until combined. Then, pour in half of the buttermilk and mix. Repeat, ending with the last of the flour mixture. **Mix *just* until combined.** Overmixing is the enemy of moist cake!
- Divide and Conquer: Divide the batter evenly into two separate bowls.
- Chocolatey Swirl Prep: In a small bowl, whisk together the cocoa powder and hot water (or coffee!) until smooth. This is called “blooming” the cocoa, and it seriously enhances the chocolate flavor. Add this mixture to one of the batter bowls and mix until fully combined. Now you have a vanilla batter and a chocolate batter!
- Assemble Your Masterpiece: Drop spoonfuls of the vanilla and chocolate batters alternately into your prepared baking pan. Don’t be shy; aim for a checkerboard-ish pattern.
- The Swirl: Take a butter knife or a skewer and gently swirl through the batters a few times to create that marble effect. **Don’t overdo it!** A few simple passes are all you need, or you’ll end up with brown cake, not marbled.
- Bake It Up: Bake for 30-35 minutes, or until a wooden skewer inserted into the center comes out clean.
- Cool Down: Let the cake cool in the pan for about 10-15 minutes before inverting it onto a wire rack to cool completely. Patience is a virtue, especially when cake is involved.
Common Mistakes to Avoid
Listen up, buttercup! Don’t let these rookie errors ruin your masterpiece:
- Overmixing the Batter: This is probably the biggest sin. You want a tender cake, not a rubbery brick. Mix just until ingredients are combined, then stop. Walk away from the mixer!
- Cold Ingredients: Using cold butter and eggs is a no-go. They don’t emulsify properly with the other ingredients, leading to a denser, less uniform cake. **Room temp is key!**
- Not Preheating the Oven: Thinking you don’t need to preheat the oven? Rookie mistake. Uneven baking and sad cake texture will be your punishment.
- Opening the Oven Door Too Early: Resist the urge! Opening the door lets out heat, causing your cake to sink in the middle. Wait until at least ¾ of the way through baking.
- Overbaking: The quickest way to a dry cake is leaving it in the oven too long. Keep an eye on it and test with a skewer. Once it’s clean, pull that baby out!
Alternatives & Substitutions
Life happens, ingredients run out. Here are some quick fixes:
- No Buttermilk? No Problem (kinda): If you don’t have buttermilk, you can make a quick substitute! Pour 1 cup of regular milk (whole or 2%) into a measuring cup, remove 1 tablespoon of milk, then add 1 tablespoon of lemon juice or white vinegar. Let it sit for 5-10 minutes until it slightly curdles. It’s not *exactly* the same as real buttermilk, but it’ll do the job for moistness in a pinch. **But seriously, real buttermilk is better!**
- Butter Swap? You *could* use oil instead of butter (like vegetable or canola oil) for an even moister cake, but you’ll sacrifice some of that rich buttery flavor. IMO, butter is worth it.
- Flavor Variations: Want to get wild? Try adding a different extract to the vanilla batter – almond, orange, or even a touch of espresso powder for a coffee-marble effect.
- Dairy-Free: For a dairy-free version, use plant-based butter sticks, your preferred plant-based milk (curdled with lemon juice for ‘buttermilk’), and ensure your cocoa powder is dairy-free.
FAQ (Frequently Asked Questions)
Got questions? I’ve got answers (and maybe a little sass):
Can I use margarine instead of butter? Well, technically yes, but why hurt your soul like that? Butter provides a superior flavor and texture. Margarine will work, but it won’t be as rich.
My cake isn’t very moist, what happened? Oh, no! Most likely culprits are overbaking, using cold ingredients, or not measuring accurately. Get yourself a kitchen scale, they’re a game-changer!
How do I get a good marble swirl? Mine just looks like brown cake! You probably overswirled it, friend! Less is more here. A few gentle passes with a knife or skewer, and then stop. Seriously, hands off!
Can I make this in a different pan size? Absolutely! Just keep in mind baking times will vary. A bundt pan might take longer (around 45-60 mins), and cupcakes would be much shorter (18-22 mins). Adjust accordingly!
How long does this cake last? If you can resist eating it all in one sitting (impressive!), it’ll stay wonderfully moist for 3-4 days at room temperature, tightly covered. Pop it in the fridge, and it’ll last a few days longer.
Can I freeze marble cake? Heck yes! Wrap individual slices or the whole cooled cake tightly in plastic wrap, then foil. It’ll keep in the freezer for up to 3 months. Just thaw at room temp, and you’re good to go!
Final Thoughts
There you have it, folks! Your new go-to recipe for a show-stopping (yet secretly super easy) Extra Moist Marble Cake. It’s perfect for impressing guests, bribing co-workers, or just treating yourself after a long week. Now go impress someone—or yourself—with your new culinary skills. You’ve earned it! Don’t forget to send me a slice (or at least a picture!). Happy baking, you rockstar!

