So you’re craving something tasty but too lazy to spend forever in the kitchen, huh? Same. Like, sometimes you just want that warm, comforting hug of a dessert without having to sell a kidney for exotic ingredients or spend three hours kneading dough. That’s where this ridiculously easy, unbelievably delicious, and super moist crumb cake swoops in like your culinary superhero. It’s the kind of cake that says, “I made this from scratch!” but secretly, you know it was a breeze. Let’s get baking, buttercup!
Why This Recipe is Awesome
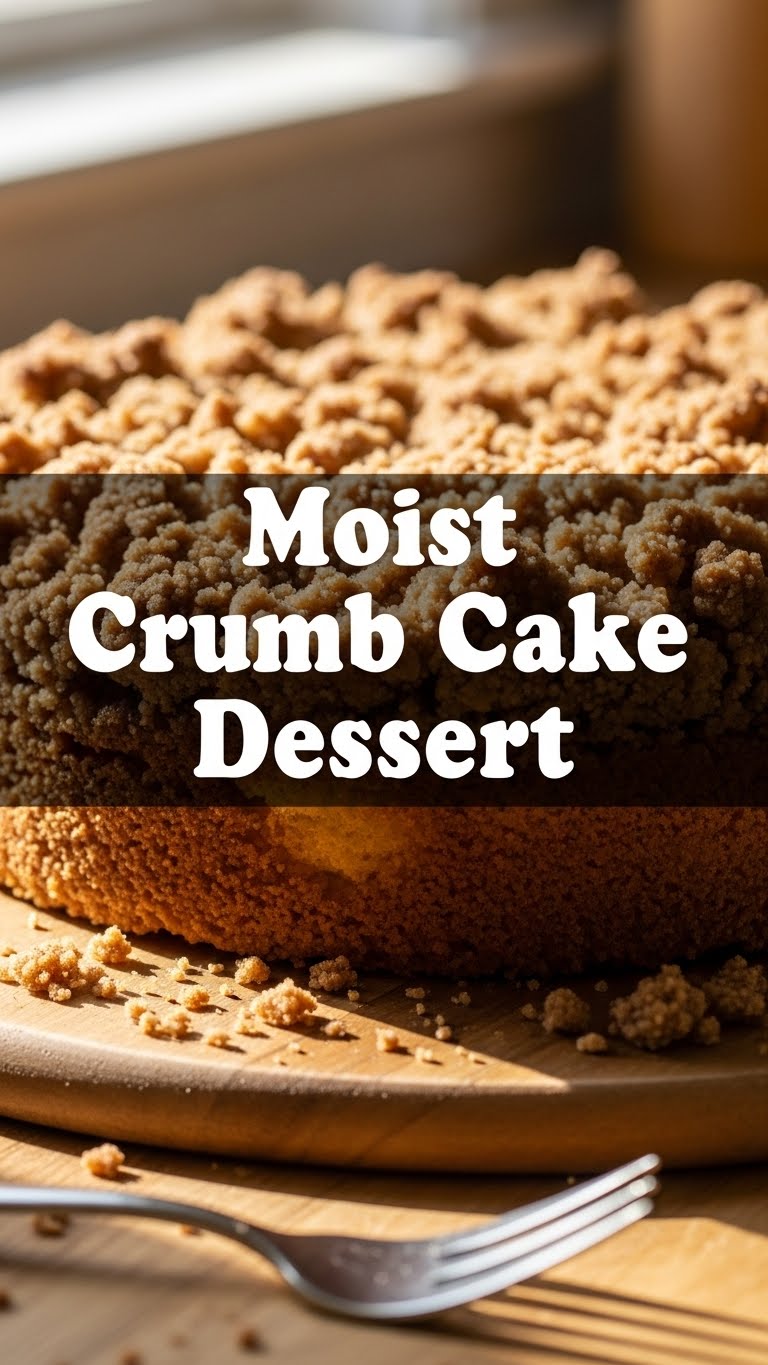
Okay, first things first, this isn’t just *any* crumb cake. This is THE crumb cake. Why? Because it’s practically idiot-proof. Seriously, even I, the queen of “oops, did I just burn water?”, didn’t mess this up. It strikes that perfect balance: a super moist, tender cake base topped with an absurdly generous, buttery, cinnamon-kissed crumb that could honestly be a dessert on its own. It’s basically two desserts in one, and who doesn’t love a two-for-one deal?
It’s also surprisingly quick to whip up. You’ll spend more time admiring your handiwork than actually, you know, “working.” Plus, the smell alone will make your neighbors jealous. Fair warning: prepare for compliments, demands for the recipe, and possibly a few marriage proposals. Don’t say I didn’t warn ya!
Ingredients You’ll Need
Get ready to raid your pantry! Here’s the lowdown on what you’ll need for this masterpiece. Don’t worry, nothing too fancy, just good old basics.
For the Crumb Topping (aka the best part):
- 1 ½ cups (180g) All-Purpose Flour: Just regular flour, no need to get snooty with fancy stuff.
- ½ cup (100g) Granulated Sugar: The white stuff.
- ½ cup (100g) Packed Light Brown Sugar: For that caramel-y depth. Don’t even think about skipping this!
- 1 teaspoon Ground Cinnamon: For that warm, cozy vibe. Adjust to your spice preference.
- ¼ teaspoon Salt: Just a pinch to make everything else pop.
- ½ cup (113g) Unsalted Butter: Make sure it’s very cold and cut into small cubes. This is key for crumbly perfection, trust me.
For the Cake:
- 1 ½ cups (180g) All-Purpose Flour: More of the good stuff.
- 1 teaspoon Baking Powder: Our little lift-off agent.
- ½ teaspoon Baking Soda: Another lifting buddy.
- ¼ teaspoon Salt: Yep, again. Balance is everything!
- ½ cup (113g) Unsalted Butter: Melted and then cooled slightly. We’re not making scrambled eggs here, folks.
- ¾ cup (150g) Granulated Sugar: Sweetness level: perfect.
- 1 large Egg: Room temperature, please! It mixes better.
- 1 teaspoon Vanilla Extract: The soul of most desserts. Don’t skimp!
- ¾ cup (180ml) Buttermilk: For ultimate moistness. If you don’t have it, see my trick below!
Step-by-Step Instructions
Alright, apron on, game face ready! Let’s get this crumb cake party started. Follow these simple steps, and you’ll be a crumb cake master in no time.
- Crumb Time! In a medium bowl, whisk together the flour, granulated sugar, brown sugar, cinnamon, and salt for the crumb topping. Now, add those cold, cubed butter pieces. With your fingers (the best tool, IMO!), a pastry blender, or two knives, cut the butter into the dry ingredients until the mixture resembles coarse crumbs with some pea-sized pieces remaining. Don’t overmix! Pop this bowl in the fridge while you make the cake batter.
- Prep the Cake Crew. Preheat your oven to 350°F (175°C). Lightly grease and flour an 8×8 inch or 9×9 inch square baking pan. Or, for minimal fuss, line it with parchment paper leaving an overhang on the sides for easy lifting.
- Dry Mix Magic. In a medium bowl, whisk together the flour, baking powder, baking soda, and salt for the cake. Set aside.
- Wet Mix Wonders. In a separate large bowl, whisk together the melted (and slightly cooled) butter and granulated sugar until well combined. Beat in the egg and vanilla extract until smooth.
- Combine & Conquer. Now for the good part: gradually add the dry ingredients to the wet ingredients, alternating with the buttermilk, beginning and ending with the dry ingredients. Mix until just combined. Stop mixing as soon as everything is incorporated. Overmixing means a tough cake, and we want tender!
- Assemble Your Masterpiece. Pour the cake batter evenly into your prepared baking pan. It might look a little thick, that’s okay! Now, retrieve that heavenly crumb topping from the fridge and generously sprinkle it all over the top of the cake batter. Make sure it’s an even layer of crumbly goodness.
- Bake It Up! Bake for 30-35 minutes, or until a wooden skewer or toothpick inserted into the center of the cake (avoiding a crumb clump) comes out with moist crumbs, not wet batter. The crumb topping should be beautifully golden brown.
- Cool Down, Buttercup. Let the cake cool in the pan on a wire rack for at least 20-30 minutes before attempting to slice. Seriously, I know it smells amazing and you want to dive in, but patience is a virtue here! A warm cake might crumble too easily.
Common Mistakes to Avoid
Nobody’s perfect, but we can try to avoid these rookie errors that might stand between you and crumb cake glory:
- Thinking you don’t need to preheat the oven: Rookie mistake! A cold oven means uneven baking and a sad cake.
- Using warm butter for the crumb: Big NO. Warm butter melts too quickly, giving you a greasy paste instead of delightful crumbs. Keep it chilly!
- Overmixing the cake batter: You want a light, tender cake, not a hockey puck. Mix until just combined. Lumps are fine, toughness is not.
- Underbaking the cake: A wobbly center or sticky toothpick means it needs more time. Don’t rush perfection!
- Cutting into it too soon: I know the struggle is real, but hot cake is fragile cake. Let it cool a bit, and it’ll slice beautifully.
Alternatives & Substitutions
Feeling adventurous? Or just missing an ingredient? Here are a few friendly tweaks:
- No Buttermilk? No Problem! Simply measure ¾ cup of regular milk (whole milk works best for richness), then stir in 1 tablespoon of white vinegar or lemon juice. Let it sit for 5-10 minutes until it looks slightly curdled. Voila! Instant buttermilk.
- Spice It Up: Not a huge cinnamon fan? Try a pinch of nutmeg, cardamom, or even some apple pie spice in the crumb. Delicious!
- Add-ins for the Cake: Want to get extra? Fold in ½ cup of chocolate chips or a handful of fresh berries (raspberries or blueberries would be divine) into the cake batter before pouring.
- Gluten-Free Option: You can often substitute a 1:1 gluten-free baking flour blend for the all-purpose flour. Just make sure it contains xanthan gum.
- Dairy-Free: Use a plant-based butter substitute (like Miyoko’s Kitchen or Earth Balance sticks) and a plain, unsweetened plant-based milk (like almond or oat milk) for both the cake and crumb.
FAQ (Frequently Asked Questions)
Got questions? I’ve got answers. And probably a few bad jokes.
- Can I use margarine instead of butter? Well, technically yes, but why hurt your soul like that? Butter just tastes better, let’s be real. If you must, use sticks of margarine for baking, not the tub spread.
- My crumb topping is soggy! What happened? This usually means one of two things: either your butter wasn’t cold enough when you made the crumbs (they melted into the batter instead of staying distinct), or the cake was underbaked. Make sure that toothpick comes out mostly clean!
- Can I make this ahead of time? Absolutely! This cake is actually fantastic on day two or three. Store it covered at room temperature for up to 3 days, or in the fridge for up to a week.
- Can I freeze crumb cake? You bet! Let it cool completely, then wrap individual slices or the whole cake tightly in plastic wrap, then foil. It’ll keep in the freezer for up to 2-3 months. Thaw at room temp.
- My cake is dry! What went wrong? Most likely, it was overbaked. Keep an eye on the oven, and remember to check for doneness with a toothpick. Also, ensure your measuring cups for flour aren’t packed too tightly – spoon and level!
- What size pan should I use? An 8×8 or 9×9 inch square pan is perfect. A 9-inch round springform pan also works! Just note that baking times might vary slightly with different pan sizes.
Final Thoughts
So there you have it, folks! Your new go-to recipe for a moist, dreamy crumb cake that will make you feel like a baking superstar without all the fuss. This isn’t just a recipe; it’s an experience. The smell, the texture, the pure joy of that first bite… it’s all worth it.
Now go impress someone—or yourself—with your new culinary skills. You’ve earned it! Seriously, go make this cake. You won’t regret it. Unless you eat the whole thing yourself… then maybe a *little* regret, but a delicious one!

