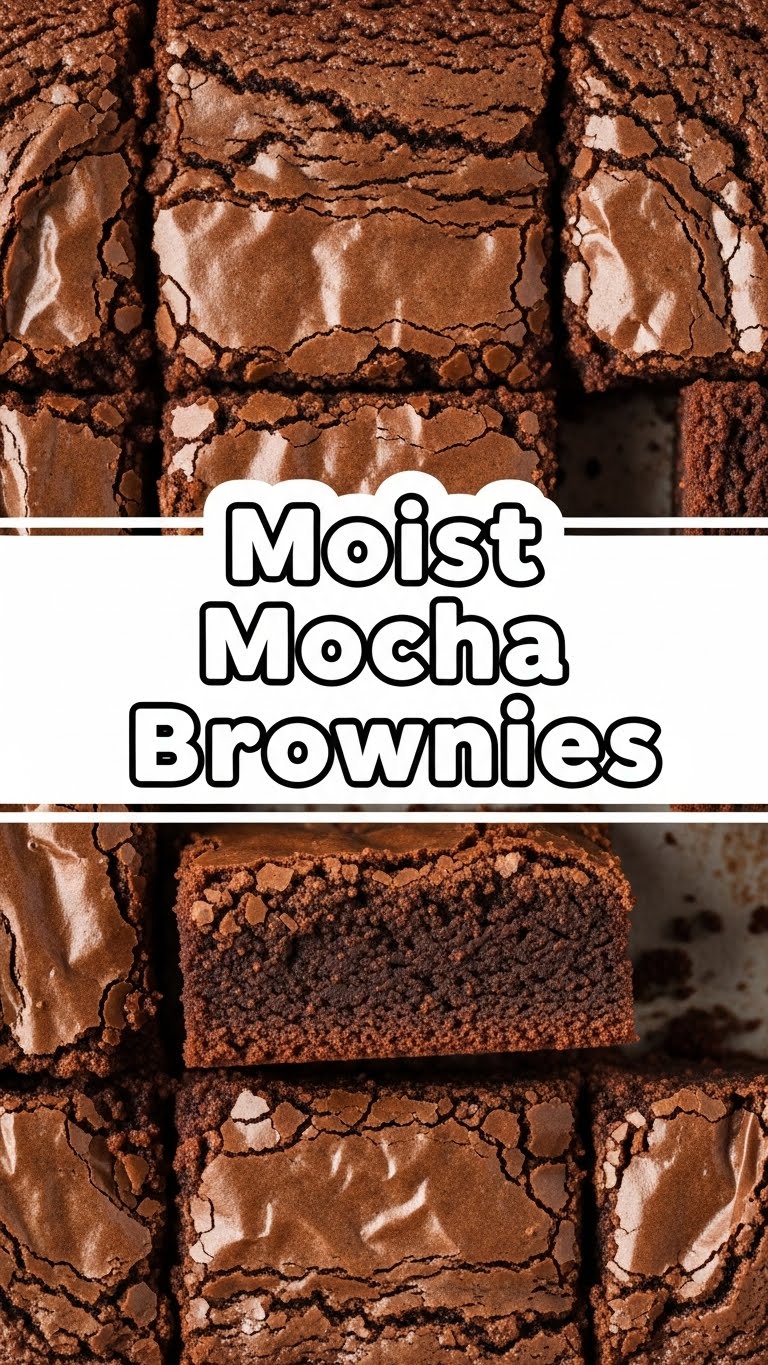
So you’re craving something tasty but too lazy to spend forever in the kitchen, huh? Same. Like, why spend hours fussing when you can whip up pure bliss in less time than it takes to decide what to watch on Netflix? Today, my friend, we’re diving into the glorious world of **Moist Mocha Brownies**. Get ready for a fudgy, chocolatey, coffee-kissed dream that practically makes itself. Seriously, even I didn’t mess these up, and that’s saying something.
Why This Recipe is Awesome
Okay, let’s be real. This isn’t just a recipe; it’s a life hack disguised as a dessert. Why is it so awesome? Because it’s practically **idiot-proof**. I made it on a Monday morning *before* my first cup of coffee, and they still turned out heavenly. You get that deep, dark, rich chocolate flavor, but then BAM! A subtle, sophisticated coffee kick swoops in, making everything just a little bit better, a little more grown-up. And the texture? Pure, unadulterated gooey, fudgy perfection. It’s the kind of brownie that makes you close your eyes and sigh dramatically. Plus, it requires minimal clean-up, which is a win in my book, **IMO**.
Ingredients You’ll Need
Gather your troops! Here’s what you’ll need to make magic happen:
- 1 cup (2 sticks) Unsalted Butter: The good stuff. Melted. Don’t skimp; butter is flavor.
- 2 cups Granulated Sugar: Sweetness, duh. This helps get that crinkly top.
- 4 Large Eggs: Room temperature, if you’re fancy (or just remember to take them out 30 mins prior). They emulsify better!
- 2 teaspoons Vanilla Extract: Because everything is better with vanilla. It’s like a warm hug.
- 1 cup All-Purpose Flour: Just the basics. Don’t overthink it.
- ¾ cup Unsweetened Cocoa Powder: For that deep, dark chocolatey soul. Go for good quality if you can!
- 2 tablespoons Instant Espresso Powder (or instant coffee): **This is the secret weapon!** Even if you don’t like coffee, DO NOT skip it. It magically amplifies the chocolate flavor without making it taste like a coffee shop.
- ½ teaspoon Salt: Balances everything out, like a good therapist for your taste buds.
- 1 cup Chocolate Chips (optional, but not really): For extra melty pockets of joy. Semi-sweet or dark are my faves.
Step-by-Step Instructions
- Prep Your Stage: Preheat your oven to 350°F (175°C). Line a 9×13 inch baking pan with parchment paper, leaving an overhang on the sides. This makes lifting them out super easy. Spray lightly with cooking spray for good measure.
- Melt & Mix (Wet Part 1): In a large, microwave-safe bowl or a saucepan over low heat, melt the butter. Once melted, stir in the granulated sugar until combined. No need to dissolve completely, just mix.
- Whisk in the Eggs (Wet Part 2): Let the butter-sugar mixture cool for a few minutes (you don’t want scrambled eggs, trust me!). Then, vigorously whisk in the eggs, one at a time, until fully incorporated. Stir in the vanilla extract. Your mixture should look glossy and smooth.
- Combine the Dry Team: In a separate medium bowl, whisk together the flour, cocoa powder, espresso powder, and salt. Give it a good whisk to break up any lumps and ensure everything is evenly distributed.
- Bring Them Together: Gradually add the dry ingredients to the wet ingredients, mixing with a spatula or wooden spoon until *just* combined. **Do not overmix!** Overmixing develops gluten, leading to tougher brownies, and we want fudgy perfection.
- Fold in the Chips: Gently fold in your chocolate chips now, if using. Because more chocolate is always a good idea, right?
- Bake ‘Em Up: Pour the batter into your prepared pan and spread evenly. Pop it into your preheated oven and bake for 25-30 minutes.
- Cool & Devour: Here’s the hard part: let them cool completely in the pan on a wire rack. I know, I know, it’s torture. But cooling allows them to set properly, giving you those perfectly fudgy, sliceable squares. Once cool, lift them out using the parchment paper handles, cut, and enjoy!
Common Mistakes to Avoid
Listen up, buttercup. We’re going for brownie nirvana, so avoid these pitfalls:
- Overbaking: This is the cardinal sin! A toothpick inserted into the center should come out with moist crumbs, **not wet batter, but definitely not clean**. If it’s clean, you’ve overbaked, and you’ll end up with cakey brownies instead of fudgy ones. Rookie mistake.
- Not letting them cool: I get it, the smell is intoxicating. But cutting warm brownies means messy, crumbly squares. Be patient; good things come to those who wait.
- Skipping the espresso powder: I said it once, I’ll say it again. It’s not for coffee flavor; it’s for **super-charging your chocolate**. Trust the process!
- Overmixing the batter: As mentioned, tough brownies are sad brownies. Mix until just combined, then stop. Walk away from the spatula.
Alternatives & Substitutions
Life happens, ingredients run out. Here are some quick fixes:
- Butter: Margarine can work in a pinch, but honestly, the flavor won’t be as rich. Your brownies will know. And judge you.
- Instant Espresso Powder: Regular instant coffee granules can be used instead, just make sure they dissolve well.
- Chocolate Chips: You can swap these for chopped chocolate bars, milk chocolate chips, white chocolate chips, or even throw in some chopped nuts for extra crunch (pecans or walnuts are fab!). Or skip them entirely for a “pure” brownie experience, but… why?
- Dairy-Free: Use a plant-based butter alternative and ensure your chocolate chips are dairy-free. Easy peasy!
FAQ (Frequently Asked Questions)
- Can I double the recipe? Absolutely! Just use a bigger pan (like a 10×15 inch) and expect the baking time to increase slightly, maybe by 5-10 minutes. More brownies = more happiness, **FYI**.
- How do I know when they’re done? A toothpick inserted into the center should come out with moist crumbs, **not liquid batter**. If it comes out clean, they’re probably overbaked.
- Can I make these gluten-free? Sure thing! Swap out the all-purpose flour for a 1:1 gluten-free baking blend. Results might vary ever so slightly in texture, but they’ll still be delicious.
- Do I really need espresso powder? Yes! Even if you’re not a coffee drinker, it deepens the chocolate flavor without making the brownies taste like coffee. It’s a flavor enhancer, not a flavor introducer.
- How long do they last? Pfft, in *my* house? About a day. But theoretically, they’ll be good for 3-4 days stored in an airtight container at room temperature. Probably longer in the fridge, but who wants cold brownies?
- Why room temperature eggs? They emulsify (mix) into the batter more smoothly, creating a more cohesive, fudgier brownie texture. Cold eggs can seize up the butter. It’s science, baby!
Final Thoughts
See? I told you it was easy! Now you’re practically a pastry chef with these amazing Moist Mocha Brownies under your belt. Go forth and share these glorious creations, or hoard them all for yourself. No judgment here – you’ve earned every single fudgy, coffee-kissed bite. Enjoy!


