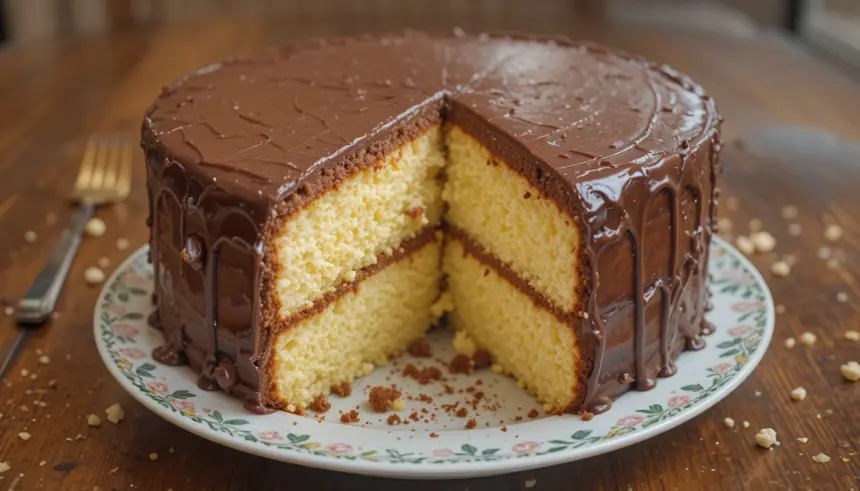
Oh, hello there, fellow dessert enthusiast! Are you ready to embark on a delectable journey that promises to tantalize your taste buds and earn you legendary status among your friends and family? Forget your troubles and grab your whisk, because today, we’re diving headfirst into the glorious world of Yellow Cake With Chocolate Cream Cheese Frosting! This isn’t just any cake; it’s a hug in cake form, a symphony of flavors that combines the sunny, buttery comfort of a classic yellow cake with the rich, tangy, and utterly irresistible embrace of chocolate cream cheese frosting. Prepare yourself, because we’re about to unlock the secrets to baking perfection with a playful spirit and expert precision!
Why This Dynamic Duo is a Dessert Legend
Let’s be honest, some flavor combinations are just meant to be. Peanut butter and jelly, cookies and milk, and without a doubt, a moist yellow cake crowned with a velvety chocolate cream cheese frosting. Why does this pairing work so well, you ask? It’s all about balance, my friend! The tender crumb of a perfectly baked yellow cake, often made with egg yolks for that signature hue and richness, provides a comforting, slightly sweet canvas. Then, boom! The frosting swoops in, offering a delightful counterpoint with its deep chocolate notes, balanced by the subtle tang and luxurious creaminess of cream cheese. It’s a taste sensation that’s both nostalgic and incredibly sophisticated, guaranteeing smiles with every single forkful.
The Golden Foundation: Crafting Your Perfect Yellow Cake
Every masterpiece needs a solid foundation, and for our Yellow Cake With Chocolate Cream Cheese Frosting, that means a yellow cake that’s moist, tender, and bursting with buttery flavor. We’re talking perfection here, no dry crumbs allowed!
Gathering Your Golden Treasures (Ingredients)
- 2 ½ cups all-purpose flour
- 1 ½ cups granulated sugar
- 1 tablespoon baking powder
- ½ teaspoon salt
- 1 cup (2 sticks) unsalted butter, softened
- 4 large egg yolks, plus 2 whole large eggs, at room temperature
- 1 teaspoon vanilla extract
- 1 cup whole milk, at room temperature
The Art of Mixing: Step-by-Step Yellow Cake Mastery
- Prep Your Stage: Preheat your oven to 350°F (175°C). Grease and flour two 8 or 9-inch round cake pans, or line with parchment paper circles. This step is non-negotiable for easy release!
- Whisk the Dry Squad: In a medium bowl, whisk together the flour, sugar, baking powder, and salt. Set aside.
- Cream the Dream: In a large bowl with an electric mixer (or stand mixer with paddle attachment), beat the softened butter on medium-high speed until light and fluffy, about 2-3 minutes. This creaming action incorporates air, leading to a lighter cake.
- Eggs-cellent Addition: Add the egg yolks one at a time, beating well after each addition. Then, add the two whole eggs, again beating until just combined. Scrape down the sides of the bowl as needed. Stir in the vanilla extract.
- Alternate & Conquer: With the mixer on low speed, gradually add the dry ingredients to the wet ingredients in three additions, alternating with the milk in two additions. Begin and end with the dry ingredients. Mix until just combined after each addition; do not overmix, or you’ll develop the gluten too much, leading to a tough cake.
- Portion & Bake: Divide the batter evenly between your prepared cake pans. Bake for 25-30 minutes, or until a wooden skewer inserted into the center comes out clean.
- Cool Down: Let the cakes cool in their pans on a wire rack for 10-15 minutes before inverting them onto the rack to cool completely. Patience, young padawan! Frosting a warm cake is a recipe for a melted mess.
Baking Brilliance: Tips for a Flawless Finish
- Room Temperature is Key: Ensure your butter, eggs, and milk are all at room temperature. This allows them to emulsify properly, creating a smoother, more uniform batter and a finer crumb.
- Don’t Overmix: As tempting as it is, overmixing develops gluten, leading to a dense, tough cake. Mix until just combined.
- Measure Accurately: Especially with flour, use a kitchen scale for best results, or spoon flour into your measuring cup and level it off with a straight edge.
The Velvety Crown: Whipping Up the Dreamy Chocolate Cream Cheese Frosting
Now for the star that truly elevates this dessert into the stratosphere: the Chocolate Cream Cheese Frosting! It’s rich, it’s tangy, it’s chocolatey, and it’s surprisingly easy to make. Get ready for some serious frosting finesse.
Your Frosting Arsenal (Ingredients)
- 8 ounces (226g) cream cheese, softened
- ½ cup (1 stick) unsalted butter, softened
- 4 cups powdered sugar, sifted
- ¾ cup unsweetened cocoa powder, sifted
- 1-2 tablespoons whole milk or heavy cream
- 1 teaspoon vanilla extract
- Pinch of salt
From Humble Beginnings to Frosting Fantasy (Instructions)
- Cream Cheese & Butter Bliss: In a large bowl with an electric mixer, beat the softened cream cheese and butter together on medium speed until smooth and creamy, about 2-3 minutes. Make sure there are no lumps of cream cheese!
- Cocoa Power: Reduce speed to low and gradually add the sifted cocoa powder, mixing until just combined.
- Powdered Sugar Perfection: Slowly add the sifted powdered sugar, about a cup at a time, mixing on low until fully incorporated before adding more. The mixture will be thick.
- Liquid Luxury: Add the vanilla extract, salt, and 1 tablespoon of milk or cream. Beat on medium speed until light and fluffy, adding the second tablespoon of milk or cream if needed to reach your desired consistency. You want it spreadable but firm enough to hold its shape.
Assembly & Presentation: Making Your Cake a Showstopper
You’ve baked your golden cakes and whipped up your dreamy frosting. Now comes the moment of truth: assembly! This is where your Yellow Cake With Chocolate Cream Cheese Frosting transforms into a work of art.
- Level Up (Optional): If your cake layers have domed tops, use a serrated knife to carefully level them. This creates a flat surface for stacking and a professional look.
- Crumb Coat Magic: Place one cake layer on your serving plate or cake stand. Spread a thin layer of frosting evenly over the top – this is your “crumb coat” and it traps any loose crumbs, ensuring a smooth final finish.
- Chill Out: Pop the cake into the refrigerator for 15-20 minutes to let the crumb coat set. This step is a game-changer!
- Stack ‘Em High: Once chilled, place the second cake layer on top. Apply the remaining frosting generously, spreading it evenly over the top and sides of the cake. Use an offset spatula or butter knife for smooth application.
- Decorate to Delight: Get creative! You can swirl the frosting, add chocolate shavings, sprinkles, or even pipe some decorative borders. This cake is already a star, but a little pizzazz never hurt anyone.
Troubleshooting & Pro Tips for Yellow Cake With Chocolate Cream Cheese Frosting
Even the most seasoned bakers run into a snag or two. Here’s a quick guide to common issues and how to become a kitchen wizard!
Common Cake Woes & Wonderful Solutions
| Problem | Possible Cause | Solution/Pro Tip |
|---|---|---|
| Dry Cake | Overmixing, too much flour, overbaking. | Measure accurately, don’t overmix, check for doneness early. Ensure room temp ingredients. |
| Dense/Tough Cake | Overmixing, too much gluten development. | Mix until just combined; use a light hand. |
| Crumbly Cake | Not enough fat/moisture, overbaking. | Ensure butter/milk amounts are correct. Don’t bake past the skewer test. |
| Melted Frosting | Ingredients too warm, adding too much liquid. | Use softened, but not warm, cream cheese/butter. Add milk gradually. If it melts, chill briefly and re-beat. |
Expert Insights & Smart Substitutions
- Buttermilk Boost: For an even more tender and moist yellow cake, substitute the whole milk with buttermilk. The acidity reacts with the baking powder, resulting in a lighter crumb.
- Chocolate Intensity: Adjust the amount of cocoa powder in the frosting to your liking. For a darker, more intense chocolate flavor, add an extra tablespoon or two.
- Make-Ahead Magic: You can bake the cake layers a day in advance, wrap them tightly in plastic wrap, and store them at room temperature. The frosting can also be made a day ahead and stored in the fridge; just bring it to room temperature and re-whip before using.
Frequently Asked Questions About Yellow Cake With Chocolate Cream Cheese Frosting
Q1: Can I use store-bought yellow cake mix for this recipe?
A1: Absolutely! While our homemade yellow cake is truly special, you can definitely use a high-quality box mix for the cake layers if you’re short on time. Just follow the package directions for baking, and then proceed with our amazing chocolate cream cheese frosting!
Q2: How do I store my Yellow Cake With Chocolate Cream Cheese Frosting?
A2: Because of the cream cheese in the frosting, this cake should be stored in an airtight container in the refrigerator. It will stay fresh and delicious for 3-5 days. Bring it to room temperature for about 30 minutes before serving for the best flavor and texture.
Q3: Can I freeze slices of the cake?
A3: Yes, you can! Wrap individual slices tightly in plastic wrap, then place them in a freezer-safe bag or container. They’ll keep well for up to 2-3 months. Thaw in the refrigerator overnight or at room temperature for a few hours.
Q4: My frosting is too stiff/too runny, what do I do?
A4: If your frosting is too stiff, add a teaspoon of milk or cream at a time, beating until it reaches the desired consistency. If it’s too runny, add a tablespoon or two more of sifted powdered sugar until it thickens up. A few minutes in the fridge can also help a runny frosting firm up a bit.
Q5: What’s the secret to getting a truly yellow cake, not just a pale one?
A5: The key to that beautiful golden hue lies in using more egg yolks than whole eggs. Our recipe calls for 4 egg yolks and 2 whole eggs, which contributes significantly to both color and richness. High-quality butter also plays a role!
Your Dessert Destiny Awaits!
There you have it, fellow baking adventurers! You are now equipped with all the knowledge, tips, and tricks to conquer the kitchen and create the most magnificent Yellow Cake With Chocolate Cream Cheese Frosting imaginable. This isn’t just a recipe; it’s an experience, a delightful journey culminating in a dessert that’s pure joy on a plate. So, what are you waiting for? Gather your ingredients, put on your favorite apron, and let the magic begin! Your taste buds (and everyone else’s) will thank you. Go forth and bake, you culinary wizard, you!

