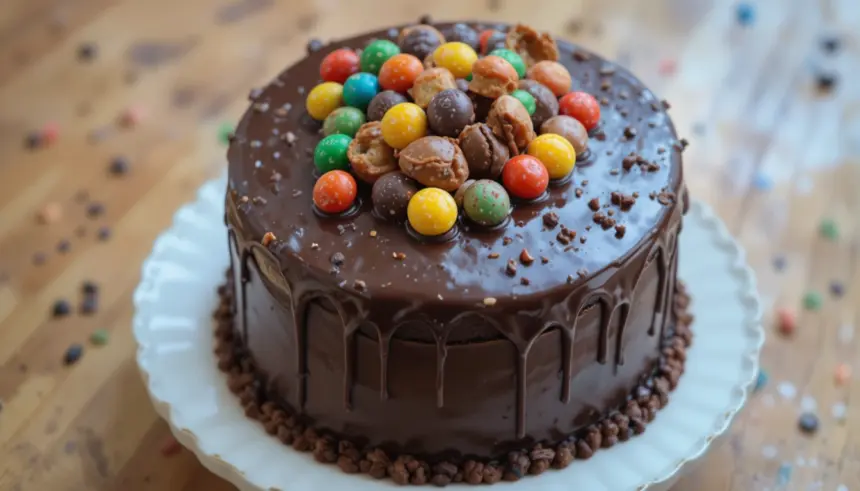
Picture this: a rich, decadent chocolate cake, its frosting gleaming under the lights, and then, a glorious explosion of color and texture on top—your favorite candy bars, chopped, drizzled, and strategically placed. No, this isn’t a dream! This is the magnificent reality of a Chocolate Cake With Candy Bars On Top, a dessert that promises not just a sugar rush but an unforgettable experience. Forget boring birthday cakes; we’re talking about a showstopper, a conversation starter, a dessert that screams “FUN!” and “indulgence” in every single bite. As an expert in all things sweet and celebratory, I’m here to guide you through crafting this whimsical masterpiece that’s guaranteed to be the star of any gathering. Let’s dive into the delicious world where classic chocolate meets playful confectionery chaos!
Why This Cake Is Your Next Celebration Sensation
A standard chocolate cake is wonderful, but a Chocolate Cake With Candy Bars On Top elevates the experience to an entirely new level. It’s more than just a dessert; it’s an edible artwork that celebrates joy, creativity, and the pure, unadulterated pleasure of sweet treats.
The Irresistible Combination: Classic Meets Crazy
There’s a reason chocolate cake remains a beloved classic. Its deep, comforting flavors provide the perfect canvas for a playful array of candy bars. The contrast in textures—the moist crumb of the cake, the smooth ganache, the chewy nougat, the crispy wafers, and the crunch of nuts from various candy bars—creates a symphony in your mouth. Each bite offers a new discovery, a different flavor profile, making this cake infinitely more exciting than its traditional counterparts.
A Feast for the Eyes (and Taste Buds!)
Let’s be honest, we eat with our eyes first! A Chocolate Cake With Candy Bars On Top is visually stunning. The vibrant colors of candy bar wrappers, the varied shapes and sizes of chopped chocolate, caramel, and peanut goodness, all artfully arranged, make for an incredibly appealing presentation. It’s an instant mood lifter and undeniably Instagram-worthy. Your guests will be clamoring for a slice, and a photo op!
Customization Galore
This cake is your personal playground! Whether you’re a fan of gooey caramel, crunchy nuts, chewy nougat, or crisp wafers, there’s a candy bar (or five!) that fits your craving. This level of customization allows you to tailor the cake to the specific tastes of the honoree or the theme of the party, making it truly unique every single time you make it. It’s an interactive dessert, even before it’s cut!
Crafting Your Masterpiece: The Chocolate Cake Base
Every great candy bar creation starts with an impeccable foundation. For a Chocolate Cake With Candy Bars On Top, that means a rich, moist, and deeply chocolatey cake base that can stand up to the extravagance of its toppings.
Choosing Your Chocolate Champion
While a boxed mix can work in a pinch, for true E-E-A-T-level expertise, I recommend a scratch-made cake. Here are a few reliable options:
- Classic Devil’s Food Cake: Known for its intense cocoa flavor and incredibly moist, tender crumb.
- Rich Chocolate Fudge Cake: Often uses melted chocolate in addition to cocoa powder for a denser, almost brownie-like texture.
- Buttermilk Chocolate Cake: The buttermilk reacts with cocoa to create a vibrant color and incredibly tender texture.
Expert Tip: Always use good quality cocoa powder (Dutch-processed for a darker, less acidic flavor, or natural for a brighter chocolate note) and fresh ingredients. Overmixing leads to tough cake, so mix just until combined!
The Art of the Frosting
The frosting not only acts as the “glue” for your candy bars but also contributes significantly to the overall flavor profile. For a Chocolate Cake With Candy Bars On Top, you want something sturdy yet smooth, complementing the chocolate cake without overpowering it.
- Chocolate Buttercream: A classic for a reason. Fluffy, sweet, and rich.
- Cream Cheese Frosting: Adds a delightful tang that cuts through the sweetness of the chocolate and candy.
- Chocolate Ganache: A glossy, deep chocolate coating that sets beautifully and provides a stunning backdrop for the candy. It can be poured when warm for a drip effect or whipped for a lighter texture.
Expert Tip: If using buttercream, ensure your butter is at room temperature. For ganache, use high-quality chocolate chips or finely chopped bar chocolate for the best melt and flavor.
The Candy Bar Extravaganza: Selecting Your Toppings
This is where the fun truly begins! Choosing the candy bars for your Chocolate Cake With Candy Bars On Top is an adventure in itself. Think about variety in flavor, texture, and color.
A Spectrum of Sweetness: What Works Best?
The key is to have a mix. You don’t want all crunchy or all chewy. Aim for balance:
- Chewy & Caramel: Snickers (peanuts, caramel, nougat), Twix (cookie, caramel, chocolate), Milky Way (nougat, caramel), Caramello (flowing caramel).
- Crunchy & Crispy: Kit Kat (wafers), Butterfinger (crisp peanut butter core), Crunch Bar (crisped rice), Heath Bar/ Skor (toffee).
- Nutty: Reese’s Peanut Butter Cups (mini or full-size, chopped), Almond Joy/Mounds (coconut, almonds).
- Fruity/Gummy (Use Sparingly!): While less traditional, some might enjoy a pop of color and chew from Skittles or M&M’s, but avoid anything too sour or intensely fruity that might clash with the chocolate.
Preparation Pointers for Perfect Placement
Before you start decorating, a little prep goes a long way:
- Chill Your Bars: Firm candy bars are easier to chop cleanly. Pop them in the fridge for 15-20 minutes.
- Chop Strategically: Decide if you want fine crumbles, chunky pieces, or a mix. Use a sharp knife. For softer bars, you might find kitchen shears work well.
- Variety in Size: Some larger, identifiable pieces (like half a mini Snickers) can create visual interest alongside smaller crumbles.
To help you brainstorm, here’s a quick table of popular candy bars and their primary attributes for your Chocolate Cake With Candy Bars On Top:
| Candy Bar | Key Flavors/Textures | Visual Appeal | Best For… |
|---|---|---|---|
| Snickers | Nuts, caramel, nougat, chocolate | Chunky, varied textures | Adding substance and chew |
| Kit Kat | Crispy wafer, chocolate | Layered, light crunch | Texture contrast, border designs |
| Reese’s PB Cups | Peanut butter, chocolate | Distinct color, iconic shape (when whole) | Classic flavor pairing, vibrant yellow |
| Twix | Cookie, caramel, chocolate | Textural contrast (cookie crunch) | Adding a buttery note and crunch |
| Butterfinger | Crispy peanut butter core, chocolate | Bright orange, shattery texture | Explosive crunch, unique flavor |
Assembly & Presentation: Making It Pop!
Once your chocolate cake is baked and frosted, it’s time for the grand finale: adorning it with the candy bar bounty. This is where your inner artist shines!
Strategic Placement for Maximum Impact
- The Foundation: Ensure your cake is fully cooled and frosted. If using ganache, let it set slightly.
- The Edge Appeal: For a dramatic effect, consider pressing whole mini candy bars or vertically aligned candy bar pieces (like Kit Kat fingers or Twix bars) around the circumference of the cake. This creates a fantastic “fence” and a substantial border.
- The Cascade: Start by arranging larger, more distinct pieces of chopped candy bars (e.g., half a Reese’s, a chunk of Snickers) over the top, focusing on an even distribution or creating a slight mound in the center.
- The Fillers: Use smaller crumbles and pieces to fill in gaps, ensuring every inch of the top surface is covered in deliciousness.
- The Drizzle (Optional but Recommended): A final drizzle of melted chocolate, caramel sauce, or even white chocolate can tie everything together visually and add another layer of flavor.
Creative Edging and Embellishments
Beyond just piling on the candy, think about how you can elevate the design:
- Crushed Cookie Crumbs: Oreo or Graham cracker crumbs can add another layer of texture around the base or edges.
- Chocolate Shavings: A sprinkle of elegant chocolate shavings can contrast with the ruggedness of the candy bars.
- Sprinkles: If the party calls for extra color, a handful of coordinating sprinkles can be a fun addition.
Beyond the Basic: Advanced Candy Bar Cake Techniques
Feeling adventurous? Let’s push the boundaries of your Chocolate Cake With Candy Bars On Top to create an even more spectacular dessert.
Layered Candy Bar Fillings
Why stop at the top? Consider crushing some candy bars and folding them into your cake batter before baking for hidden pockets of joy. Or, even better, create a candy bar filling between cake layers! Imagine a layer of caramel and chopped Snickers nestled between two chocolate cake layers, sealed with buttercream. Pure bliss!
Drip Glaze Magic
A chocolate or caramel drip glaze adds a sophisticated, professional touch. Apply a slightly warm, pourable ganache or caramel sauce to the top edge of your chilled cake, letting it drip artfully down the sides before adding your candy bar toppings. This creates a stunning backdrop and an extra layer of flavor.
Themed Candy Bar Cakes
Got a favorite candy? Dedicate your cake to it! A “Snickers Lovers” cake could feature chopped Snickers in the batter, Snickers-flavored buttercream, a caramel drip, and a generous topping of Snickers pieces. The possibilities are endless!
Tips for Storing Your Sweet Creation
Once your magnificent Chocolate Cake With Candy Bars On Top is complete, you’ll want to ensure it stays fresh and delicious.
- Room Temperature (Short Term): If consuming within 1-2 days, and your frosting is buttercream or ganache (without cream cheese), the cake can generally be stored in an airtight container at cool room temperature. Avoid direct sunlight or warm environments.
- Refrigeration (Long Term/Cream Cheese Frosting): For longer storage (up to 5 days) or if using cream cheese frosting, refrigerate the cake in an airtight container.
- Serving Chilled Cake: If refrigerated, allow the cake to come to room temperature for at least 30-60 minutes before serving. This improves the texture of both the cake and the frosting.
- Freezing: Leftover slices can be individually wrapped in plastic wrap and then foil, and frozen for up to 1 month. Thaw in the refrigerator overnight.
Frequently Asked Questions (FAQ)
Q1: Can I use different types of cake for a Chocolate Cake With Candy Bars On Top?
A1: Absolutely! While chocolate is a classic pairing, a vanilla or yellow cake can also serve as a delightful base, especially if you want the chocolate from the candy bars to be the primary chocolate flavor. Just ensure the base cake is sturdy enough to hold the toppings.
Q2: How far in advance can I make the cake?
A2: You can bake the cake layers 2-3 days in advance and store them, well-wrapped, at room temperature or refrigerated. The cake can be assembled and decorated with candy bars 1 day in advance. Fresher is always better for the candy bar crunch!
Q3: Will the candy bars get soggy on top of the cake?
A3: Most candy bars, especially those with crispy components, will retain their texture for a good 24-36 hours on top of a frosted cake, especially if stored properly. Very soft or gummy candies might soften faster. If moisture is a concern, consider adding those types of candies closer to serving time.
Q4: What if I have nut allergies in my group?
A4: This is a crucial consideration. If there are nut allergies, you must carefully select nut-free candy bars (e.g., Milky Way, certain types of M&M’s, Kit Kat—always check labels as ingredients can change and cross-contamination is a risk) or opt for entirely nut-free toppings. Clearly label the cake as containing or not containing nuts.
Q5: Can I make a smaller version of this cake?
A5: Yes! The concept translates perfectly to cupcakes, a smaller 6-inch cake, or even a sheet cake. Simply adjust the quantity of candy bars needed. For cupcakes, chop candy bars into very small pieces or use mini versions.
Conclusion: Your Candy Bar Cake Adventure Awaits!
There you have it—your comprehensive guide to creating a truly unforgettable Chocolate Cake With Candy Bars On Top. From choosing the perfect chocolate base and luxurious frosting to curating an epic candy bar collection and artfully arranging them, every step is an opportunity for fun and creativity. This isn’t just a dessert; it’s a statement, a centerpiece, and a testament to the joy of sweet indulgence. So, gather your ingredients, unleash your inner pastry architect, and prepare to delight everyone with a cake that’s as playful as it is delicious. Don’t just bake a cake, create an experience! Go forth and build your masterpiece, and don’t forget to share your amazing creations with the world!
