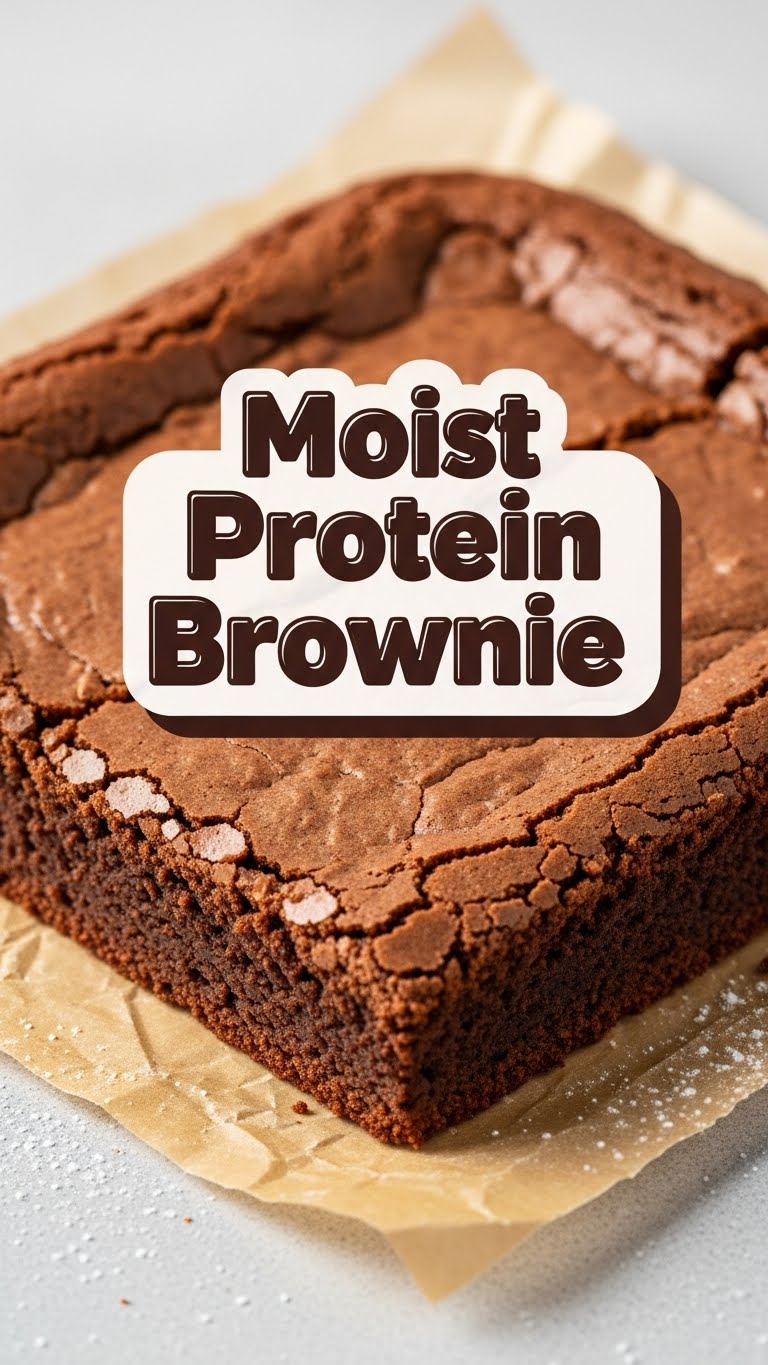
So you’re craving something tasty but too lazy to spend forever in the kitchen, huh? Same. Like, why can’t delicious food just magically appear? While we’re still waiting for that technology, I’ve got the next best thing: a recipe for Moist Protein Brownies that’s so ridiculously easy, you’ll wonder if you accidentally became a chef overnight. No fancy tools, no obscure ingredients, just pure, chocolatey, guilt-free-ish bliss. Ready to get your brownie on without breaking a sweat? Let’s do this!
Why This Recipe is Awesome
Okay, buckle up, buttercup, because this isn’t just *any* brownie recipe. This is THE brownie recipe for when you want to feel like a culinary genius but actually put in minimal effort. Here’s the lowdown on why these brownies are about to become your new best friend:
- It’s Idiot-Proof: Seriously, even I didn’t mess it up, and my kitchen skills sometimes involve setting off the smoke alarm while making toast. If you can stir, you can make these.
- Protein-Packed Power: We’re talking brownies that actually contribute to your gains! Or, you know, just make you feel less guilty about eating a whole tray. Your muscles (and your soul) will thank you.
- Ridiculously Moist: No dry, crumbly sadness here. We’re aiming for fudgy, melt-in-your-mouth perfection. Because life’s too short for dry brownies, right?
- Quick & Easy: From zero to hero in under an hour. You’ll spend more time picking a show to binge-watch than actually making these.
- Taste Bud Nirvana: Despite being “protein” brownies, they taste like the real deal. No weird aftertastes, just pure chocolate happiness.
Ingredients You’ll Need
Gather ’round, my fellow lazy gourmets! Here’s your shopping list. Most of this stuff you probably already have lurking in your pantry, you magnificent creature.
- 1/2 cup (113g) Unsalted Butter: The good stuff. Melted, please. Or coconut oil if you’re feeling tropical.
- 1 cup (200g) Granulated Sugar: Or coconut sugar for a slightly less refined vibe. Don’t skimp, this is a brownie, not a diet snack!
- 2 Large Eggs: Room temp if you’re fancy, straight from the fridge if you’re like me and forget everything.
- 1 tsp Vanilla Extract: The secret ingredient to making everything taste better. Don’t skip it!
- 1/2 cup (45g) Unsweetened Cocoa Powder: The darker, the better for that deep, rich chocolate flavor.
- 1/2 cup (60g) All-Purpose Flour: Just a little for structure. We’re not making a cake, we’re making a brownie.
- 1/4 cup (25g) Chocolate Protein Powder: Your secret weapon! Whey works great, but plant-based is fine too. Just make sure it’s a flavor you actually like.
- 1/2 tsp Baking Powder: Just enough lift to keep them light, not cakey.
- 1/4 tsp Salt: Crucial for balancing sweetness and enhancing all that chocolate goodness.
- 1/2 cup (85g) Chocolate Chips: Optional, but are they really? I think not. More chocolate is always the answer.
Step-by-Step Instructions
Alright, apron on (or not, I won’t judge), let’s bake some magic!
- Preheat & Prep: First things first, crank that oven to 350°F (175°C). Then, grab an 8×8 inch baking pan, grease it, and line it with parchment paper, leaving an overhang on the sides. This makes lifting the brownies out ridiculously easy. You’ll thank me later.
- Melt the Fat: In a medium microwave-safe bowl, melt your butter (or coconut oil). Don’t nuke it into oblivion, just until it’s liquid.
- Combine Wet Ingredients: Add the sugar to the melted butter and whisk vigorously for about a minute. You want it to be nice and smooth. Then, crack in the eggs, one at a time, whisking well after each addition. Stir in that glorious vanilla extract. It should look glossy and delicious already.
- Sift the Dry Stuff: In a separate bowl, whisk together the cocoa powder, flour, protein powder, baking powder, and salt. Make sure there are no lumps—nobody likes a lumpy brownie!
- Marry Them Together: Slowly add the dry ingredients to the wet ingredients. Mix gently with a spatula or wooden spoon until *just* combined. Do not overmix! Overmixing is the enemy of fudgy brownies. A few streaks of flour are totally fine.
- Fold in the Chips: Now for the best part! Gently fold in your chocolate chips. Scatter them evenly so every bite is a little piece of heaven.
- Pour & Bake: Pour the batter into your prepared pan and spread it evenly. Pop it into the preheated oven and bake for about 20-25 minutes. You’ll know they’re done when a toothpick inserted into the center comes out with moist crumbs, not wet batter. Remember, slightly underbaked is better than overbaked for fudgy goodness!
- Cool Down: This is the hardest part: let them cool completely in the pan on a wire rack. I know, I know, the smell is intoxicating, but resist the urge to cut into them immediately. Warm brownies are crumbly; cool brownies are perfect slices of joy. Once cool, use the parchment paper overhang to lift them out and slice ’em up!
Common Mistakes to Avoid
Listen, we all make mistakes. But with these brownies, let’s try to avoid the common pitfalls, okay? You’re better than that!
- Thinking you don’t need to preheat the oven: Rookie mistake! A cold oven equals unevenly baked brownies. Don’t be that person.
- Overmixing the batter: This is a big one! Mixing too much develops the gluten in the flour, leading to cakey, tough brownies instead of the fudgy, chewy kind we’re aiming for. Mix until *just* combined, then stop. Walk away from the bowl.
- Overbaking: The ultimate brownie killer. If you bake them until a toothpick comes out completely clean, they’re probably already dry. Look for moist crumbs. When in doubt, take them out!
- Not greasing AND lining your pan: You’ll regret it. Trust me. Getting sticky brownies out of a pan is a workout nobody asked for.
- Cutting them while warm: I get it, the temptation is real. But warm brownies are like toddlers—messy and prone to falling apart. Let them chill out for a bit to set properly.
Alternatives & Substitutions
Life’s all about options, and so are these brownies! Here are some ways to tweak this recipe to your heart’s content, because who says you can’t have it all?
- Flour Power: Not a fan of all-purpose? You can totally swap it for **almond flour** (use 1/2 cup + 2 tbsp as it absorbs more liquid) or even **oat flour** (use 1/2 cup). They might slightly change the texture, but still delish!
- Sweet Stuff: If you’re looking to cut down on sugar, feel free to use a sugar substitute like **erythritol** or a blend, but keep in mind it might affect the fudginess slightly. Maple syrup or honey could work but will add moisture and a distinct flavor profile.
- Fat Swaps: No butter? No problem! **Coconut oil** is a fantastic 1:1 substitute. You could also try a portion of unsweetened applesauce or mashed banana for some moisture and to reduce fat, but be warned, it will change the flavor and texture significantly—more cakey, less fudgy.
- Protein Powder Ponderings: I used chocolate whey, but **plant-based protein powders** (like pea or soy) work too! Just ensure it’s a flavor you enjoy, as it will definitely come through. Vanilla protein with extra cocoa powder could also be a fun experiment!
- Chocolate Chip Chaos: Go wild! White chocolate chips, dark chocolate chunks, peanut butter chips, or even a sprinkle of chopped nuts (walnuts or pecans are classic) are all fair game.
FAQ (Frequently Asked Questions)
Got questions? I’ve got answers. Probably. Let’s tackle some of the burning inquiries you might have.
- Can I make these vegan? Absolutely! Swap butter for vegan butter or coconut oil, and use flax eggs (1 tbsp ground flaxseed + 3 tbsp water per egg, let it sit for 5 mins) instead of regular eggs. Make sure your protein powder is plant-based, obviously!
- How long do these magical brownies last? If they even make it past day one, they’ll stay good in an airtight container at room temperature for up to 3-4 days. In the fridge? Maybe up to a week. But let’s be real, they won’t last that long.
- Can I use a different size pan? You can! An 9×9 inch pan will make them a bit thinner, so adjust baking time down by a few minutes. If you go for a smaller pan (like 7×7), they’ll be thicker and might need a few extra minutes. Just keep an eye on them!
- Are these *actually* healthy? Well, they have protein, which is good! And cocoa has antioxidants! But they also have sugar and fat. So, “healthier” is probably a better word. Everything in moderation, right? They’re a treat, enjoy them!
- My brownies are dry. What went wrong? You probably overbaked them. It’s a common culprit! Or maybe you used too much flour or too little fat. Next time, aim for that moist crumb on the toothpick, not fully clean.
- Can I freeze them? You bet! Wrap individual brownies tightly in plastic wrap, then pop them into a freezer-safe bag or container. They’ll last for a couple of months. Just thaw at room temp when the craving hits!
Final Thoughts
See? That wasn’t so hard, was it? You just whipped up a batch of delicious, fudgy, protein-packed brownies, and you barely broke a sweat. Now go impress someone—or yourself—with your new culinary skills. You’ve earned it! Grab a brownie (or three), put your feet up, and pat yourself on the back. You’re officially a Moist Protein Brownie master. Enjoy every glorious bite!

