
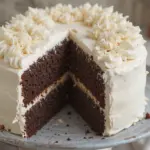
Ever wondered what happens when rich, velvety chocolate meets the creamy, dreamy embrace of peanut butter? Pure magic, that’s what! And nowhere is this culinary alchemy more perfectly demonstrated than in the magnificent creation known as the Chocolate Bundt Cake With Peanut Butter Filling. Forget your mundane desserts; we’re about to embark on an epicurean adventure that’s as fun to bake as it is to devour. Prepare your taste buds for a journey to ultimate decadence!
For those of us who live life with a spoon in hand and a passion for peanut butter, and who understand that chocolate isn’t just a treat but a way of life, this cake is your spirit animal. The Bundt cake, with its distinctive fluted design, offers a stunning presentation, while its deep, satisfying chocolate flavor provides the perfect counterpoint to a luscious, hidden peanut butter filling. It’s not just a cake; it’s an experience, a celebration, a grand gesture of love for all things delicious. Let’s get baking!
Mastering the Chocolate Bundt: Your Canvas for Culinary Art
Creating the perfect chocolate Bundt cake is foundational to our masterpiece. It needs to be moist, rich, and sturdy enough to hold its delightful secret. Here’s how we achieve Bundt brilliance.
Choosing Your Chocolatey Canvas: The Power of Cocoa
The soul of our chocolate cake lies in the quality of its cocoa. Don’t skimp here! I recommend a high-quality unsweetened natural cocoa powder for a deep, authentic chocolate flavor. Dutch-processed cocoa works too, but natural cocoa often reacts better with baking soda to create a lighter, more tender crumb. If you’re feeling extra fancy, a combination of cocoa powder and melted bittersweet chocolate can elevate the richness to stratospheric levels.
- Natural Cocoa: Brighter chocolate flavor, often used with baking soda.
- Dutch-Processed Cocoa: Smoother, darker, less acidic; pairs well with baking powder.
- Melted Chocolate: Adds unparalleled depth and moisture. Bittersweet or semi-sweet is ideal.
Bundt Pan Best Practices: The Great Release
Ah, the dreaded stick! A beautiful Bundt cake is useless if it’s cemented to the pan. Here’s the expert trick:
- Grease Generously: Use a solid shortening (like Crisco) or a quality non-stick baking spray with flour. I personally swear by a thin, even layer of melted shortening applied with a pastry brush, ensuring every nook and cranny is coated.
- Flour Power: Lightly dust the greased pan with cocoa powder (instead of flour) to prevent white patches on your dark cake. Rotate the pan to ensure an even coating, then tap out any excess.
- Chill Out: After flouring, pop the pan in the fridge for 10-15 minutes. This helps the grease and flour adhere better, creating a more robust non-stick barrier.
The Art of Mixing: A Delicate Balance
For a tender crumb, resist the urge to overmix! Once you add the dry ingredients to the wet, mix only until just combined. A few lumps are perfectly fine; overmixing develops gluten, leading to a tough, dry cake. Gentle folding is your friend here.
Baking for Bundt Brilliance: Timing is Everything
Oven temperatures can vary, so an oven thermometer is your best friend. Bake at the specified temperature (usually 325-350°F / 160-175°C) until a wooden skewer or toothpick inserted into the thickest part of the cake comes out with a few moist crumbs, but no wet batter. Don’t open the oven door too early, and definitely don’t overbake, or you’ll end up with a dry cake.
Here’s a quick reference for Bundt pan sizes and approximate baking times:
| Bundt Pan Size (Cups) | Approximate Baking Time (Minutes) | Yield (Servings) |
|---|---|---|
| 6-Cup | 30-40 | 6-8 |
| 10-Cup (Standard) | 50-65 | 10-12 |
| 12-Cup | 60-75 | 12-16 |
Peanut Butter Filling: The Creamy Dream Within
This is where our Chocolate Bundt Cake With Peanut Butter Filling truly shines! The filling needs to be rich, smooth, and peanut-butter-forward without being overly sweet.
The Perfect Peanut Butter: Choose Wisely
For this filling, creamy peanut butter is king. Natural peanut butter can sometimes be too oily or separate, leading to a runny filling. Stick to a good quality, commercial creamy peanut butter (like Jif or Skippy) for consistent texture and flavor. If you do use natural, make sure it’s well-stirred and try draining off some of the excess oil first.
Crafting the Silky Smooth Filling: Ingredients & Technique
Our filling is essentially a peanut butter buttercream, designed to be stable yet utterly delectable. Here’s the lineup and the magic process:
- 1/2 cup (113g) unsalted butter, softened
- 1 cup (240g) creamy peanut butter
- 2-3 cups (240-360g) powdered sugar, sifted (adjust to desired sweetness and consistency)
- 1/4 cup (60ml) whole milk or heavy cream (plus more if needed)
- 1 teaspoon vanilla extract
- Pinch of salt (enhances the peanut butter flavor!)
Method:
- In a large bowl, cream the softened butter until light and fluffy using an electric mixer.
- Add the peanut butter and beat until fully incorporated and smooth.
- Gradually add the sifted powdered sugar, alternating with the milk/cream and vanilla extract, starting and ending with powdered sugar. Beat on low speed until combined, then increase to medium-high and beat until light, fluffy, and spreadable. Add more milk or powdered sugar as needed to reach your desired consistency.
- Stir in the pinch of salt. Taste and adjust. Oh, this is the best part!
Assembling Your Masterpiece: The Big Reveal
The Great Unmolding: Patience, Young Padawan
Once your cake is baked, let it cool in the pan for about 10-15 minutes. This crucial step allows the cake to firm up slightly and pull away from the pan edges. Then, place a wire rack over the Bundt pan and, with confidence, invert the cake onto the rack. If you’ve prepped your pan correctly, it should slide right out! Let it cool completely before filling.
Filling Your Bundt’s Heart: A Sweet Surprise
Once the cake is completely cool, it’s time for the grand filling! You can pipe the peanut butter filling into the center cavity of the Bundt cake using a piping bag with a large round tip, or simply spoon it in, smoothing the top with an offset spatula. Ensure the filling is level with the top edge of the cake’s center hole.
Garnish Galore! The Finishing Touch
While the Chocolate Bundt Cake With Peanut Butter Filling is magnificent on its own, a little garnish never hurt anyone. Here are some playful ideas:
- Chocolate Ganache Drizzle: A simple ganache (equal parts hot cream and chopped chocolate) drizzled over the top adds elegance and more chocolatey goodness.
- Extra Peanut Butter Drizzle: Melt a little extra peanut butter with a touch of powdered sugar and milk for a contrasting drizzle.
- Chopped Peanuts or Peanut Butter Cups: For added texture and a visual cue to the filling within.
- Powdered Sugar Dusting: Simple, classic, and always beautiful.
Here’s a table of popular garnish pairings:
| Garnish Option | Flavor Profile | Texture |
|---|---|---|
| Chocolate Ganache | Rich, Sweet Chocolate | Smooth, Creamy |
| Crushed Peanuts | Nutty, Salty | Crunchy |
| Mini Peanut Butter Cups | Sweet, Salty, Chocolate-Peanut | Chewy, Solid |
| Powdered Sugar Dusting | Subtly Sweet | Fine, Soft |
Troubleshooting Your Bundt Bliss: Expert Solutions
Even the most seasoned bakers hit a snag sometimes. Here’s how to navigate common Bundt cake conundrums:
- Cake Sticking: Your pan wasn’t sufficiently greased and floured. Next time, be meticulous, get into every crevice, and try the fridge trick.
- Dry Cake: Likely overbaked. Invest in an oven thermometer, check for doneness early, and trust the “moist crumbs” toothpick test.
- Lopsided Cake: Your batter might not have been evenly distributed, or your oven has hot spots. Rotate the pan halfway through baking, and ensure the batter is level before baking.
- Filling Too Runny: Add more sifted powdered sugar, a tablespoon at a time, until it reaches the desired thickness.
- Filling Too Stiff: Add milk or cream, a teaspoon at a time, until it’s smooth and pliable.
FAQs: Your Chocolate Bundt Cake With Peanut Butter Filling Questions Answered!
Q1: Can I use a different type of chocolate for the Bundt cake?
Absolutely! While cocoa powder provides a deep chocolate flavor, you can experiment with melted dark chocolate (60-75% cacao) for an even richer, denser cake. Adjust the sugar slightly if using very dark chocolate. You can also add chocolate chips to the batter for little pockets of melty goodness!
Q2: How do I prevent my Bundt cake from sticking to the pan?
The secret is in the prep! Use a high-quality non-stick Bundt pan. Grease it thoroughly with solid vegetable shortening (like Crisco) or a baking spray containing flour, ensuring every crevice is coated. Then, dust with cocoa powder (for chocolate cakes) or flour, tapping out the excess. Chilling the prepared pan for 10-15 minutes before adding batter also helps!
Q3: Can the peanut butter filling be made ahead of time?
Yes, you can prepare the peanut butter filling up to 2-3 days in advance. Store it in an airtight container in the refrigerator. Before using, let it come to room temperature and then give it a good whip with an electric mixer to restore its creamy, spreadable consistency.
Q4: How long does the Chocolate Bundt Cake With Peanut Butter Filling last?
Stored at room temperature in an airtight container, the cake will stay fresh and delicious for 3-4 days. If refrigerated, it can last up to a week, but ensure it’s well-covered to prevent drying out. For best flavor, bring refrigerated cake to room temperature before serving.
Q5: What are some variations I can try with this Bundt cake?
The possibilities are endless! You could add a layer of chopped bananas to the center of the cake before adding the filling for a “chunky monkey” vibe. Or, swirl in some cream cheese frosting into the peanut butter filling for a tangier note. For a spiced twist, add a pinch of cinnamon or a dash of espresso powder to the chocolate cake batter to deepen its flavor. A salted caramel drizzle over the top would also be divine!
Conclusion: Your Bundt Cake Awaits!
There you have it – the ultimate guide to creating a truly unforgettable Chocolate Bundt Cake With Peanut Butter Filling. We’ve journeyed through the intricacies of a perfect chocolate Bundt, mastered the art of a silky-smooth peanut butter filling, and even tackled those pesky baking dilemmas. This isn’t just a dessert; it’s a statement, a showstopper, and a deeply satisfying culinary triumph. So, preheat your ovens, gather your ingredients, and prepare to delight friends, family, or just your fabulous self with this irresistible creation. Don’t just dream of this cake; go forth and bake it! And when you do, be sure to share your spectacular results – we can’t wait to see your Bundt cake brilliance!
