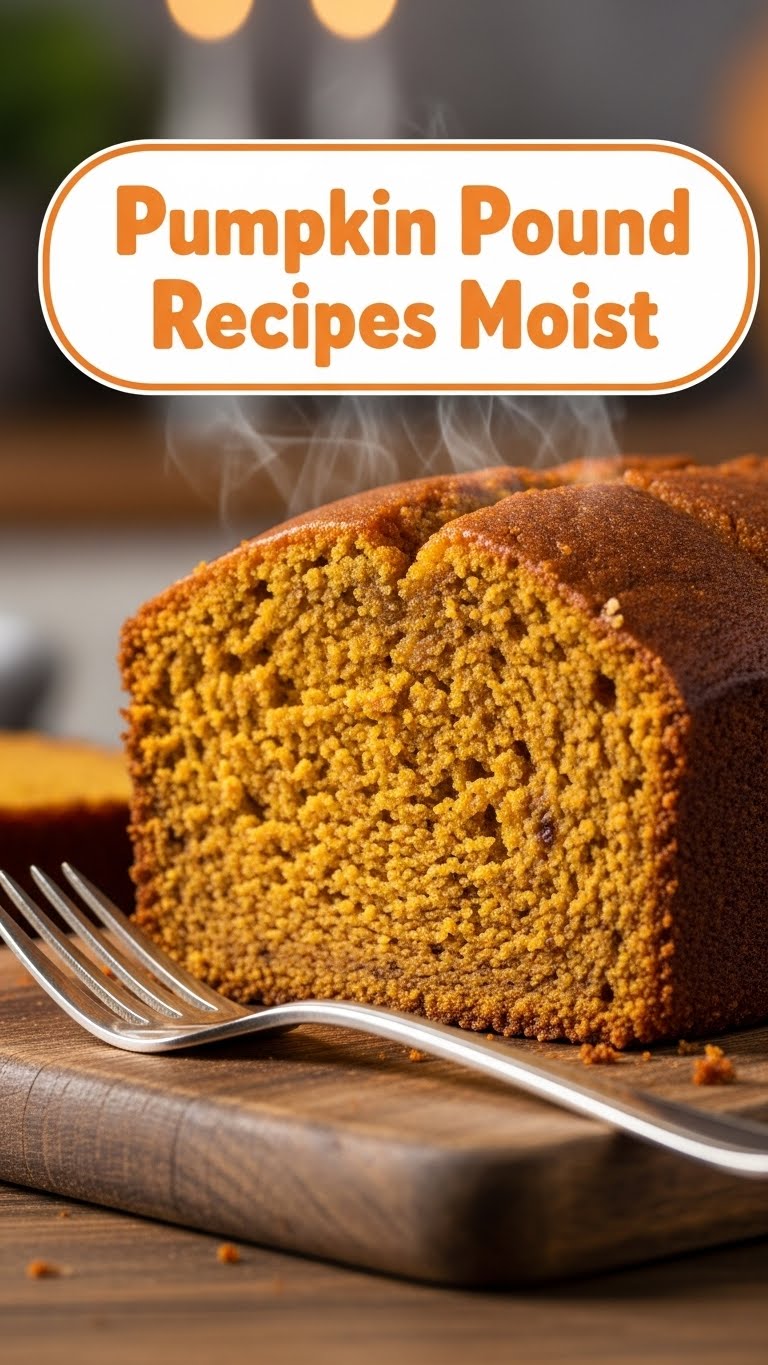
You know that feeling when autumn whispers, ‘pumpkin spice everything,’ but your energy screams, ‘make it easy, make it NOW’? Or maybe you just saw a picture of a ridiculously moist pumpkin cake and thought, “Yeah, I need that in my life, like, yesterday.” My friend, you’ve come to the right place. We’re about to dive into the kind of pumpkin pound cake that makes angels sing and your taste buds do a happy dance. No fuss, maximum flavor. Let’s do this!
Why This Recipe is Awesome
This isn’t just any pumpkin pound cake, my friend. This is *the* pumpkin pound cake. It’s so moist it practically apologizes for being so good. Seriously, you’ll wonder if you accidentally swapped flour for clouds. Plus, it’s pretty much foolproof. If I, a person who once set off the fire alarm with toast (don’t ask), can nail this, so can you. It’s the perfect balance of cozy, spicy, and “OMG, I made this?!” And because it’s a pound cake, it’s dense in the best possible way, meaning it holds its moisture like a champ. No dry cake nightmares here!
Ingredients You’ll Need
Gather your troops! Here’s what you’ll need to make magic happen:
- Unsalted Butter: 1 cup (2 sticks), softened to room temperature. Don’t even *think* about using cold butter unless you enjoy fighting with a mixer.
- Granulated Sugar: 1 ¾ cups. For that sweet, sweet magic.
- Large Eggs: 4, also at room temperature. Patience, grasshopper. It makes a difference!
- Vanilla Extract: 2 teaspoons. A splash of liquid gold for that warm, inviting aroma.
- All-Purpose Flour: 2 ½ cups. The backbone of our cake. Sift it if you’re feeling fancy, but no judgment if you don’t.
- Baking Powder: 1 teaspoon. For a little lift-off.
- Baking Soda: ½ teaspoon. Another lift agent, working with the pumpkin.
- Salt: ¾ teaspoon. Just a pinch, because every good cake needs balance.
- Ground Cinnamon: 2 teaspoons. Hello, autumn!
- Ground Nutmeg: 1 teaspoon. The unsung hero of pumpkin spice.
- Ground Ginger: ½ teaspoon. A little zing!
- Ground Cloves: ¼ teaspoon. Just a whisper for depth.
- Pumpkin Puree: 1 cup (from a can, not pie filling!). Unless you enjoy a very different (and probably too sweet) cake.
- Sour Cream: ½ cup, full-fat and at room temperature. Our secret weapon for ultimate moistness. You’re welcome.
Step-by-Step Instructions
Ready to bake? Let’s get down to business. Follow these simple steps for pumpkin perfection:
- Prep Your Stage: Preheat your oven to 325°F (160°C). Grease and flour a 9×5-inch loaf pan or a 10-cup Bundt pan. Don’t skip this, unless you want to wrestle your cake out later.
- Cream It Up: In a large bowl, using an electric mixer, beat the softened butter and granulated sugar together until they’re light and fluffy. This should take about 3-5 minutes. **Don’t rush this step; it incorporates air for a lighter crumb!**
- Egg-cellent Additions: Add the eggs one at a time, beating well after each addition. Then stir in the vanilla extract. Scrape down the sides of the bowl to make sure everything gets acquainted.
- Dry Mix Fun: In a separate medium bowl, whisk together the flour, baking powder, baking soda, salt, cinnamon, nutmeg, ginger, and cloves. Give it a good whisk to distribute all those yummy spices.
- Alternate & Combine: Now for the magic! Add about a third of the dry ingredients to the butter mixture, and beat until just combined. Then, add half of the pumpkin puree and sour cream, beating until smooth. Repeat with another third of the dry ingredients, then the remaining pumpkin and sour cream, and finally the last of the dry ingredients. **Be careful not to overmix**; stop as soon as the flour streaks disappear.
- Into the Pan: Pour the glorious batter into your prepared pan. Smooth the top with a spatula. Give the pan a gentle tap on the counter to release any trapped air bubbles.
- Bake Away: Bake for 60-75 minutes for a loaf pan, or 50-60 minutes for a Bundt pan. You’ll know it’s done when a wooden skewer or toothpick inserted into the center comes out clean or with just a few moist crumbs attached.
- Cool Down: Let the cake cool in the pan on a wire rack for about 15-20 minutes. Then, carefully invert it onto the rack to cool completely. Patience, my friend, is a virtue (and prevents your cake from falling apart).
Common Mistakes to Avoid
Even though this recipe is pretty bulletproof, there are a few rookie errors that can derail your pumpkin dreams. Learn from my past kitchen mishaps!
- Not Preheating the Oven: Seriously, it makes a difference! A cold oven won’t bake evenly, and your cake will suffer.
- Overmixing the Batter: Once you add the flour, mix *just* until combined. Overmixing develops the gluten too much, leading to a tough, dense cake. We want moist and tender, not a brick!
- Using Cold Ingredients: Butter, eggs, sour cream – room temp is key. They emulsify better and create a smoother, more uniform batter.
- Opening the Oven Door Too Early: Resist the urge! Opening the oven door lets out heat, causing your cake to sink. Wait until at least ⅔ of the baking time has passed.
- Using Pumpkin Pie Filling: This is a big one. Pumpkin puree is 100% pumpkin. Pie filling has added sugar and spices, which will throw off the balance of your cake. Read the label, my friend!
Alternatives & Substitutions
Feeling adventurous or just missing an ingredient? No stress! Here are some simple swaps:
- Sour Cream Swap: If you don’t have sour cream, **full-fat Greek yogurt** works beautifully for that same moistness.
- Spice Blend: Don’t have all the individual spices? No problem! You can use 2 ½ – 3 teaspoons of **pumpkin pie spice blend** instead. Just make sure it’s fresh.
- Glaze It Up: If you’re not a fan of plain cake (who are you?!), a simple glaze is easy. Whisk together 1 cup powdered sugar with 2-3 tablespoons milk (or orange juice for a zing!) and a splash of vanilla. Drizzle over the cooled cake.
- Add-ins: Feel free to fold in ½ cup of chopped walnuts, pecans, or even chocolate chips with the dry ingredients before combining with the wet. Adds a nice texture!
- Gluten-Free: You can absolutely try this with a 1:1 gluten-free baking flour blend. Results may vary slightly, but it should still be delicious.
FAQ (Frequently Asked Questions)
Got questions? I’ve got (casual, friendly, slightly sarcastic) answers!
- Can I use pumpkin pie spice instead of individual spices?
Absolutely! **(FYI: a good shortcut!)** Just use about 2 ½ to 3 teaspoons in place of the cinnamon, nutmeg, ginger, and cloves. Easy peasy! - My cake is dry, what happened?
Oh no! Usually, this means either you **overmixed the batter** (leading to a tough texture) or you **overbaked it** (sucking out all that lovely moisture). Keep an eye on that baking time! - Can I add nuts or chocolate chips?
Heck yes! Walnuts or pecans are classic, and white chocolate chips are divine with pumpkin. Just toss about ½ cup with a tablespoon of flour before adding to the batter to prevent them from sinking. - How long does this pumpkin pound cake last?
If it actually lasts (mine rarely does), it’ll be good for 3-4 days at room temperature, stored in an airtight container. It’ll last a week in the fridge, or you can freeze slices for up to 3 months. - Do I need a stand mixer for this recipe?
Nope! A hand mixer works perfectly fine, just make sure to use those arm muscles for the creaming stage. You can even do it by hand with a whisk and a strong arm, but I don’t recommend it if you value your time or sanity. - Can I make this in a different pan?
Sure! A Bundt pan works great (just reduce baking time by about 10-15 minutes). For muffins, you’d bake for about 20-25 minutes. Always do the toothpick test! - Is this really “moist” moist?
Oh honey, it’s *moist*. Like, “I can’t believe it’s not butter… oh wait, it *is* butter” moist. It’s the sour cream and pumpkin combo that brings the hydration party!
Final Thoughts
So there you have it, your ticket to pumpkin pound cake bliss. This recipe is designed to bring you maximum joy with minimal fuss, because life’s too short for complicated baking. Now go forth, conquer that kitchen, and bake something utterly delicious. And maybe, just maybe, share a slice or two (or don’t, I won’t tell). You’ve earned those bragging rights, you culinary wizard, you!

