Oh, hello there, fellow dessert enthusiast! Are you ready to dive into a world where rich, decadent chocolate cake meets a playful explosion of chocolate candies? Forget your worries for a moment, because we’re about to embark on a delightful journey to create not just a dessert, but a celebration. A Chocolate Cake With Chocolate Candies isn’t just food; it’s an experience, a memory in the making, and quite possibly, the most fun you can have with a whisk and an oven. From the moment you imagine it to the last delicious crumb, this cake promises pure, unadulterated joy. So, tie on your apron, crank up your favorite baking playlist, and let’s get messy (in the best way possible)!
Why a Chocolate Cake With Chocolate Candies is Pure Joy
Let’s be honest, chocolate cake is already a superstar. It’s the comfort food champion, the birthday hero, the “I-need-a-hug-in-cake-form” solution. But what happens when you introduce a vibrant, textured, and utterly charming ensemble of chocolate candies? Magic, my friends. Pure, unadulterated, sprinkle-coated magic! It elevates the humble chocolate cake from fantastic to phenomenal, adding layers of excitement that a plain cake just can’t match. It’s the culinary equivalent of putting a party hat on a masterpiece – a touch of whimsy that makes everyone smile.
The Thrill of Texture and Flavor Contrast
Imagine this: a bite of moist, tender chocolate cake, followed by the satisfying crunch of a candy-coated chocolate shell, or the creamy melt of an inner truffle-like filling. The juxtaposition of smooth, soft cake against the varied textures of chocolate candies is nothing short of brilliant. It’s a symphony for your taste buds, keeping every forkful interesting and surprising. This isn’t just about sweetness; it’s about the dance between different forms of chocolate, each contributing its unique personality to the party.
A Feast for the Eyes (and the Soul!)
Beyond the taste, a Chocolate Cake With Chocolate Candies is a visual spectacle. It’s bright, it’s colorful, it’s playful. It screams “fun!” and “celebration!” before anyone even takes a bite. Whether it’s for a child’s birthday, a festive gathering, or just a Tuesday that needs a little extra sparkle, this cake is guaranteed to be the centerpiece and a conversation starter. It’s an edible work of art that invites everyone to indulge their inner child.
Crafting Your Masterpiece: The Perfect Chocolate Cake Base
Every magnificent edifice needs a strong foundation, and our incredible Chocolate Cake With Chocolate Candies is no exception. We need a chocolate cake base that’s moist, rich, and robust enough to handle its candy crown. Forget dry, crumbly cakes; we’re aiming for a hug for your mouth!
Choosing Your Chocolate: The Heart of the Cake
The type of chocolate you use will profoundly impact the final flavor profile. Don’t skimp here; quality matters! Here are your prime contenders:
- Unsweetened Cocoa Powder: For a deep, intense chocolate flavor without added sweetness. Dutch-processed cocoa powder offers a darker hue and a milder, less acidic taste, while natural cocoa powder is fruitier and more intense.
- Melted Chocolate (Bars or Chips): Using high-quality dark or semi-sweet chocolate adds richness and a luxurious texture. Think 60-70% cacao for a balanced bitterness.
- A Combination: Often, the best chocolate cakes use both cocoa powder and melted chocolate for a complex, multi-layered flavor.
Key Ingredients for Moistness and Flavor:
Achieving that coveted moist texture isn’t just luck; it’s science and careful ingredient selection. My top tips:
- Buttermilk or Sour Cream: These acidic ingredients react with baking soda, leading to a tender crumb and incredible moisture.
- Oil and Butter: A combination often yields the best of both worlds – oil for consistent moistness and butter for rich flavor.
- Coffee (or Espresso): Don’t worry, your cake won’t taste like coffee! It simply deepens and enhances the chocolate flavor, making it more robust and nuanced.
- Good Vanilla Extract: A splash of high-quality vanilla is like a secret weapon, rounding out and brightening the chocolate notes.
Baking Best Practices for a Flawless Base:
- Room Temperature Ingredients: Ensures everything incorporates smoothly, leading to a uniform batter.
- Don’t Overmix: Overmixing develops gluten, resulting in a tough cake. Mix until just combined.
- Proper Pan Preparation: Grease and flour or use parchment paper to prevent sticking.
- Monitor Oven Temperature: An oven thermometer is your best friend. Uneven temperatures lead to uneven baking.
- Don’t Overbake: This is the cardinal sin! Use a skewer or toothpick test – if it comes out with moist crumbs, it’s done.
The Sweet Symphony: Choosing Your Chocolate Candies
Now for the fun part! The candies are the stars of our Chocolate Cake With Chocolate Candies, bringing personality, crunch, and color. This is where your creativity truly shines!
Candy Selection: A World of Possibilities
Consider a mix of shapes, sizes, and textures for maximum impact. Here are some crowd-pleasers:
- M&M’s (Regular, Peanut, Caramel): A classic for a reason! The candy shell adds a satisfying crunch, and the vibrant colors are irresistible.
- Chocolate Covered Pretzels: For that delightful salty-sweet crunch. Crush them or place them whole.
- Mini Chocolate Bars (Snickers, Milky Way, Kit Kat): Chop these up to add different chocolate textures and fillings.
- Whoppers or Malted Milk Balls: A light, airy crunch that contrasts beautifully with dense cake.
- Reese’s Peanut Butter Cups (Mini): For the peanut butter chocolate lovers, offering a creamy, salty-sweet pop.
- Chocolate Sprinkles or Jimmies: A foundational candy decoration, adding fine texture and a celebratory look.
- Chocolate Rocks or Pebbles: For a unique, earthy texture and a realistic “candy garden” effect.
To help you decide, here’s a table outlining some popular chocolate candies and their contributions:
| Candy Type | Texture Contribution | Flavor Profile | Visual Impact |
|---|---|---|---|
| M&M’s (Plain) | Crisp shell, soft chocolate center | Classic milk chocolate, sweet | Bright, vibrant dots of color |
| Mini Kit Kat Bars | Crunchy wafer, smooth chocolate | Sweet milk chocolate, subtle wafer | Geometric, layered appearance (chopped) |
| Whoppers | Airy, malty crunch | Sweet, distinct malted milk flavor | Spherical, rustic texture |
| Reese’s Mini PB Cups | Creamy peanut butter, firm chocolate shell | Sweet, salty, rich peanut butter | Distinctive orange/brown, iconic shape |
| Chocolate Covered Pretzels | Hard crunch, salty interior | Sweet chocolate, savory pretzel | Rustic, varied shapes, contrast |
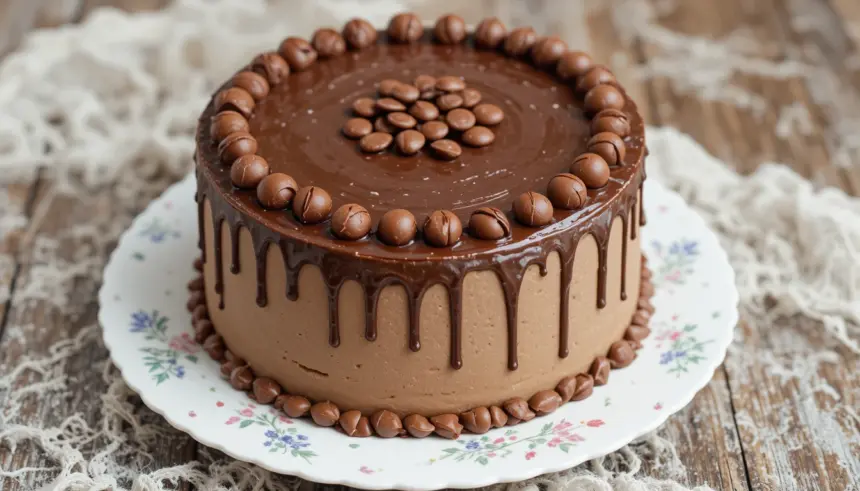
Decking the Halls (and the Cake!): Decorating with Delight
Once your chocolate cake is cooled and your candies are chosen, it’s showtime! The decorating phase is where your Chocolate Cake With Chocolate Candies truly comes alive. This is your canvas; unleash your inner artist!
Frosting Fun: The Sticky Foundation
You’ll need a frosting that’s both delicious and strong enough to hold your candy treasures. My go-to options:
- Classic Chocolate Buttercream: Rich, smooth, and holds candies beautifully. You can make it with cocoa powder or melted chocolate.
- Cream Cheese Frosting: Adds a tangy counterpoint to the sweetness of the cake and candies. Just make sure it’s firm enough.
- Ganache: A luxurious, pourable (or whipped) chocolate coating that sets up perfectly. Use a thicker consistency if you want candies to adhere to the sides.
Candy Placement Strategies:
- The “Pile it On” Method: For a truly decadent look, simply pile a generous mound of mixed chocolate candies right on top of your frosted cake. Let them tumble over the sides for an abundant, joyous effect.
- Concentric Rings: Arrange different types of candies in neat, concentric circles starting from the center outwards. This creates a very organized yet striking look.
- Side-Adhering Magic: Gently press smaller, flatter candies (like M&M’s or chopped chocolate bar pieces) onto the sides of your freshly frosted cake. Roll the cake in a tray of sprinkles or mini candies for an even coating.
- Candy “Drip”: If using a slightly looser ganache, apply a thick layer on top, then push candies into it. Some candies can be placed on the edges to catch the drips as they fall, creating a dynamic, playful appearance.
- Pattern Play: Use candies to create specific shapes, letters, or numbers for birthdays or special occasions.
Expert Tip: If your candies are prone to melting or have sensitive coatings, add them closer to serving time, especially if your cake will be at room temperature for a while. For refrigerated cakes, candies generally hold up very well.
Common Questions for Your Chocolate Candy Creation
You’ve got questions, and as your expert guide to the world of Chocolate Cake With Chocolate Candies, I’ve got answers!
FAQ:
Q1: How do I prevent candies from sinking into the cake batter if I want to bake them inside?
A1: For candies with hard shells (like M&M’s), you can lightly toss them in a tablespoon of flour before folding them into the batter. This creates a barrier that helps them suspend. However, for most chocolate candy cakes, the candies are best used as a topping or decoration *after* baking and frosting to preserve their texture and appearance.
Q2: Can I use non-chocolate candies on my chocolate cake?
A2: Absolutely! While our focus is on a “Chocolate Cake With Chocolate Candies,” you are the artist! Gummy bears, sour worms, or colorful sprinkles can add another layer of fun and color. Just ensure their flavors complement chocolate (e.g., fruity candies often pair well) and consider their texture alongside your cake.
Q3: How far in advance can I decorate my cake with chocolate candies?
A3: Most chocolate candies hold up well on a frosted cake for 1-2 days at room temperature (in a cool, dry place) or up to 3-4 days refrigerated. Candies with softer centers or those prone to moisture absorption (like malted milk balls in very humid conditions) might become slightly softer over time. For the freshest look and texture, decorating the day before or the day of serving is ideal.
Q4: What’s the best way to store a Chocolate Cake With Chocolate Candies?
A4: Store your cake in an airtight container at room temperature for up to 2-3 days, or in the refrigerator for up to 5 days. If refrigerating, let it come to room temperature for about 30-60 minutes before serving for the best flavor and texture.
Q5: My chocolate cake turned out dry! What went wrong?
A5: The most common culprit for dry cake is overbaking. Keep a close eye on your baking time and use the toothpick test. Other factors can include incorrect ingredient measurements (especially flour), oven temperature issues, or too little fat/liquid in the recipe. Always use reliable recipes and measure accurately!
Conclusion: Your Chocolate Candy Cake Adventure Awaits!
Phew! We’ve journeyed through the decadent depths of chocolate and emerged triumphantly with a treasure trove of tips for creating the ultimate Chocolate Cake With Chocolate Candies. This isn’t just about following a recipe; it’s about embracing the joy of baking, the thrill of creativity, and the sheer delight of bringing smiles to faces (including your own!). So go ahead, unleash your inner pastry architect, choose your favorite chocolate candies, and bake a cake that’s truly a party in every slice.
Don’t just dream about it; make it happen! Grab your ingredients, preheat your oven, and prepare for an explosion of chocolatey, candy-filled happiness. Share your creations with us – tag your photos or tell us about your favorite candy combinations. Happy baking, and may your cake be as joyful as you are!
