So, you’re craving something that screams “I’m fancy but also incredibly fun,” but you’re also kinda eyeing that comfy couch for a quick nap, huh? Same, friend, same. Welcome to the club! Today, we’re diving headfirst into a recipe that’s guaranteed to make your taste buds do a happy dance and impress anyone within a 5-mile radius, all without breaking a sweat. Or at least, not *too* much sweat. Say hello to the **Moist Cookies and Cream Cake** of your dreams!
Why This Recipe is Awesome
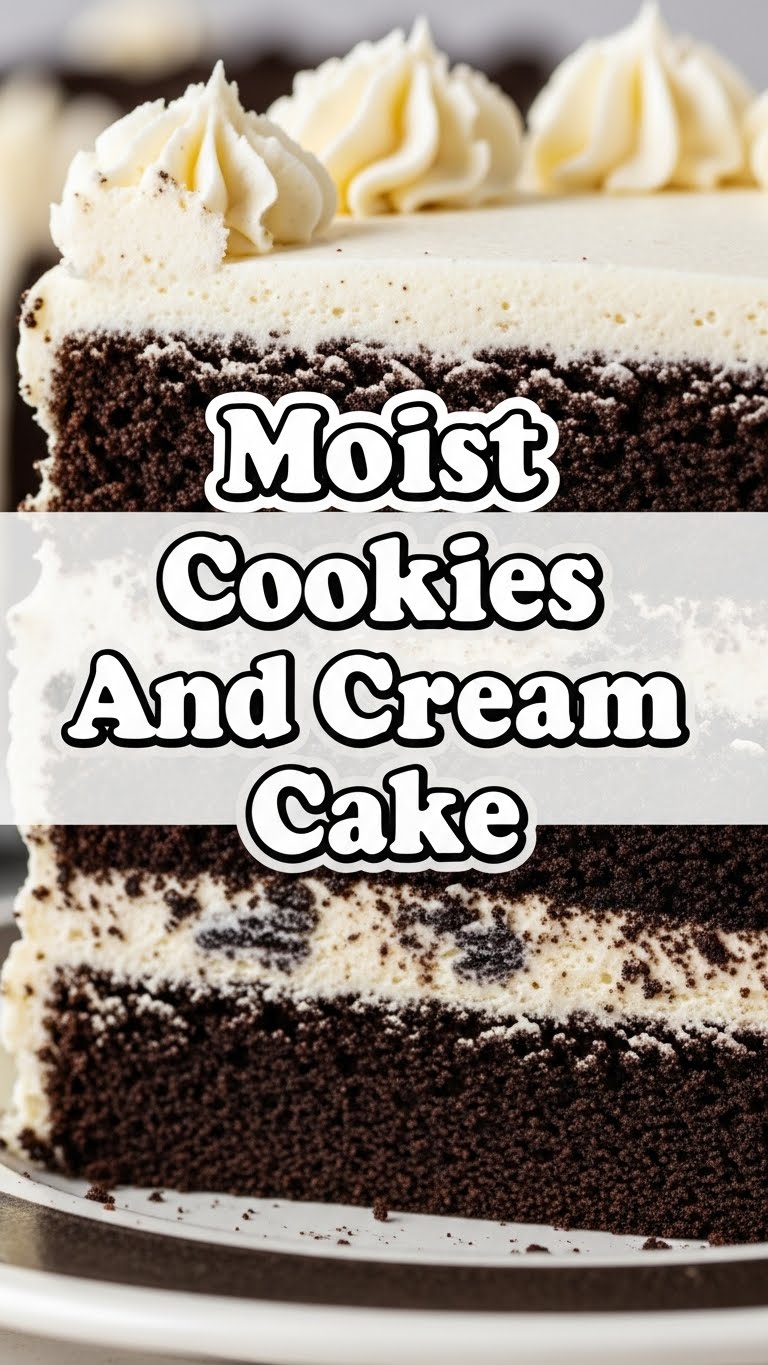
Let’s be real, life’s too short for dry, sad cake. This recipe? It’s the antithesis of sad. It’s moist, it’s decadent, and it’s packed with everyone’s favorite sandwich cookie – Oreos! Not only is it ridiculously delicious, but it’s also surprisingly straightforward. Seriously, it’s pretty much **idiot-proof**, even I didn’t mess it up on the first try, which is saying something. Plus, it just looks impressive. Think about it: a fluffy, vanilla-speckled cake dotted with cookie bits, smothered in a creamy, dreamy frosting. It’s a party in your mouth, and everyone’s invited!
Ingredients You’ll Need
Get ready to raid your pantry (or make a quick, joyful trip to the store). Here’s what you’ll be wrangling:
- For the Cake:
- 2 ½ cups All-Purpose Flour: The backbone of our cake. Don’t swap it for self-rising unless you’re feeling chaotic.
- 2 tsp Baking Powder: Our little lift-off specialist.
- ½ tsp Baking Soda: Its bubbly sidekick.
- ¼ tsp Salt: Don’t skip it! It brings out all the other flavors.
- 1 cup (2 sticks) Unsalted Butter, softened: Room temperature, please! Cold butter is a foe of creamy batters.
- 2 cups Granulated Sugar: For that sweet, sweet goodness. Measure it, don’t just eyeball it unless you like surprises (of the overly sweet or not sweet enough kind).
- 3 Large Eggs: Also room temp! It really does make a difference.
- 1 tbsp Vanilla Extract: Use good stuff here, it’s worth it. We’re talking pure vanilla, not the imitation impostor.
- 1 cup Buttermilk: Creates that tender crumb. If you don’t have it, no sweat: add 1 tbsp lemon juice or white vinegar to regular milk and let it sit for 5 mins. Voila!
- 1 ½ cups Crushed Oreo Cookies (about 15-18 cookies): The star of the show!
- For the Cookies and Cream Buttercream:
- 1 cup (2 sticks) Unsalted Butter, softened: Again, room temp is key for fluffy frosting.
- 4-5 cups Powdered Sugar (Confectioners’ Sugar): Sift it if you want to avoid lumps. I usually don’t, because #lazylife.
- 1 tsp Vanilla Extract: More vanilla, because why not?
- 3-4 tbsp Heavy Cream or Milk: Adjust for your desired consistency.
- 1 cup Crushed Oreo Cookies (about 10-12 cookies): Frosting needs cookies too!
- Pinch of Salt: To cut the sweetness just a tad.
Step-by-Step Instructions
Alright, apron on, good vibes only! Let’s get baking!
- Prep Your Stage: Preheat your oven to **350°F (175°C)**. Grease and flour two 8-inch round cake pans. Or, line with parchment paper circles if you’re feeling extra fancy and want zero sticking drama.
- Dry Mix Magic: In a medium bowl, whisk together the flour, baking powder, baking soda, and salt. Set aside. This ensures everything is evenly distributed.
- Cream Dream Team: In a large bowl with an electric mixer (or stand mixer, if you’re living the dream), beat the softened butter and granulated sugar together on medium-high speed until it’s light and fluffy. This usually takes about 3-5 minutes. Don’t rush this step; it incorporates air!
- Egg-cellent Addition: Add the eggs one at a time, beating well after each addition. Scrape down the sides of the bowl as needed. Stir in the vanilla extract.
- Alternate & Combine: Now, with the mixer on low speed, gradually add about a third of the dry ingredients to the butter mixture, followed by half of the buttermilk. Repeat this, ending with the last third of the dry ingredients. **Be careful not to overmix!** Mix just until combined. Overmixing = dense cake, and we want fluffy cake!
- Oreo Time! Gently fold in the 1 ½ cups of crushed Oreos with a spatula. Don’t go wild; we want chunks, not dust.
- Into the Pans: Divide the batter evenly between your prepared cake pans. Smooth the tops with a spatula.
- Bake It Off: Bake for **28-32 minutes**, or until a wooden skewer or toothpick inserted into the center comes out clean.
- Cool Down: Let the cakes cool in their pans for about 10-15 minutes before inverting them onto a wire rack to cool completely. **Patience is a virtue here!** Trying to frost a warm cake is a one-way ticket to a melted mess.
- Frosting Frenzy: While the cakes are cooling, make the buttercream. In a large bowl, beat the softened butter until creamy (about 2 minutes). Gradually add the powdered sugar, a cup at a time, mixing on low until combined, then increasing speed. Add the vanilla, heavy cream/milk, and pinch of salt. Beat on medium-high until light and fluffy (another 3-5 minutes).
- Final Flourish: Gently fold in the 1 cup of crushed Oreos into the buttercream.
- Assemble Your Masterpiece: Once the cakes are completely cool, spread a generous layer of frosting on top of the first cake layer, then carefully place the second cake layer on top. Frost the top and sides of the entire cake. Garnish with a few extra Oreos if you’re feeling extra.
Common Mistakes to Avoid
We all make mistakes, but let’s try to dodge these common cake pitfalls, shall we?
- Cold Ingredients: Using cold butter or eggs is a rookie mistake. **Always bring your dairy and eggs to room temperature** for a smoother, fluffier batter.
- Overmixing the Batter: This is a biggie! Once the wet and dry ingredients are combined, stop mixing. Overmixing develops gluten, leading to a tough, dry cake. Nobody wants that!
- Not Greasing Your Pans Properly: Thinking you can get away with a quick spray? Think again! Take the extra minute to grease *and* flour thoroughly, or use parchment paper. It saves you from a crumbled cake tragedy.
- Opening the Oven Door Too Often: Resist the urge to peek! Every time you open that door, the temperature drops, messing with your cake’s rise. Only open it when it’s almost time to check for doneness.
- Frosting a Warm Cake: Unless you’re going for a deconstructed cake soup look, make sure your cakes are **completely cool** before you even think about frosting.
Alternatives & Substitutions
Feeling adventurous? Or just missing an ingredient? No stress, we’ve got options!
- Dairy-Free Delight: You can absolutely make this cake dairy-free! Swap out the butter for a good quality plant-based butter (like Miyoko’s or Earth Balance sticks), use plant-based milk + lemon juice for “buttermilk,” and grab some dairy-free cream for the frosting. Don’t forget to check your Oreos are dairy-free (most are, but always good to double-check).
- Different Cookies? While Oreos are classic, you could totally experiment with other chocolate sandwich cookies. Or hey, even use graham crackers for a s’mores vibe. (But IMO, Oreos are king here).
- Less Sweet? You can slightly reduce the sugar in both the cake and frosting by about ¼ cup each. Just know it might alter the texture slightly, but if you prefer things less sweet, go for it!
- Cake Flour: Want an even tenderer cake? Substitute 2 tablespoons of all-purpose flour per cup with cornstarch for a DIY cake flour, or just use store-bought cake flour. You’ll need about 2 ¼ cups.
FAQ (Frequently Asked Questions)
Got questions? I’ve got (casual) answers!
- Can I use margarine instead of butter? Well, technically yes, but why hurt your soul like that? Butter provides a richer flavor and better texture. If you must, use stick margarine, but expect a slight difference.
- My cake is dry! What did I do wrong? Most likely, it was overbaked. **Invest in an oven thermometer!** Ovens can lie, and baking too long is the number one cause of dry cakes. Also, make sure you measured your flour correctly (spoon and level, don’t scoop directly from the bag).
- Can I make this into cupcakes? Absolutely! Divide the batter into cupcake liners and bake for about 18-22 minutes, or until a toothpick comes out clean. Perfect for individual portions!
- How long will this cake last? If stored in an airtight container at room temperature, it’s generally good for 2-3 days. In the fridge, it can last up to 5 days. But honestly, if it lasts that long, are you even trying? 😉
- Can I freeze this cake? Yes! You can freeze unfrosted cake layers wrapped tightly in plastic wrap for up to 2 months. Or, freeze individual slices of frosted cake for a quick dessert fix. Thaw overnight in the fridge.
Final Thoughts
There you have it, my friend! You’re now armed with the knowledge and the recipe to create a Cookies and Cream Cake that will make people swoon. This isn’t just a dessert; it’s a statement. It says, “Yes, I can bake, and yes, it’s ridiculously delicious.” Now go forth, preheat that oven, and get baking. You’ve earned this, and your taste buds are about to send you a thank-you note. Enjoy!


