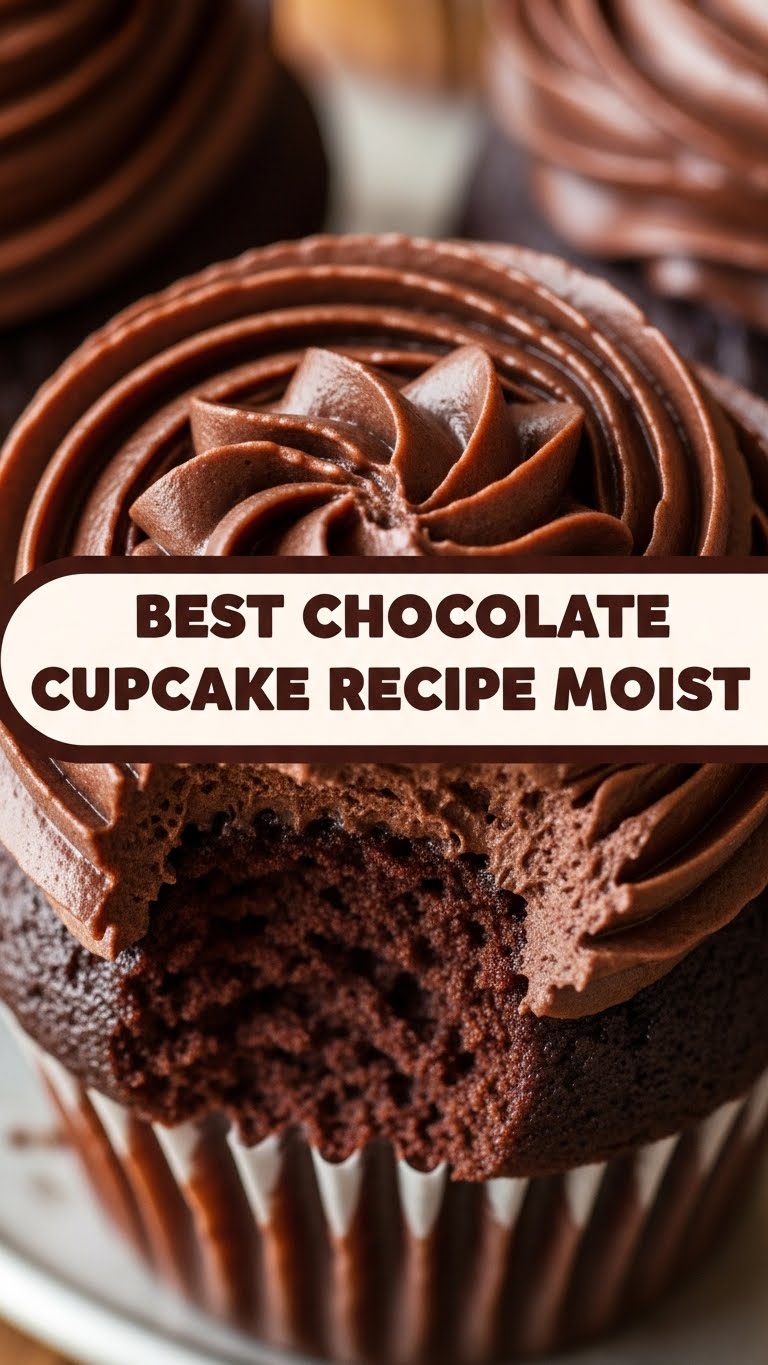
So you’re craving something ridiculously tasty but too lazy to spend forever in the kitchen, huh? Same, friend, same. We’ve all been there, staring into the fridge, dreaming of that perfect, **moist chocolate cupcake** that just melts in your mouth without a hint of dryness. Well, dream no more, because I’m about to drop the recipe bomb that’s going to change your dessert game forever. Get ready to bake some magic!
Why This Recipe is Awesome
Let’s be real, there are a gazillion chocolate cupcake recipes out there. So why this one? Because, my dear friend, it’s pretty much **idiot-proof**. And I say that with love, having successfully messed up many a recipe in my culinary adventures. This isn’t just a cupcake; it’s a moist, rich, chocolatey hug in paper form. It’s the kind of recipe that makes people ask for seconds (and thirds, let’s be honest) and think you’re some kind of baking wizard, when in reality, you just followed these super chill steps.
The secret sauce? A combo of simple ingredients and a method that locks in all that glorious moisture, ensuring every bite is pure bliss. No more dry, crumbly sadness, only deep, dark, decadent joy. You’re welcome.
Ingredients You’ll Need
Gather ’round, baking buddies! Here’s your lineup for cupcake greatness. Don’t worry, nothing too fancy, just good ol’ kitchen staples.
- 1 ½ cups (180g) All-Purpose Flour: The backbone of our deliciousness. Don’t go for cake flour unless you’re feeling adventurous and want a different texture.
- 1 ½ cups (300g) Granulated Sugar: Because life’s too short for unsweetened sadness.
- ¾ cup (65g) Unsweetened Cocoa Powder: Go for a good quality one here. It truly makes a difference in flavor, IMO. Dark AF is good.
- 1 ½ teaspoons Baking Soda: Our main leavening agent. It’s working hard behind the scenes!
- ¾ teaspoon Baking Powder: Back-up leavening. Teamwork makes the dream work.
- ¾ teaspoon Salt: Just a pinch to balance all that sweetness and make the chocolate sing. Don’t skip it!
- 2 Large Eggs: Make sure they’re at room temperature. Happy eggs bake better.
- ¾ cup (180ml) Whole Milk: Also room temp, please!
- ¼ cup (60ml) Vegetable Oil: Or any neutral oil. This is a moisture champion, trust me.
- 2 teaspoons Vanilla Extract: The secret handshake of good baking. Don’t be shy with it.
- ¾ cup (180ml) Hot Water or Hot Coffee: Okay, this might sound weird, but **this is key** for intensifying that chocolate flavor and keeping things super moist. Seriously.
Step-by-Step Instructions
- Preheat & Prep: First things first, get that oven to 350°F (175°C). Line a 12-cup muffin pan with paper liners. We want these beauties to pop out easily.
- Dry Mix Magic: In a large bowl, whisk together your flour, sugar, cocoa powder, baking soda, baking powder, and salt. Give it a good whisk to make sure everything is evenly distributed. No lumps allowed!
- Wet Mix Whimsy: In a separate medium bowl, whisk your room temperature eggs, milk, vegetable oil, and vanilla extract until they’re nicely combined.
- Combine & Conquer: Pour the wet ingredients into the dry ingredients. Grab a spatula or a whisk and mix until just combined. **Do not overmix!** A few small lumps are totally fine. Overmixing leads to tough cupcakes, and we’re aiming for tender love.
- The Hot Secret: Carefully pour in your hot water or hot coffee. Mix gently until just combined. The batter will be thin, and that’s exactly what we want. This is where the magic happens, folks!
- Fill ‘Em Up: Divide the batter evenly among your 12 prepared cupcake liners. Fill each about **two-thirds full**. Don’t be greedy and overfill, unless you like mushroom-top cupcakes (which, honestly, can be cute, but not ideal for even baking).
- Bake It ‘Til You Make It: Pop that pan into your preheated oven. Bake for **18-22 minutes**, or until a toothpick inserted into the center of a cupcake comes out with moist crumbs, not wet batter.
- Cool Down: Let the cupcakes cool in the muffin pan for about 5-10 minutes before transferring them to a wire rack to cool completely. Patience is a virtue, especially when it comes to frosting.
Common Mistakes to Avoid
Baking is fun, but a few slips can turn your masterpiece into a “whoopsie.” Here are some rookie (and not-so-rookie) mistakes to steer clear of:
- Not Preheating the Oven: Seriously, this isn’t optional. Your oven needs to be at temperature before the cupcakes go in, or they won’t rise properly. Think of it as giving them a warm, ready welcome.
- Overmixing the Batter: I cannot stress this enough. Once the wet and dry ingredients just come together, STOP. Mixing too much develops the gluten, making your cupcakes tough and dry. We want tender, remember?
- Overfilling the Liners: You’ll end up with giant, overflowing volcanoes that merge into one big cake in the pan. Stick to two-thirds full for perfect domes.
- Opening the Oven Door Too Early: Resist the urge! Opening the door lets out heat, which can cause your cupcakes to sink in the middle. Give them at least 15 minutes before peeking.
- Not Using Room Temperature Ingredients: Eggs, milk… they blend much better and create a smoother, more emulsified batter when they’re not straight from the fridge. Plan ahead, it’s worth it!
Alternatives & Substitutions
Life happens, and sometimes you don’t have exactly what the recipe calls for. No stress, we can totally adapt!
- Milk: No whole milk? You can use 2% milk, or even buttermilk (which will add an extra tangy moistness – yum!). For a dairy-free option, unsweetened almond milk or oat milk works great.
- Vegetable Oil: You can swap this for melted coconut oil (just make sure it’s cooled a bit) or even melted unsalted butter if you prefer. Butter adds a richer flavor, but oil typically provides more consistent moisture.
- Hot Water/Coffee: If you’re not a coffee fan (gasp!) or don’t have any on hand, hot water works perfectly fine. The coffee just enhances the chocolate flavor without making it taste like coffee, FYI.
- Vanilla Extract: Feeling fancy? Try adding a different extract like almond, peppermint, or even a touch of orange zest for a fun twist!
FAQ (Frequently Asked Questions)
Got questions? I’ve got answers (and probably some sassy commentary to go with them).
- Can I use margarine instead of butter? Well, technically yes, but why hurt your soul like that? Margarine can work in a pinch, but for the best flavor and texture, stick to butter or oil as specified.
- Why do my cupcakes always sink in the middle? Ah, the dreaded dip! This usually happens if your baking soda/powder is old (check those expiry dates!), you opened the oven door too early, or the oven temperature was too low. Make sure your leavening agents are fresh!
- Can I add chocolate chips to the batter? Absolutely, you rebel! Fold in about ½ to ¾ cup of your favorite chocolate chips (dark, milk, white – go wild!) with the dry ingredients. Just remember, they add extra weight, so your cupcakes might be a tad denser.
- How long do these moist chocolate cupcakes last? Stored in an airtight container at room temperature, they’re usually fantastic for 2-3 days. In the fridge, they can last up to 5 days, but warm them up a tiny bit before eating for ultimate deliciousness.
- My cupcakes are dry! What went wrong? Most likely culprits are overmixing the batter, overbaking them (keep an eye on that toothpick test!), or not using enough liquid/fat. This recipe specifically tackles dryness, so follow it closely!
- Can I make these gluten-free? You bet! Swap the all-purpose flour for a good quality 1:1 gluten-free all-purpose flour blend that contains xanthan gum. The results are usually pretty good, though the texture might vary slightly.
Final Thoughts
So there you have it, folks! Your new go-to recipe for the best, most ridiculously moist chocolate cupcakes. No more dry disappointments, just pure, unadulterated chocolatey bliss. This recipe is your secret weapon for impressing friends, winning bake sales (if you’re into that), or just treating yourself because, let’s face it, you deserve it.
Now go forth, preheat that oven, and get baking! Don’t forget to share your cupcake triumphs (and maybe even a pic or two). You’ve earned those bragging rights. Happy baking!

