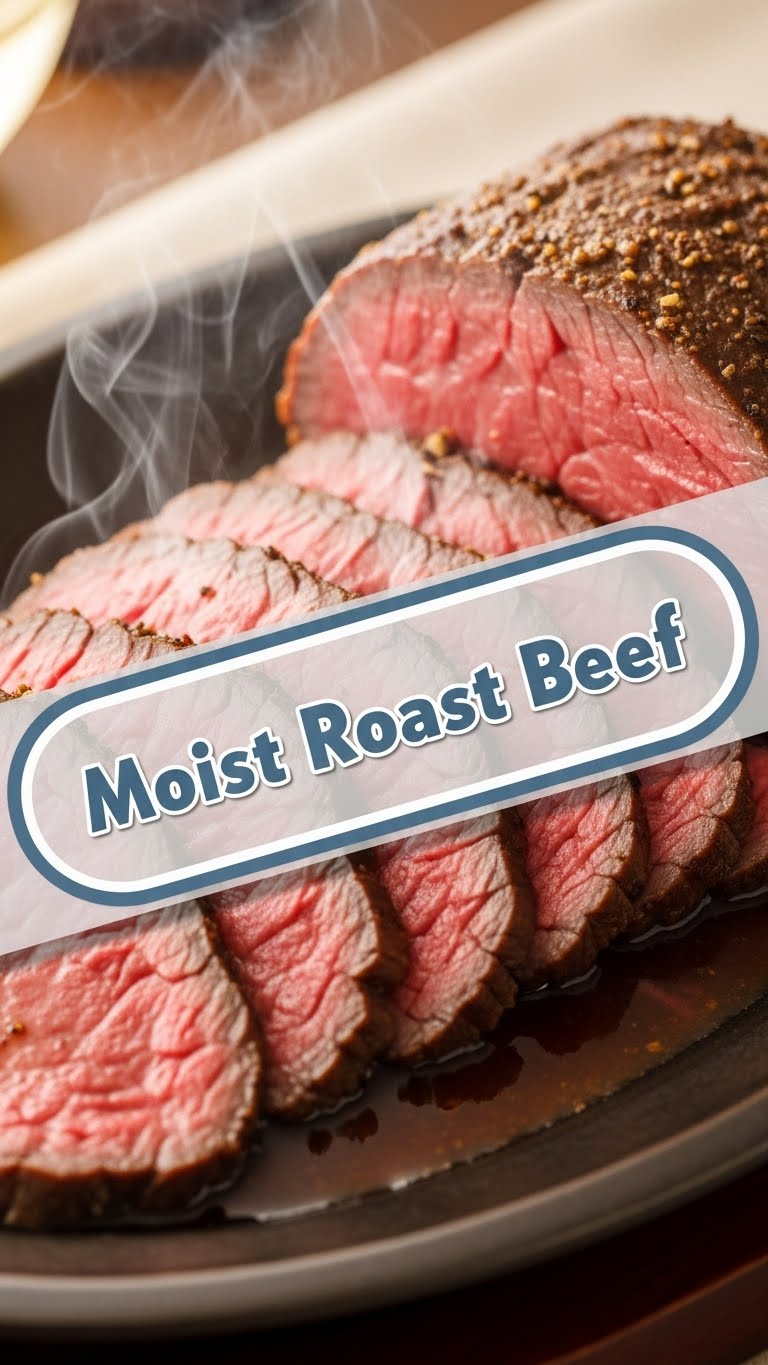
So, you’re eyeing that gorgeous hunk of beef at the grocery store but secretly terrified of turning it into a sad, dry hockey puck? Been there, friend. We’ve all got beef with dry beef. But today, we’re changing that narrative with a recipe so simple, so delicious, it almost feels like cheating. Prepare for moist roast beef. Yes, I said it. Moist. And trust me, after this, you’ll be saying it too!
Why This Recipe is Awesome
Okay, first off, it’s pretty much **idiot-proof**. Seriously, if I can pull this off without setting off the smoke detectors (a rare occurrence for me, TBH), you definitely can. This isn’t one of those recipes where you need a culinary degree or three extra hands. It’s designed for maximum flavor with minimum fuss. Plus, your house will smell like a fancy restaurant, and you’ll get all the credit. Winning!
Ingredients You’ll Need
- A beautiful roast beef cut (2-3 lbs of chuck, rump, sirloin tip, or even a small rib roast – whatever looks good at the butcher. Let’s not get too specific; we’re chill.)
- Olive oil (the good stuff, or whatever you have on hand, no judgment here).
- Salt (kosher or sea salt, because tiny grains are for wimps who don’t want flavour).
- Freshly cracked black pepper (don’t even *think* about pre-ground, my friend. We have standards.)
- Garlic powder (or 2-3 fresh garlic cloves, minced – feeling fancy today?).
- Onion powder (or a roughly chopped onion if you want more roasted goodness in the pan).
- Rosemary or Thyme (fresh is best, but dried is totally fine if your herb garden is… non-existent. Like mine.)
- Optional but highly recommended: a few extra sprigs of fresh rosemary/thyme and a couple of smashed garlic cloves for the pan. Flavour bomb!
Step-by-Step Instructions
- Prep Time! Take your beef out of the fridge at least **an hour before cooking**. This is crucial, trust me. It helps it cook more evenly. Pat it super dry with paper towels. Like, really, really dry.
- Season It Up. Drizzle the roast generously with olive oil. Then, go wild with the salt, pepper, garlic powder, and onion powder. Don’t be shy! Rub it all over like you’re giving it a spa treatment. If using fresh herbs/garlic, tuck them into the pan now.
- Sear for Glory. Get a heavy-bottomed, oven-safe pan (cast iron is my **MVP** here) screaming hot over medium-high heat. Add a tiny splash more oil if needed. Sear the beef on all sides until it’s beautifully browned and caramelized. We’re talking 2-3 minutes per side. This step locks in flavour. **Don’t skip it!**
- Oven Time! Transfer the pan (with the beef) directly to your preheated oven set to **450°F (230°C)**. Roast it at this high temp for **15 minutes**.
- The Slow Down. After 15 minutes, **reduce the oven temperature to 250°F (120°C)** *without* opening the door! Let it cook for another 45 minutes to 1.5 hours, depending on your roast’s size and desired doneness. A meat thermometer is your BFF here.
- Rest, You Beautiful Beast. This is arguably the most important step. Once your roast reaches your desired internal temp (see FAQ for temps), **remove it from the oven, tent it loosely with foil, and let it rest for at least 15-20 minutes**. All those beautiful juices need to redistribute, making it incredibly moist. Patience, young padawan.
- Slice and Devour. Slice against the grain into thin, glorious pieces. Drizzle with any pan juices. Prepare for applause.
Common Mistakes to Avoid
- Cooking it cold: Trying to roast beef straight from the fridge is a recipe for uneven cooking and a tough exterior. Rookie mistake. Let it warm up!
- Not searing: Skipping the sear is like skipping the intro to your favourite show – you miss out on all the good stuff (flavour and crust!).
- Eyeballing doneness: Unless you’re a beef wizard, invest in a meat thermometer. It’s like having superpowers for perfect roasts.
- Forgetting to rest: Cutting into your roast straight out of the oven is a cardinal sin. You’ll lose all those precious juices. **Rest your meat, people!**
- Overcooking: The ultimate sin. Dry roast beef is a sad, sad thing. Pull it out a few degrees *before* your target temp, as it’ll continue cooking while resting.
Alternatives & Substitutions
- Herbs: No rosemary or thyme? No prob! Oregano, marjoram, or even a good Italian seasoning blend will work wonders.
- Garlic/Onion: If you’re out of powder, use fresh! Mince a few cloves of garlic and finely dice half an onion. Just roast ’em with the beef.
- Roast Cut: While I often grab whatever looks good, a **bottom round roast** is usually a safe bet. If you want something super fancy (and pricier), a **rib roast** is divine. Chuck roast also works great but might prefer a slightly longer, lower cook time for max tenderness.
- Pan: No cast iron? A heavy-bottomed stainless steel pan will do, just make sure it’s oven-safe! If not, sear in a regular pan then transfer to a roasting dish.
FAQ (Frequently Asked Questions)
- “What internal temperature should I aim for?” Great question! For **rare**, pull it at 120-125°F (49-52°C). For **medium-rare** (my personal fave), 125-130°F (52-54°C). **Medium** is 130-135°F (54-57°C). Remember, it’ll rise a few degrees while resting!
- “Can I add veggies to the pan?” Absolutely! Carrots, potatoes, and onions chopped into chunks and tossed with olive oil, salt, and pepper make an amazing side. Add them during the last hour of cooking.
- “My roast is smaller/larger, how do I adjust cooking time?” The beauty of a meat thermometer! It takes the guesswork out. But generally, expect slightly less time for smaller roasts and more for larger ones. Always go by temp, not just time.
- “What if I don’t have an oven-safe pan?” Sear it in a regular pan, then transfer the beef to a roasting tray or baking dish before putting it in the oven. Easy peasy.
- “Can I use this method for other meats?” This high-then-low temp method is fantastic for many roasts! Pork loin or a leg of lamb could totally rock this technique.
- “My roast beef came out dry, what went wrong?” Two main culprits: **overcooking** (see thermometer advice!) or **not resting** it long enough. Don’t be that person who skips the rest!
- “Leftovers? What are those?” Haha, if you *do* manage to have any, thinly sliced roast beef makes the best sandwiches!
Final Thoughts
See? Not so scary, right? You’ve just mastered the art of moist roast beef, and probably learned a thing or two about life (like the importance of patience, especially when it comes to resting meat). Now go impress someone – or yourself – with your new culinary skills. You’ve earned it! Seriously, pour yourself a glass of something nice and enjoy your masterpiece. You’re basically a kitchen rockstar. Don’t forget to send me pics!


