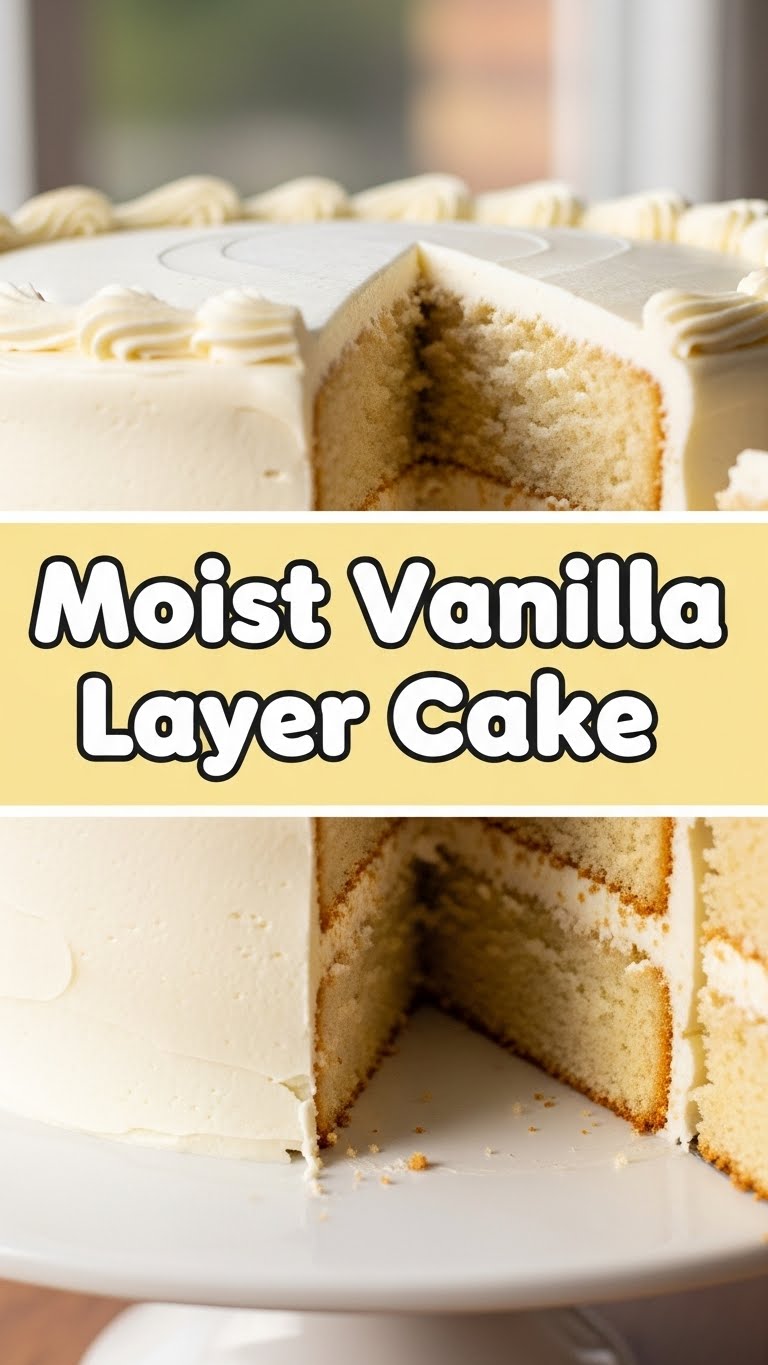
Staring into the void of your fridge, dreaming of cake but dreading the culinary marathon? Honey, I feel you. And I’ve got your back with a recipe so good, it’ll make you question all your life choices (in a good way, obvs). Forget dry, crumbly imposters; we’re talking about a moist vanilla layer cake that’s so fluffy, it practically floats, and so delicious, you’ll want to marry it. Let’s bake this bad boy, shall we?
Why This Recipe is Awesome
Seriously, this isn’t one of those “Pinterest-perfect” recipes that require a culinary degree and a small loan. This is *the* moist vanilla layer cake that’s practically fool-proof. We’re talking about a cake that comes out perfectly every time, even if your usual baking skills stop at “toast.” It’s impressive enough to wow your friends, but easy enough that you won’t throw your mixer across the kitchen. Plus, the vanilla flavor? It’s not shy; it practically sings a symphony in your mouth. **This recipe is your new secret weapon for effortless deliciousness.**
Ingredients You’ll Need
Gather your troops! No fancy obscure stuff here, just your everyday heroes ready to become cake perfection.
- Unsalted Butter (2 sticks / 226g): Room temperature, please! Not melted, not rock hard. We’re looking for spreadable joy.
- Granulated Sugar (1 ¾ cups / 350g): For sweetness, duh.
- Large Eggs (3): Also at room temperature. Happy chickens make happy cakes, right?
- All-Purpose Flour (2 ¼ cups / 270g): The workhorse of the baking world. Don’t substitute with self-rising, unless you enjoy chaos.
- Baking Powder (2 ½ teaspoons): For that glorious lift. Don’t skip it unless you’re aiming for sad, flat cake pucks.
- Salt (½ teaspoon): A pinch of magic to enhance all those lovely flavors. Don’t worry, it won’t taste like the ocean.
- Whole Milk (1 cup / 240ml): Again, room temperature! Because we’re not messing around with cold shock.
- Vanilla Extract (2 teaspoons): The star of the show! **Use good quality stuff; it makes a HUGE difference.** None of that imitation nonsense.
For the Easy Vanilla Buttercream Frosting:
- Unsalted Butter (2 sticks / 226g): Softened, but not melty.
- Powdered Sugar (4 cups / 480g): Sifted, unless you like lumpy frosting (nobody likes lumpy frosting).
- Heavy Cream or Milk (2-4 tablespoons): To get that perfect consistency.
- Vanilla Extract (1 ½ teaspoons): More vanilla, because why not?
- Pinch of Salt: Balances the sweetness.
Step-by-Step Instructions
- Get Prepped: Preheat your oven to 350°F (175°C). Grease and flour two 8-inch round cake pans. Or, even better, line the bottoms with parchment paper and grease the sides. This helps with the “no sticking” thing.
- Cream It Up: In a large bowl, cream together the room temperature butter and granulated sugar until it’s light and fluffy. This usually takes about 3-5 minutes with an electric mixer. **Don’t rush this step; it’s crucial for airiness!**
- Egg-cellent Addition: Add the eggs one at a time, beating well after each addition. Then, stir in that glorious vanilla extract. Scrape down the sides of the bowl to make sure everything’s incorporated.
- Whisk the Dry Stuff: In a separate bowl, whisk together the flour, baking powder, and salt. Give it a good swirl so everything is evenly distributed.
- Alternate & Mix: With your mixer on low speed, gradually add about a third of the dry ingredients to the butter mixture, then half of the milk. Repeat, ending with the dry ingredients. Mix just until combined – **overmixing is the enemy of tender cake!**
- Bake, Baby, Bake: Divide the batter evenly between your prepared cake pans. Smooth the tops with a spatula. Pop them into the preheated oven for 28-32 minutes, or until a wooden skewer inserted into the center comes out clean.
- Cool Down: Let the cakes cool in their pans for about 10-15 minutes. Then, carefully invert them onto a wire rack to cool completely. **Patience, my friend, patience!** Trying to frost warm cake is a recipe for a melted mess.
- Whip Up the Frosting: While the cakes cool, beat the softened butter until creamy. Gradually add the sifted powdered sugar, alternating with splashes of cream/milk, and the vanilla extract and salt. Beat until light, fluffy, and spreadable. Add more liquid if needed for your desired consistency.
- Assemble Your Masterpiece: Once the cakes are completely cool, place one layer on your serving plate. Spread a generous amount of frosting on top. Gently place the second layer on, and then frost the top and sides of the entire cake. Get creative, or just keep it rustic; it’ll taste amazing either way.
Common Mistakes to Avoid
- Cold Ingredients: Forgetting to bring your butter, eggs, and milk to room temperature. This isn’t just a suggestion; it’s a non-negotiable for that perfectly smooth, emulsified batter and tender crumb.
- Overmixing the Batter: Once you add the flour, mix *just* until everything is combined. Overmixing develops the gluten, leading to a tough, dense cake. Nobody wants that!
- Opening the Oven Door Too Soon: Curiosity killed the cat, and it will kill your cake’s rise. Keep that door shut for at least the first two-thirds of the baking time.
- Not Greasing Your Pans Properly: Thinking a quick swipe of butter is enough. Use a good layer of butter and flour, or even better, parchment paper on the bottom. Cake sticking to the pan? The actual worst.
- Frosting a Warm Cake: This is a rookie mistake. Your frosting will melt, slide, and weep. Resist the urge! Let those layers cool completely, **IMO, this is where most people go wrong.**
Alternatives & Substitutions
Feeling a little adventurous? Or just working with what you’ve got? Here are a few swaps that can work!
- Milk: You can totally use buttermilk for a slightly tangier, even more tender cake. Almond milk can work if you’re dairy-free, but it might slightly alter the texture. Just make sure it’s room temp!
- Butter: Technically, you *could* use margarine, but why hurt your soul like that? Butter just tastes better. For a different texture (more dense, less airy), you could swap some or all for a neutral oil, but it won’t be quite the same.
- Vanilla Extract: If you’re feeling fancy, try adding a little almond extract for a twist, or even some lemon zest for a brighter flavor. But honestly, pure vanilla is perfect as is.
- Frosting: Not a buttercream fan? A simple cream cheese frosting (reduce the butter and powdered sugar, add cream cheese!) or even a quick chocolate ganache would be divine.
FAQ (Frequently Asked Questions)
Got questions? I’ve got answers (mostly).
- Can I halve this recipe? Absolutely! Just use one 8-inch pan and adjust the baking time down to about 25-30 minutes. Easy peasy.
- My cake sank in the middle! Why?! Oh, the dreaded sinkhole! It’s usually due to opening the oven door too early, overmixing, or old baking powder. Make sure your leavening agents are fresh, and try to resist peeking!
- How long does this cake last? If kept covered at room temperature, it’s usually good for 3-4 days. In the fridge, maybe a day or two longer, but it’s best at room temp. As if it’ll last that long, though!
- Can I make cupcakes instead? You betcha! Fill cupcake liners about two-thirds full and bake for 18-22 minutes. You’ll get about 24 cupcakes from this recipe.
- Do I *really* need room temperature ingredients? **YES, YES, a thousand times YES!** This is not a suggestion, it’s a fundamental step for a perfectly emulsified batter and a tender, even crumb. Don’t skip it unless you want a sad, lumpy cake.
- Can I freeze the cake layers? You totally can! Wrap unfrosted, cooled layers tightly in plastic wrap, then foil. They’ll keep in the freezer for up to a month. Thaw overnight in the fridge before frosting.
Final Thoughts
So there you have it, your very own ridiculously moist vanilla layer cake! You’ve basically just graduated from cake-making school (honorary degree, obvi). This recipe is proof that baking can be fun, delicious, and totally achievable without pulling your hair out. Now go forth and spread vanilla joy! You deserve that slice. Or two. No judgment here. Go impress someone—or yourself—with your new culinary skills. You’ve earned it!

