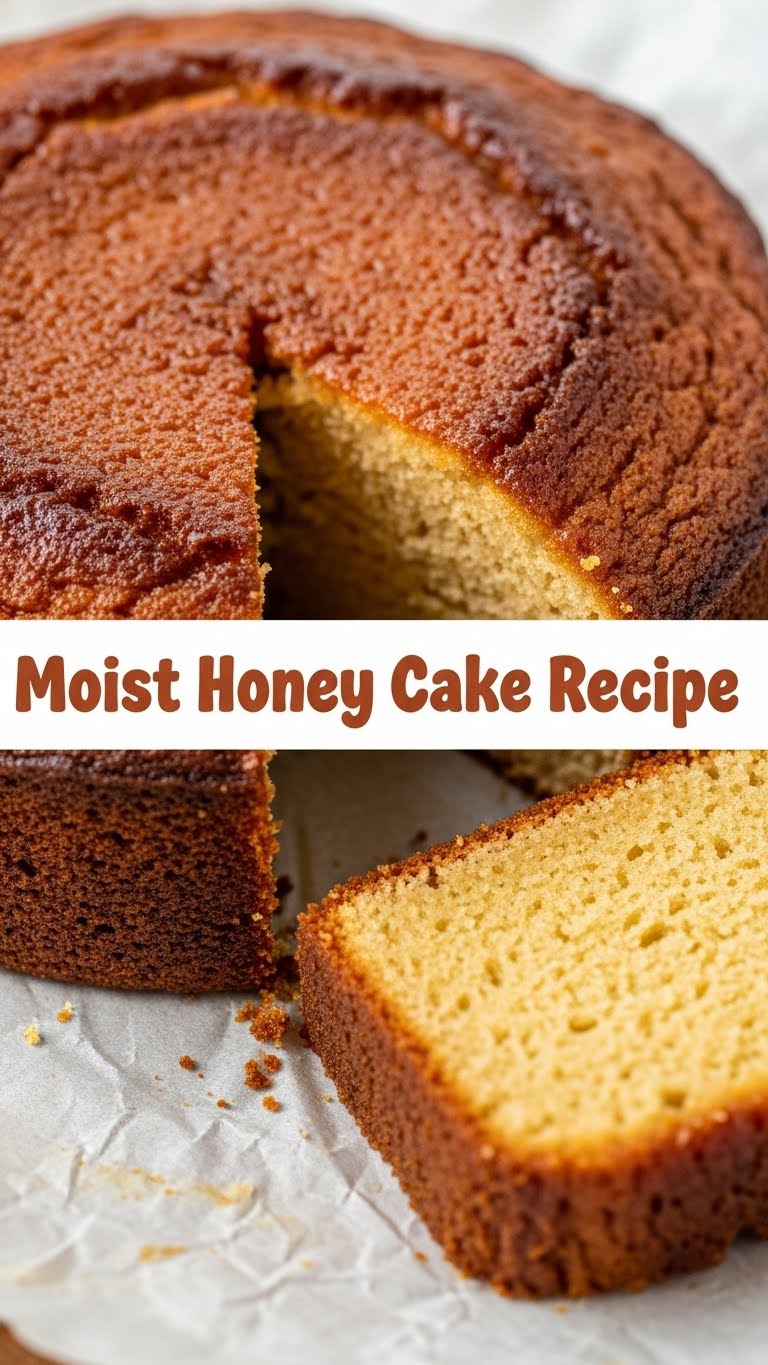
Ever stared into the abyss of your fridge, yearning for something sweet but *also* something that won’t require a culinary degree, a small loan, or three hours of your precious Netflix time? Yeah, me too. We’ve all been there, hovering between “I should just buy a cookie” and “I totally *could* bake something… if it were easy.” Well, my friend, today is your lucky day because we’re diving headfirst into the glorious, sticky, moist world of the most ridiculously easy and delicious honey cake you’ll ever make. No stress, just pure, unadulterated honey bliss!
Why This Recipe is Awesome
Listen, I’m not going to lie. I’ve burnt toast more times than I care to admit. My culinary prowess usually involves successfully boiling water and not setting off the smoke alarm. But this honey cake? It’s like it *wants* you to succeed. Seriously, it’s practically idiot-proof. Even I didn’t mess it up!
What makes it so great? First off, it’s unbelievably moist. Like, “did you secretly add a magical ingredient?” moist. Secondly, the honey flavor is perfectly balanced – sweet, comforting, and not overwhelmingly sticky. Plus, it comes together faster than you can say “I need a second slice.” It’s the kind of cake that makes you look like a baking genius without actually having to *be* one. You’re welcome.
Ingredients You’ll Need
Alright, gather your troops! These are your essential players for cake domination. Don’t worry, nothing too fancy here.
- All-Purpose Flour: About 2 cups. The universal binder of deliciousness.
- Baking Soda: 1 teaspoon. Our little lift committee, making sure things rise to the occasion.
- Baking Powder: 1 teaspoon. Double the leavening, double the fun!
- Salt: 1/2 teaspoon. Just a pinch! Don’t go full salt lick, we’re making cake, not a pretzel.
- Large Eggs: 2 of ’em. Happy little protein spheres, room temperature if you’re feeling fancy.
- Granulated Sugar: 1/2 cup. For that sweet, sweet bliss.
- Honey: 1 cup. The star of the show! Don’t skimp on the good stuff, this is where the magic happens.
- Vegetable Oil (or any neutral oil): 1/2 cup. Our moisture master. Keeps things luscious.
- Milk (or plain yogurt/buttermilk): 1/2 cup. For ultimate tenderness and that “oh wow” factor.
- Vanilla Extract: 1 teaspoon. Because everything’s better with a splash of vanilla.
Step-by-Step Instructions
Ready? Let’s do this! This is so easy, you might even find yourself humming a happy tune.
- Get Your Oven Warm & Cozy: Preheat your oven to 350°F (175°C). Then, grab an 8 or 9-inch round cake pan (or a square one, we’re not picky!) and grease it like it owes you money. Flour it too, just for extra non-stick insurance.
- Dry Stuff First: In a medium bowl, whisk together the flour, baking soda, baking powder, and salt. Give it a good whisk, no lumpy bits allowed. Set this aside.
- Wet Stuff Next (Mostly): In a larger bowl, whisk the eggs and granulated sugar until they’re light and fluffy-ish. Then, pour in the honey, vegetable oil, and vanilla extract. Whisk it all together until it’s beautifully combined and smells amazing.
- Combine Forces: Now, for the grand unification! Gradually add your dry flour mixture to the wet mixture, mixing until *just* combined. Don’t overmix, or your cake will be tough and sad. Then, gently stir in the milk (or yogurt/buttermilk) until the batter is smooth.
- Pour & Bake: Pour your glorious batter into the prepared pan. Give the pan a gentle tap or two on the counter to release any air bubbles. Slide it into your preheated oven.
- Wait (The Hardest Part): Bake for 30-35 minutes. How do you know it’s done? A toothpick inserted into the center should come out clean or with a few moist crumbs attached. If it’s gooey, give it another 5 minutes.
- Cool Down & Dig In: Once baked, let the cake cool in the pan for about 10-15 minutes before flipping it out onto a wire rack to cool completely. Or, if you’re like me, cut a slice while it’s still warm and slightly melty. No judgment here!
Common Mistakes to Avoid
We’ve all been there, staring at a slightly-less-than-perfect bake. Here are a few rookie errors to dodge:
- Thinking You Don’t Need to Preheat: Rookie mistake! Your oven needs a warm-up, just like you before a workout. A cold oven equals unevenly cooked, sad cake. Always preheat!
- Overmixing the Batter: Aggression isn’t always the answer, especially with cake batter. Once you add the flour, mix until *just* combined. Overmixing develops the gluten, making your cake tough and chewy instead of light and fluffy.
- Opening the Oven Door Constantly: Patience, padawan. Every time you peek, you let out precious heat, which can make your cake sink. Let it bake in peace, only checking towards the end of the baking time.
- Not Greasing/Flouring the Pan Properly: Nobody wants a cake stuck to the bottom of the pan. Sticky situations are for dramas, not cakes. Grease and flour diligently!
Alternatives & Substitutions
Feeling adventurous? Here are a few swaps to keep things interesting:
- Oil vs. Butter: I suggest oil for maximum moistness, but you can definitely use melted butter for a richer, buttery flavor. Your call, high roller!
- Yogurt vs. Milk: Plain Greek yogurt or buttermilk instead of regular milk will add an amazing tang and an even moister crumb. Highly recommend!
- Different Honeys: Experiment with different types of honey! Clover, wildflower, acacia, orange blossom… each one adds a unique whisper of flavor. It’s like a honey tasting party in your mouth!
- Add-Ins: Want to spice things up? A teaspoon of cinnamon or a pinch of nutmeg would be divine. Throw in some chopped walnuts or pecans for crunch. A little orange or lemon zest can also brighten the flavors beautifully.
FAQ (Frequently Asked Questions)
Got questions? I’ve got answers, served with a side of sass.
- Can I use margarine instead of butter/oil? Well, technically yes, but why hurt your soul like that? Margarine can work, but for the best flavor and texture, stick with actual butter or a good neutral oil.
- My cake looks too dark, what gives? Honey caramelizes, my friend! It’s usually a beautiful golden brown. If it’s burning (and smells like it), cover it loosely with foil for the last part of baking. Also, double-check your oven temperature!
- How do I know if it’s done? The toothpick test is your best friend! Insert one into the center; if it comes out clean or with a few moist crumbs, you’re golden. If it’s gooey, give it more time.
- Can I make it gluten-free? Absolutely! Use a good quality gluten-free all-purpose flour blend (one that includes xanthan gum usually works best). Textures might vary slightly, but it’ll still be delicious.
- How long does it last? In my house? About 10 minutes. Realistically, it’ll stay moist and delicious for 3-4 days at room temperature, covered tightly. It’s also amazing stored in the fridge!
- Can I add spices to the batter? OMG, yes! A teaspoon of cinnamon, a half-teaspoon of nutmeg, or a dash of allspice would be divine. Go wild, flavor adventurer!
- Do I *really* need to preheat the oven? Unless you enjoy dry, unevenly cooked cake with a weird texture, then YES. It’s not a suggestion, it’s a commandment.
Final Thoughts
So there you have it! Your new go-to recipe for when you need a hug in cake form, or just want to impress your friends/family/cat without breaking a sweat. This Moist Honey Cake is a winner every single time, and it’s proof that baking doesn’t have to be intimidating. It can be fun, easy, and incredibly rewarding.
Now go forth and bake, my friend. Your taste buds (and probably anyone lucky enough to be nearby) will thank you. You’ve totally got this!

