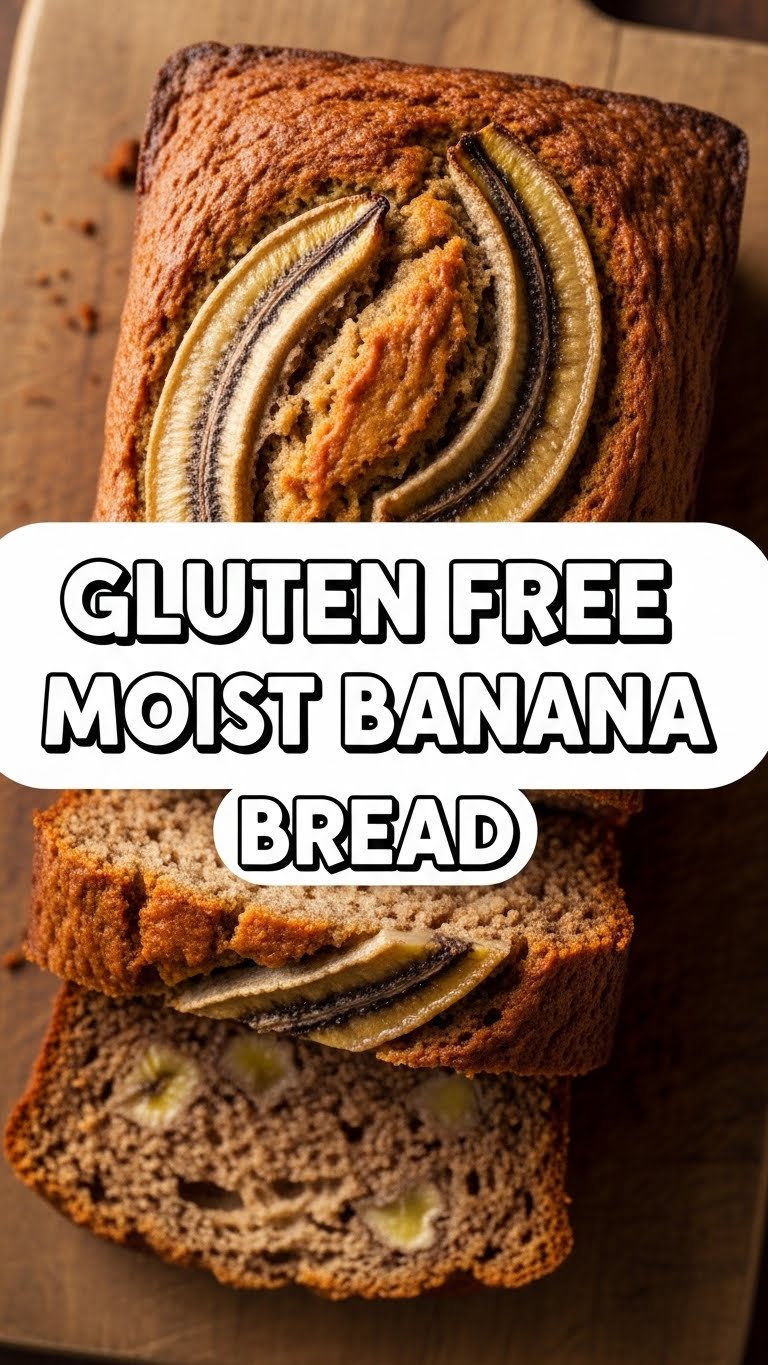
So you’re craving something tasty but too lazy to spend forever in the kitchen, huh? Same. High five! You’re probably staring at those suspiciously brown bananas on your counter, wondering if they’re a sign of impending fruit fly doom or a delicious destiny. Good news, friend! They’re destiny, baby! And even better news? We’re about to whip up some Gluten-Free Moist Banana Bread that’s so good, you’ll forget it’s GF. Like, seriously forget.
Why This Recipe is Awesome
Okay, let’s get real. Why *this* banana bread recipe? Because it’s not just “gluten-free.” It’s **actually moist**. No dry, crumbly sadness here, thank you very much. We’re talking tender, flavorful, hug-your-soul kind of moistness. Plus, it’s pretty much idiot-proof. Seriously, if I, a person who once set off the fire alarm microwaving popcorn (don’t ask), can nail this, so can you. It comes together quickly, smells like a dream, and makes your kitchen feel all cozy. What’s not to love?
Ingredients You’ll Need
Gather your troops! Here’s what you’ll need to make this magic happen. Don’t worry, nothing too fancy, just good ol’ deliciousness.
- **3-4 Very Ripe Bananas**: We’re talking brown, spotty, practically black. These are the unsung heroes of moisture and sweetness. Embrace their ugliness!
- **1/2 cup (113g) Unsalted Butter**: Softened. Don’t even *think* about rock-hard butter. It needs to be cozy for creaming.
- **3/4 cup (150g) Granulated Sugar**: Or a little less if your bananas are basically candy.
- **1 Large Egg**: Room temp, if you’re feeling fancy.
- **1 tsp Vanilla Extract**: Don’t skimp on this. It’s the secret sauce of deliciousness.
- **1 1/2 cups (180g) Gluten-Free All-Purpose Flour Blend**: Make sure it has xanthan gum, or add 1/2 tsp if it doesn’t. This is where the GF magic happens.
- **1 tsp Baking Soda**: Our lift-off agent!
- **1/2 tsp Salt**: Balances all that sweetness. A tiny hero.
- **Optional: 1/2 cup Chocolate Chips or Chopped Nuts**: Because sometimes, you just need a little extra pizzazz, right?
Step-by-Step Instructions
Alright, apron on (or don’t, I won’t tell), let’s do this!
- **Preheat Power**: Fire up your oven to **350°F (175°C)**. Grease and flour (or line with parchment) a 9×5 inch loaf pan. Don’t skip this, unless you want your banana bread to become one with the pan.
- **Banana Mash-Up**: In a medium bowl, mash those ridiculously ripe bananas with a fork until they’re mostly smooth with a few small lumps. We’re not aiming for baby food here, just a good squish.
- **Cream It Good**: In a separate large bowl, beat the softened butter and sugar together until light and fluffy. This usually takes about 2-3 minutes with an electric mixer. Think cloud-like.
- **Egg & Vanilla Time**: Beat in the egg and vanilla extract into the butter mixture until well combined. Scrape down the sides of the bowl to make sure everything gets in on the action.
- **Dry Mix-Up**: In another small bowl (yes, more bowls, worth it!), whisk together the GF flour blend, baking soda, and salt. Whisk well to distribute everything evenly.
- **Combine Forces**: Gradually add the dry ingredients to the wet ingredients, mixing on low speed until *just* combined. **Don’t overmix!** Overmixing is the enemy of moistness, especially with GF flour.
- **Banana & Bling**: Gently fold in the mashed bananas. If you’re using chocolate chips or nuts, now’s the time to fold those in too. Give it a few gentle stirs until everything is incorporated.
- **Pan It Up**: Pour the batter into your prepared loaf pan and smooth the top. You can sprinkle a few extra chocolate chips on top for extra visual appeal (and deliciousness).
- **Bake Away**: Bake for **55-65 minutes**, or until a wooden skewer inserted into the center comes out clean. If the top starts browning too much, loosely tent it with foil.
- **Cool Down**: Let the banana bread cool in the pan for about 10 minutes before turning it out onto a wire rack to cool completely. This part is torture, but essential for structure!
Common Mistakes to Avoid
We’ve all been there, staring at a baking disaster. Learn from my missteps, my friend!
- **Using Under-Ripe Bananas**: This is the number one rookie mistake! Green bananas are for smoothies, not glorious banana bread. They won’t provide the sweetness or moisture needed.
- **Overmixing the Batter**: Seriously, stop once the flour is just incorporated. Overmixing develops tough texture, even in GF baking. Think gentle, not aggressive.
- **Not Greasing Your Pan Properly**: Unless you want to chisel your banana bread out in sad, broken pieces, grease that pan! Or use parchment. Your future self will thank you.
- **Cutting While Hot**: I know, I know. The smell is intoxicating. But please, resist! Hot banana bread is structurally weak and can crumble. Give it time to set.
Alternatives & Substitutions
Feeling adventurous? Or just out of an ingredient? No worries, we’ve got options!
- **Dairy-Free**: Swap the butter for your favorite dairy-free stick butter (like Miyoko’s Kitchen or Earth Balance sticks).
- **Sugar Swap**: You can use coconut sugar for a slightly different flavor profile. Or, if you prefer less refined sugar, reduce the amount if your bananas are super sweet.
- **Add-Ins Galore**: Instead of chocolate chips or nuts, try dried cranberries, shredded coconut, or even a dash of cinnamon or nutmeg in the dry ingredients for extra spice.
- **Mini Loaves/Muffins**: This recipe works great for smaller portions! For muffins, bake for about 20-25 minutes. For mini loaves, around 30-40 minutes. Keep an eye on them!
FAQ (Frequently Asked Questions)
Got questions? I’ve got answers. Probably.
- **”Can I use less ripe bananas?”** Well, technically yes, but why would you want to hurt your banana bread’s feelings (and flavor)? Ripe bananas are the key to moisture and natural sweetness. Don’t compromise!
- **”My banana bread is raw in the middle, but the top is burnt! Help!”** Ah, the classic baking dilemma. Try loosely tenting the top with aluminum foil partway through baking. It protects the top while allowing the middle to cook through.
- **”How long does it stay fresh?”** Covered tightly at room temperature, it’s good for 2-3 days. In the fridge, maybe up to a week. But honestly, it rarely lasts that long, does it?
- **”Can I freeze it?”** Heck yes! Once completely cooled, wrap individual slices or the whole loaf tightly in plastic wrap, then foil. It’ll keep for up to 3 months. Just thaw at room temp when cravings strike.
- **”Is it really *that* moist?”** My friend, you doubt my word? Yes. Yes, it is. The bananas, butter, and proper baking technique ensure a delightfully tender crumb. It’s a game-changer for GF baking, IMO.
Final Thoughts
And there you have it! Your ticket to gluten-free banana bread bliss. This isn’t just a recipe; it’s an experience. A delicious, comforting, kitchen-smelling-amazing experience. So go forth, mash those bananas, get baking, and then enjoy every single glorious bite. You deserve it! Now go impress someone—or yourself—with your new culinary skills. You’ve earned it!

