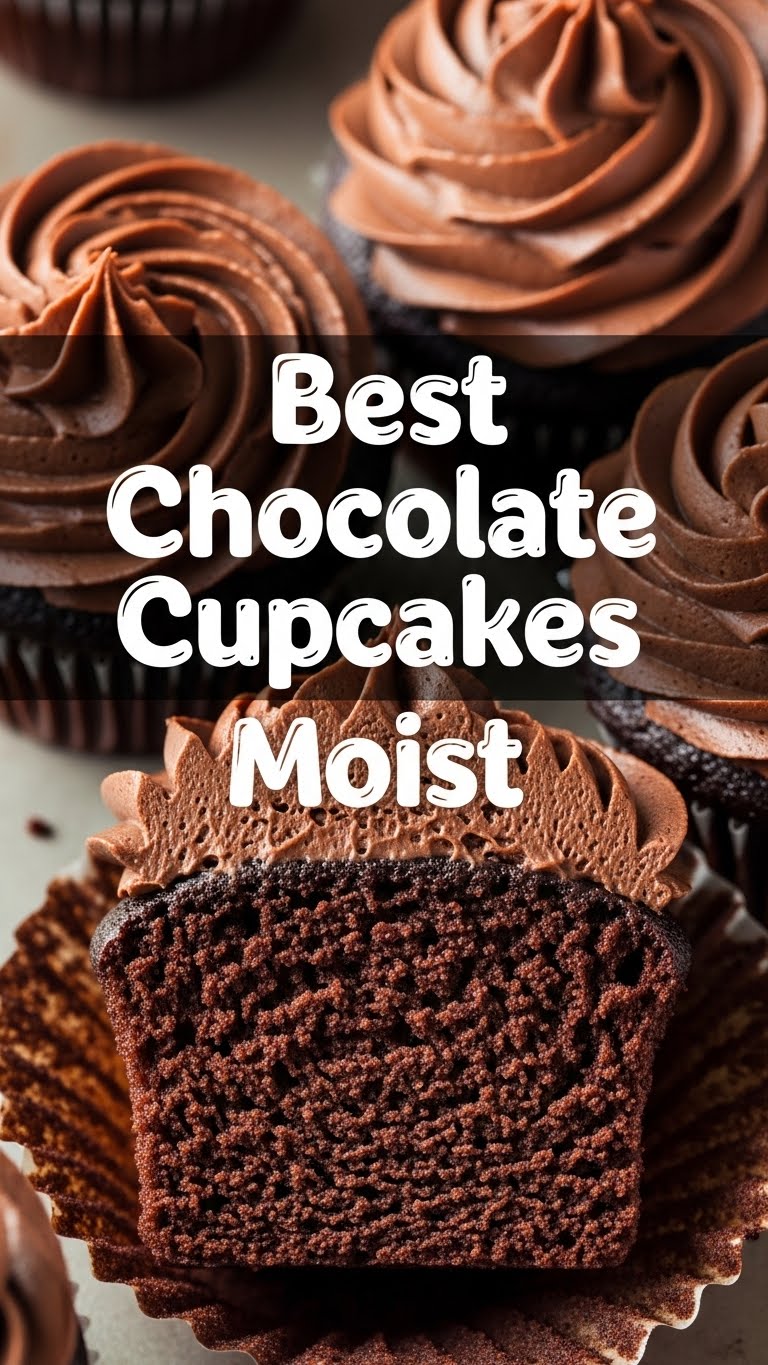
Okay, let’s be real. Sometimes you just need chocolate. Not “a little piece of chocolate,” but “I need to drown my sorrows (or celebrate my wins!) in something deeply, darkly delicious and incredibly moist.” You feel me? Good. Because today, we’re not just making cupcakes; we’re crafting little chocolate clouds of happiness that are so easy, you’ll wonder why you ever bought them from a bakery. And guess what? They’re ridiculously moist. Like, “did a secret chocolate fairy sprinkle extra dew on these?” moist.
Why This Recipe is Awesome
Forget those dry, crumbly imposters that call themselves “chocolate cupcakes.” This recipe is your new best friend for several reasons. First off, it’s practically **idiot-proof**. Seriously, if I can make these after a long day of adulting, you can too. Second, it’s fast. Like, “from zero to warm, chocolatey goodness in under an hour” fast. Third, and most importantly, the result is consistently, unbelievably **moist**. We’re talking melt-in-your-mouth, ‘can I have another?’ moist. Plus, it only uses one bowl for the dry ingredients and another for the wet ones. Less cleanup? Count me in!
Ingredients You’ll Need for Your Chocolate Cloud Quest
Gather ’round, my fellow chocolate adventurers! Here’s your treasure map of ingredients. Nothing fancy, just the good stuff:
- All-Purpose Flour: About 1 ½ cups. The backbone of our fluffy dreams.
- Granulated Sugar: 1 cup. Sweetness is key, my friends.
- Unsweetened Cocoa Powder: ½ cup. The darker, the better, IMO. This is where the magic happens!
- Baking Soda: 1 teaspoon. Our secret weapon for that perfect lift.
- Salt: ½ teaspoon. Just a pinch to make everything else taste even better.
- Large Egg: 1. Our binder, our friend, our little yolky hero.
- Milk: ½ cup (whole milk preferred for max richness, but whatever you have works).
- Vegetable Oil: ¼ cup. This is a big part of why these are so **ridiculously moist**. Don’t skimp!
- Vanilla Extract: 1 teaspoon. A splash of warmth and complexity.
- Hot Water (or coffee!): ½ cup. The ultimate secret ingredient for blooming that cocoa and ensuring max moisture. Trust me on this.
Your Journey to Chocolate Bliss: Step-by-Step!
Ready? Set? Bake! Follow these super simple steps and prepare for chocolate glory.
- Preheat & Prep: First things first, get your oven ready. Preheat it to 350°F (175°C). Line a 12-cup muffin pan with those cute little paper liners. No liners? Lightly grease the pan instead.
- Dry Mix Magic: In a large bowl, whisk together the flour, sugar, cocoa powder, baking soda, and salt. Make sure there are no lumpy bits. We want smooth sailing!
- Wet Mix Wonders: In a separate medium bowl, lightly beat your egg. Then, add the milk, vegetable oil, and vanilla extract. Give it a good whisk until everything is combined.
- Combine Forces: Pour the wet ingredients into the dry ingredients. Stir gently with a spatula or wooden spoon until just combined. **Don’t overmix!** A few lumps are totally fine.
- The Hot Secret: Now, carefully pour in the hot water (or coffee!) into the batter. Stir again until just combined and smoothish. The batter will be thin—don’t panic, this is what gives us the moisture!
- Fill ‘Em Up: Divide the batter evenly among your 12 prepared muffin cups, filling each about **two-thirds full**. This prevents them from overflowing and looking like alien muffins.
- Bake Away: Pop the pan into your preheated oven. Bake for about **18-22 minutes**, or until a toothpick inserted into the center of a cupcake comes out clean or with moist crumbs, not wet batter.
- Cool Down: Let the cupcakes cool in the pan for about 5-10 minutes before transferring them to a wire rack to cool completely. This is the hardest part – resisting the urge to eat them all hot!
Rookie Mistakes to Dodge (Trust Me, I’ve Made Them All)
Even the best of us have face-planted in the kitchen. Here are a few common pitfalls to steer clear of:
- The Overmixer: Stirring the batter too much is the enemy of moist cupcakes. It develops the gluten, making them tough. Mix until just combined, a few lumps are A-OK.
- The No-Preheater: Thinking you don’t need to preheat the oven? Rookie mistake! A cold oven means uneven baking and sad, dense cupcakes. **Always preheat!**
- The Overfiller: Filling your cupcake liners to the brim. No, no, no. They’ll overflow and make a mess, plus you get weirdly shaped tops. Stick to **two-thirds full**.
- The Impatient One: Taking them out too early or too late. Use the toothpick test! Too early = gooey center. Too late = dry edges. Aim for moist crumbs, not liquid batter.
- The Cold Ingredients Enthusiast: While not a deal-breaker for these, generally, room temp eggs and milk emulsify better. But for this quick recipe, we’re being flexible!
Shake It Up! Alternatives & Substitutions
Feeling adventurous? Or just missing an ingredient? No worries, we’ve got options!
- Dairy-Free: Swap the milk for any plant-based milk (almond, soy, oat). They work beautifully.
- Coffee vs. Water: Using hot coffee instead of hot water will **deepen the chocolate flavor** without making them taste like coffee. Seriously, try it!
- Oil Alternatives: While vegetable oil is key for moisture, you could technically use melted butter, but the texture will be slightly different (still good, just different!). I recommend sticking to oil for that super moist crumb.
- Cocoa Power: Regular unsweetened cocoa powder is great. If you have Dutch-processed cocoa, it will give a darker, less acidic flavor. Both are delish!
- Frosting Fun: While these are amazing plain, a simple chocolate buttercream, cream cheese frosting, or even a dusting of powdered sugar would be divine. Get creative!
Burning Questions Answered (Because We’re Friends Like That)
Got questions? I’ve got answers. Probably with a side of sass.
Q: Can I use margarine instead of vegetable oil?
A: Well, technically yes, but why hurt your soul like that? Vegetable oil gives these cupcakes their signature moisture and tenderness. Margarine might work, but it won’t be quite the same level of dreamy. Stick with the oil if you can!
Q: My cupcakes look a little sunken in the middle, what gives?
A: Ah, the dreaded sinkhole! This usually means they weren’t fully baked, or the oven door was opened too early during baking causing a temperature drop. Make sure your toothpick comes out clean!
Q: Can I make this recipe as a cake instead?
A: Absolutely! This recipe scales pretty well. You could pour it into an 8×8 inch square pan or a round 9-inch pan. Just adjust baking time (likely 25-30 minutes for a square pan, maybe longer for round, test with a toothpick!).
Q: How long do these delicious nuggets of joy last?
A: If they even make it past day one, they’ll stay fresh at room temperature in an airtight container for 2-3 days. In the fridge, maybe up to 5 days. But trust me, they won’t last that long.
Q: Can I freeze these cupcakes?
A: Heck yes! Let them cool completely (no frosting!), then wrap them individually in plastic wrap and pop them in a freezer bag. They’ll last for up to 3 months. Thaw at room temperature when the chocolate craving strikes again!
Q: Does the type of cocoa powder really matter?
A: A little bit! Regular unsweetened cocoa powder (like Hershey’s) is acidic and reacts with baking soda. Dutch-processed cocoa (like Ghirardelli) is less acidic. For this recipe, either works, but regular cocoa powder will give a slightly more intense chocolate flavor because of the reaction. Use what you have!
Final Thoughts: Go Forth and Conquer!
There you have it, my friend! Your new go-to recipe for the absolute best, most ridiculously moist chocolate cupcakes. No fuss, no drama, just pure chocolatey goodness that will make you the hero of any potluck, family gathering, or Tuesday night couch session. Seriously, these are good. Now go impress someone—or yourself—with your new culinary skills. You’ve earned it! And don’t forget to save one (or three) for yourself. You deserve it.

