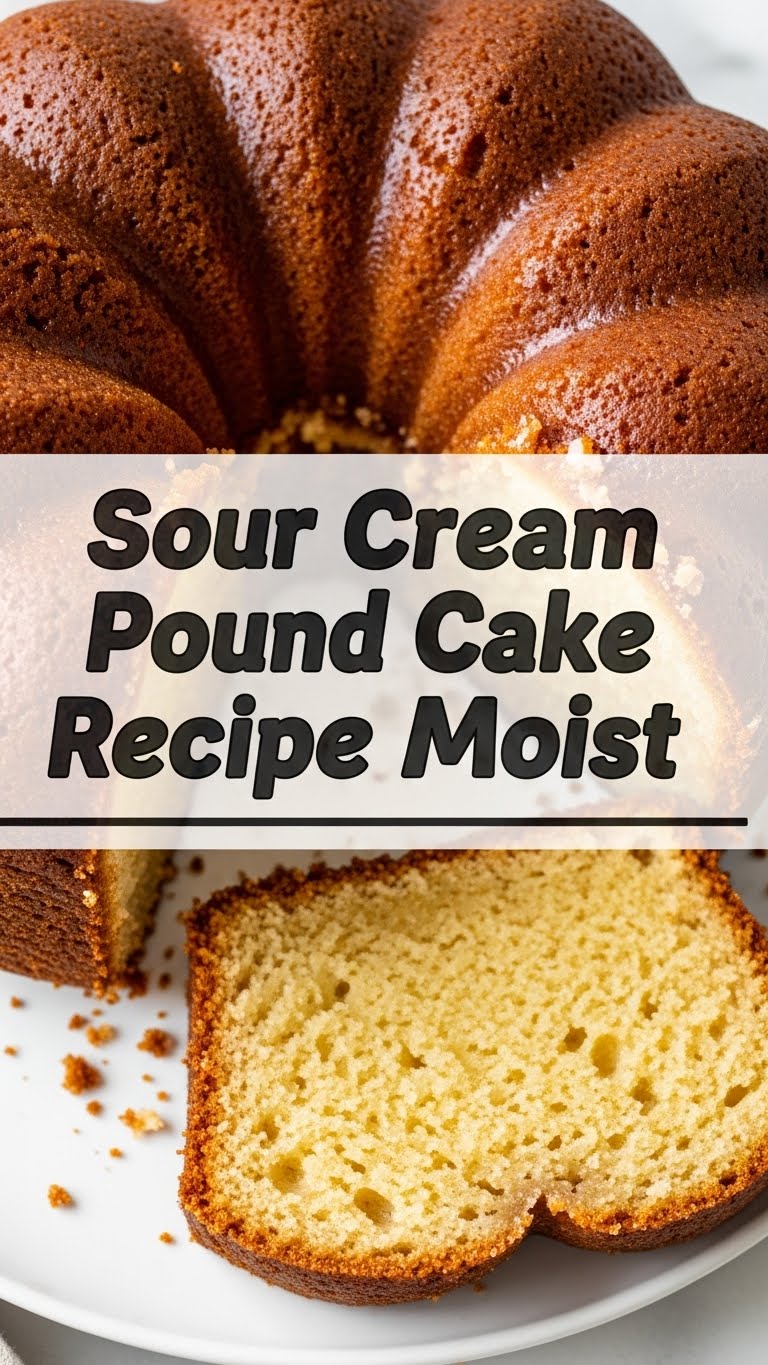
So you’re craving something tasty but too lazy to spend forever in the kitchen, huh? Same. And honestly, who isn’t? But what if I told you there’s a magical dessert that tastes like a million bucks but doesn’t require a culinary degree or sacrificing your entire weekend? Enter the Sour Cream Pound Cake. Yes, you heard right. It’s moist, it’s dreamy, and it practically bakes itself while you binge-watch your favorite show. Let’s do this!
Why This Recipe is Awesome
Okay, first off, this isn’t just any pound cake. This is a Sour Cream Pound Cake. That little secret ingredient (sour cream, duh) is going to give you a cake so moist, you’ll wonder where it’s been all your life. Seriously, dry cake? We don’t know her. This recipe is also:
- Practically idiot-proof: Even if your kitchen skills are usually limited to ordering takeout, you can nail this. I did, and that’s saying something.
- Ridiculously versatile: Wanna dress it up? Go for it. Keep it simple? Also perfect.
- A crowd-pleaser: Everyone loves it. Your grumpy uncle, your picky niece, your dog (don’t give it to the dog though).
- Budget-friendly: No fancy-schmancy ingredients you’ll use once and then forget about in the back of your pantry. Just the good stuff.
Ingredients You’ll Need
Gather ’round, my fellow kitchen adventurers! Here’s your treasure map to deliciousness. Nothing too wild, I promise.
- 1 cup (2 sticks) unsalted butter, softened: Yes, softened. Not melted, not straight-from-the-fridge-hard-as-a-rock. Plan ahead, people!
- 2 cups granulated sugar: The sweet stuff. Don’t skimp, this is pound cake territory!
- 4 large eggs: Room temp is best, if you’re feeling fancy. Otherwise, just use ’em!
- 1 teaspoon vanilla extract: Go for the good stuff here. It makes a difference, trust me.
- 3 cups all-purpose flour: The backbone of our cake. No fancy almond flour or anything, unless you’re feeling rebellious.
- 1 teaspoon baking soda: Our little lifting agent.
- ½ teaspoon salt: Balances all that sweetness. Don’t skip it!
- 1 cup full-fat sour cream: The star of the show! This is where the magic happens, folks.
- Optional for dusting: A little extra flour and shortening/butter for your bundt pan.
Step-by-Step Instructions
Alright, apron on (or not, I’m not your mom), let’s get baking!
- Preheat & Prep: First things first, get that oven fired up to 325°F (160°C). Then, grab your 10-12 cup bundt pan. Grease and flour it like you mean it – no sticking allowed! A good non-stick spray with flour works wonders, too.
- Cream it Good: In a large bowl (or stand mixer if you’re living the dream), cream together your softened butter and granulated sugar until it’s light and fluffy. We’re talking 3-5 minutes here, really get that air in there.
- Eggcellent Addition: Add your eggs one at a time, beating well after each addition. Make sure each egg is fully incorporated before the next one jumps in. Stir in that glorious vanilla extract.
- Dry Mix Time: In a separate medium bowl, whisk together your flour, baking soda, and salt. Give it a good swirl so everything is evenly distributed.
- Alternate Wet & Dry: Now for the fun part! Add your dry ingredients to the butter mixture in three additions, alternating with the sour cream in two additions. Start and end with the flour. So, flour, sour cream, flour, sour cream, flour. Mix just until combined after each addition – don’t overmix! Overmixing is the enemy of moist cake.
- Into the Pan: Pour that beautiful batter into your prepared bundt pan. Smooth the top with a spatula. If you’re feeling extra, give the pan a gentle tap on the counter to release any trapped air bubbles.
- Bake Away: Pop it into your preheated oven. Bake for 60-75 minutes, or until a wooden skewer inserted into the center comes out clean. Every oven is a diva, so keep an eye on it!
- Cool Down: Once baked, let the cake cool in the pan for about 10-15 minutes. This is crucial for easy removal! Then, invert it onto a wire rack to cool completely. Don’t rush it, trust the process.
Common Mistakes to Avoid
We’ve all been there, making silly mistakes. Learn from mine, save yourself the sorrow!
- Not Softening Butter: Trying to cream cold, hard butter? Good luck with that. You’ll end up with lumpy batter and tired arms. Plan ahead!
- Overmixing the Batter: This is probably the number one sin. Overmixing develops the gluten in the flour, leading to a tough, dry cake. Mix just until combined, seriously.
- Not Greasing & Flourishing Your Pan Properly: There’s nothing sadder than a beautiful cake stuck in the pan. Be generous, especially with bundt pans and their intricate designs.
- Opening the Oven Door Too Soon: Resist the urge to peek before at least 45 minutes have passed! This can cause your cake to sink.
- Not Cooling in the Pan: Yanking it out too early is a recipe for a broken cake. Let it chill out for a bit before flipping.
Alternatives & Substitutions
Feeling adventurous? Or just missing an ingredient? No worries, I’ve got your back (mostly).
- Butter: You can use margarine, but honestly, butter is superior for flavor and texture in this recipe. Don’t compromise on the good stuff unless you absolutely have to.
- Sour Cream: Greek yogurt (full-fat, please!) is a decent substitute if you’re in a pinch. It will give a similar tang and moisture. Just make sure it’s plain and unsweetened.
- Vanilla Extract: You could try almond extract for a different flavor profile, or even a mix of vanilla and almond. Experiment!
- Flour: All-purpose is best here. Don’t go swapping in self-rising or bread flour unless you really know what you’re doing. (Which I don’t, so I stick to AP!)
- Add-ins: Want some zest? Throw in a tablespoon of lemon or orange zest with the wet ingredients for a bright kick. Chocolate chips? Sure, why not! Just toss them in a little flour first to prevent sinking.
FAQ (Frequently Asked Questions)
You’ve got questions, I’ve got (mostly) sarcastic answers!
- Q: Can I use low-fat sour cream?
A: Well, technically yes, but why hurt your soul (and your cake’s moisture) like that? Full-fat is king for a reason, my friend. It gives you that luscious texture we’re after. - Q: My cake sank in the middle! What happened?
A: Oh no! This often means your oven wasn’t hot enough, you opened the door too early, or (gasp!) you overmixed the batter. Or maybe you live at a super high altitude? Just kidding… mostly. - Q: How do I store this deliciousness?
A: It’s best stored at room temperature, tightly covered, for up to 3-4 days. If it lasts that long, you have more willpower than me! You can also freeze slices for a rainy day. - Q: Do I really need to bring eggs and butter to room temperature?
A: For the best results, yes, absolutely! Room temp ingredients emulsify better, leading to a smoother, more uniform batter and a finer crumb. It’s not a deal-breaker if you forget, but it definitely helps. - Q: Can I make this in a regular loaf pan?
A: You sure can! You’ll likely need two loaf pans (9×5 inches) and the baking time will be shorter, maybe 45-55 minutes. Just keep an eye on them! - Q: Should I add a glaze?
A: You do you! A simple powdered sugar glaze (powdered sugar + milk/lemon juice) is fantastic. Or just a dusting of powdered sugar. Or nothing at all! It’s perfect plain.
Final Thoughts
So there you have it, folks! Your new favorite go-to recipe for a cake that’ll make you look like a kitchen wizard without actually having to be one. This Sour Cream Pound Cake is pure comfort, easy to make, and dangerously delicious. Now go forth and create! Impress your friends, baffle your enemies, or just indulge yourself on the couch with a slice (or three). You’ve earned it, my culinary comrade. Happy baking!


