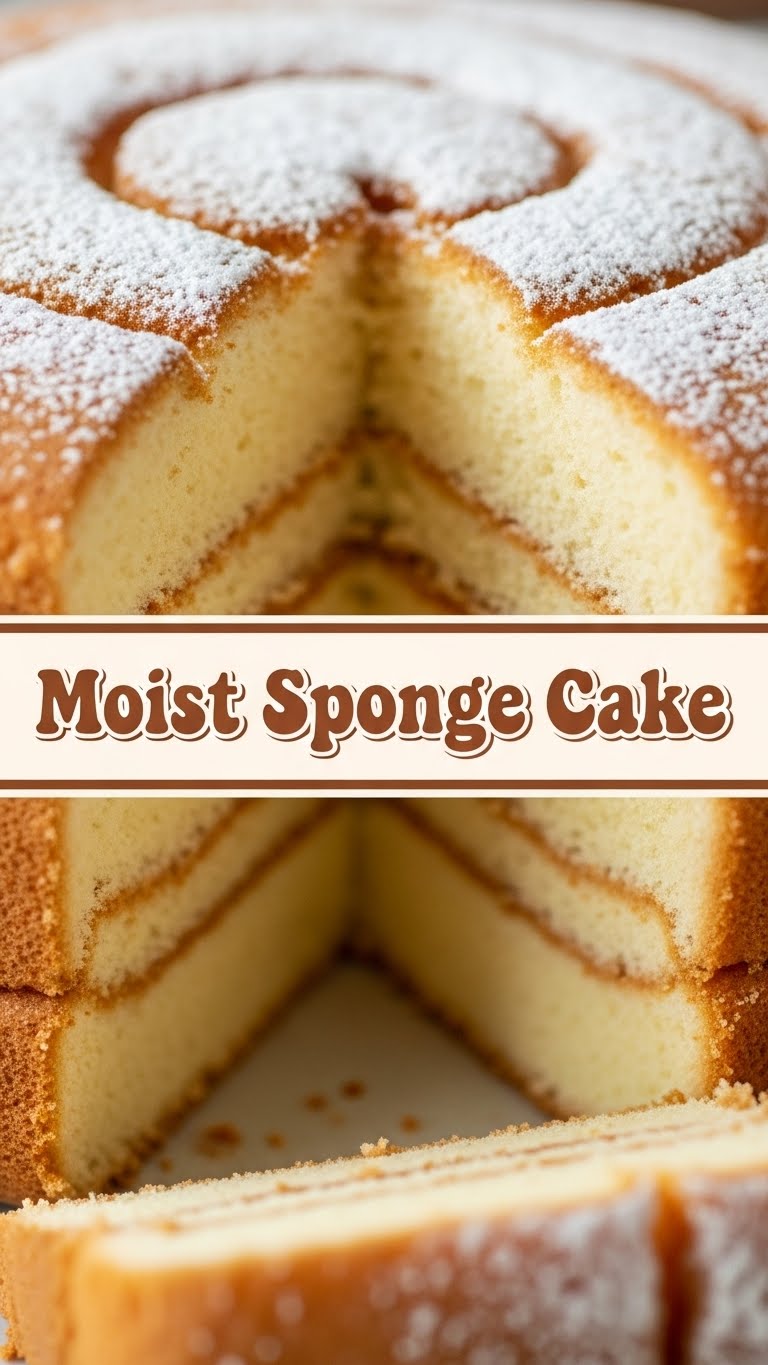
Okay, so you’re scrolling, probably procrastinating, and suddenly a craving hits you like a rogue shopping cart: something sweet, comforting, and oh-so-**moist**. But you’re also contemplating if ordering takeout for dessert is a valid life choice. Been there, friend, been there. Good news! We’re about to whip up a Moist Sponge Cake that’s so easy, your cat could probably supervise. (Disclaimer: please don’t let your cat supervise. Or bake.)
Why This Recipe is Awesome
Let’s be real, some recipes look like they require a science degree and three hours of undisturbed focus. This isn’t one of them. This recipe is your culinary BFF – it’s forgiving, surprisingly simple, and delivers on its promise of *moistness*. We’re talking melt-in-your-mouth, ‘OMG did I make this?’ kind of moist. Plus, it uses ingredients you probably already have lying around, meaning less frantic trips to the grocery store. It’s practically guilt-free!
And **it’s seriously hard to mess up**, even if your baking skills usually involve burning toast. Trust me, I’ve had my share of ‘oops’ moments, and this one consistently comes out a winner. No dry, crumbly sadness here!
Ingredients You’ll Need
Gather your troops, folks! Make sure everything is at room temperature for best results (especially the butter, eggs, and milk – it really makes a difference!).
- 1 ½ cups (190g) All-Purpose Flour: The basic building block. Don’t overthink it.
- 1 ½ teaspoons Baking Powder: Our little lift-off agent. Makes things fluffy.
- ¼ teaspoon Salt: Just a pinch, to make everything taste *more* like itself. Trust me.
- ½ cup (113g) Unsalted Butter, softened: Not melted, not rock hard. Goldilocks zone, people!
- 1 cup (200g) Granulated Sugar: Sweetness without being cloying. Unless you eat it all at once, then no guarantees.
- 2 Large Eggs: Room temperature, please! They mix better. No cold shocks for our batter.
- 1 teaspoon Vanilla Extract: The MVP of flavour. Don’t skimp.
- ¾ cup (180ml) Whole Milk: Also room temperature. Again, temperamental batter.
Step-by-Step Instructions
Get ready to make magic!
- **Prep Your Stage:** First things first, preheat your oven to **350°F (175°C)**. Grab an 8 or 9-inch round cake pan. Grease it like you’re oiling up for a wrestling match, then dust lightly with flour. Tap out the excess. This prevents stickage, which is a major party foul.
- **Dry Mix Fun:** In a medium bowl, whisk together your flour, baking powder, and salt. Give it a good whisk to evenly distribute everything, then set it aside. This is your “dry team.”
- **Wet Mix Power-Up:** In a larger bowl, using an electric mixer (or a strong arm if you’re feeling ambitious), cream together the softened butter and granulated sugar until it’s light and fluffy. This usually takes about 2-3 minutes. Don’t rush this step; **fluffy butter and sugar equals a fluffy cake!**
- **Egg-cellent Addition:** Beat in your eggs one at a time, making sure each is fully incorporated before adding the next. Then, stir in that glorious vanilla extract. Scrape down the sides of the bowl to ensure everything gets mixed evenly.
- **Alternating Awesomeness:** Now, add about a third of your dry ingredient mix to the wet mix, beating on low speed until just combined. Next, pour in half of your milk, mixing until just combined. Repeat with another third of the dry mix, then the remaining milk, and finally the last of the dry mix. **Stop mixing as soon as everything is just combined.** Overmixing is the enemy of moist.
- **Pan It Out:** Pour your beautiful batter into your prepared cake pan. Give it a gentle tap or two on the counter to release any lurking air bubbles.
- **Bake It Up:** Slide that pan into your preheated oven. Bake for **25-30 minutes**, or until a wooden skewer inserted into the center comes out clean. The top should be golden brown and spring back when lightly touched.
- **Cool Down:** Once baked, let the cake cool in the pan for about 10-15 minutes. Then, carefully invert it onto a wire rack to cool completely. Patience, young Padawan! Cooling completely makes it easier to handle and prevents crumbling.
Common Mistakes to Avoid
Don’t be *that* baker. Seriously, let’s learn from others’ (and my) past blunders!
- **Cold Ingredients:** Seriously, I mentioned it thrice now. **Room temperature ingredients mix smoothly and create a better emulsion**, leading to a lighter, more even texture. Cold eggs and butter are just being stubborn.
- **Overmixing:** Once you add flour, mixing too much develops the gluten, making your cake tough and chewy instead of light and moist. Mix until *just* combined. I mean it!
- **Opening the Oven Door Too Early:** Resist the urge! The sudden change in temperature can make your cake sink in the middle. Wait until at least two-thirds through the baking time. It’s like peeking at your birthday presents too early – ruins the surprise!
- **Not Greasing and Flourishing:** Skipping this step is asking for a stuck cake. And no one wants to chisel their dessert out of a pan. FYI, parchment paper on the bottom is also a great idea for extra insurance.
Alternatives & Substitutions
Feel like getting fancy or just working with what you’ve got? No judgment here!
- **Dairy-Free?** Swap the butter for a good quality dairy-free stick butter (like Miyoko’s Kitchen) and the milk for unsweetened almond or oat milk. The texture might be slightly different, but still delish!
- **Lemon Zest Power!** Add the zest of one lemon to the sugar in step 3. It brightens the flavor beautifully and adds a little zing. IMO, lemon makes everything better.
- **Gluten-Free Flour:** You *can* use a 1:1 gluten-free baking blend, but results can vary. I haven’t personally tested every brand, so start with one you trust. You might need a tiny bit more liquid.
- **Sugar Swap:** You can try half brown sugar for a slightly deeper, more caramel-y note. Just make sure it’s packed brown sugar.
FAQ (Frequently Asked Questions)
Got questions? I’ve got (casual) answers!
- **”My cake sank in the middle! What happened?”** Oh no! This often happens from overmixing, opening the oven door too early, or your baking powder might be expired. **Always check your leavening agents’ expiry dates!** They lose their mojo.
- **”Can I make this into cupcakes?”** Absolutely! Pour the batter into cupcake liners, fill them about two-thirds full, and reduce the baking time to around 18-22 minutes. Test with a skewer!
- **”How do I know if my butter is ‘softened’ enough?”** You should be able to press your finger into it and leave a slight indentation without it melting or being rock hard. If it’s too soft, your cake might be greasy. Think soft serve ice cream, not soup.
- **”Do I *really* need room temperature ingredients?”** Yes, darling, you really do. Cold ingredients don’t emulsify properly with the fats, leading to a denser, less uniform crumb. It’s a small step, big difference. Trust the process!
- **”Can I add chocolate chips?”** You know what? You’re the chef! Go for it. Toss about ½ cup of chocolate chips with a tablespoon of flour before adding them to the batter (this helps prevent them from sinking).
- **”How long does this cake last?”** If kept covered at room temperature, it’s usually fantastic for 2-3 days. In the fridge, maybe 4-5. But let’s be real, it’s usually gone in a day.
Final Thoughts
See? That wasn’t so scary, was it? You just crafted a beautiful, *moist* sponge cake that’s ready to be devoured plain, with a dusting of powdered sugar, or even slathered with your favorite frosting (homemade buttercream, anyone?). This recipe is your secret weapon for impressing guests, making a rainy afternoon a little brighter, or just satisfying that sweet tooth without ordering something questionable from a delivery app. Now go impress someone—or yourself—with your new culinary skills. You’ve earned it! (And don’t forget to send me a slice, Kthxbye!)

