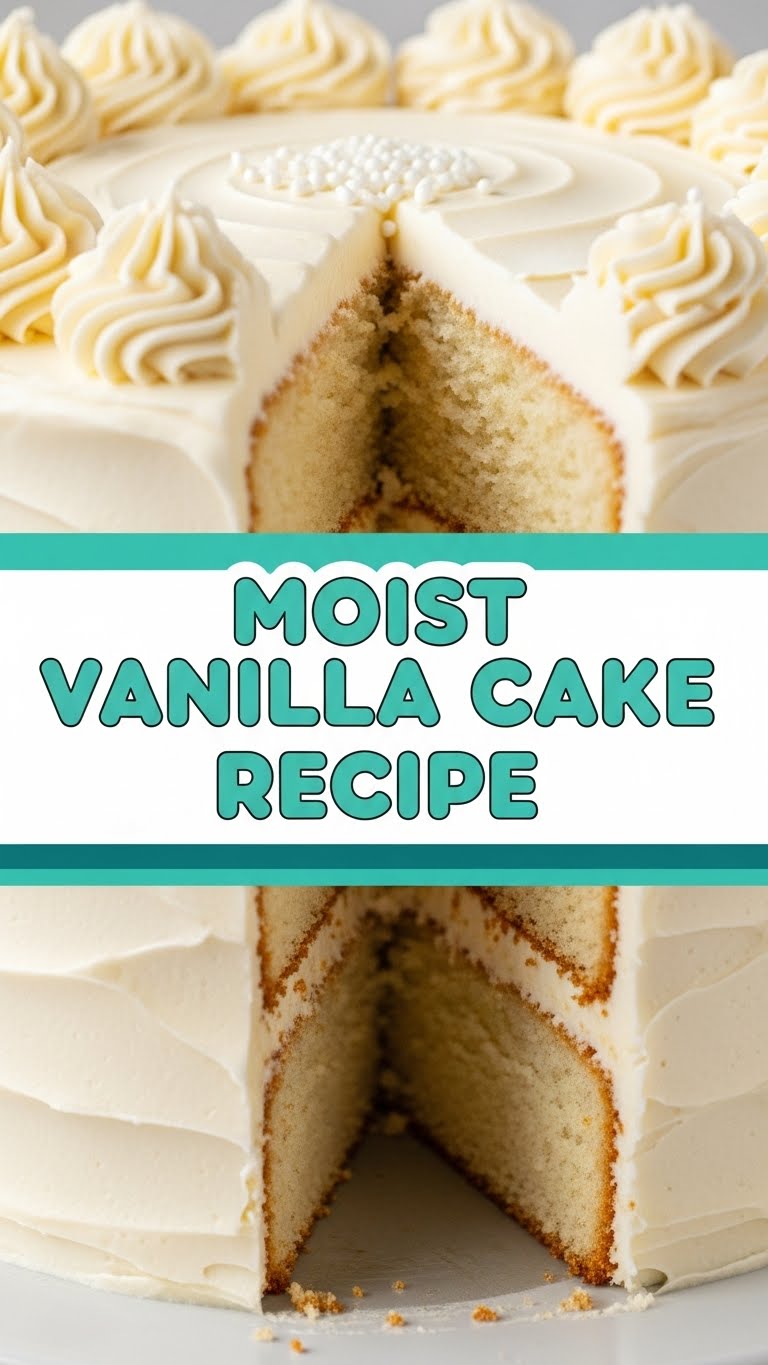
So, you’ve scrolled past enough perfect-looking cakes on Instagram, and now your sweet tooth is staging a full-blown revolution, right? Or maybe you just need a serious pick-me-up that involves more than just another coffee. Whatever your cake-related crisis, you’ve landed in the right spot! We’re talking moist, fluffy, ridiculously flavorful vanilla cake that tastes like a warm hug and makes people ask for the recipe. Yes, even *you* can make this. Let’s do this!
Why This Recipe is Awesome
Okay, let’s get real. This isn’t just *a* vanilla cake; it’s *the* vanilla cake. The kind that makes you wonder if you accidentally became a pastry chef overnight. Seriously, it’s so moist, you’ll wonder if it secretly moonlights as a sponge. But here’s the best part: it’s surprisingly simple to make. We’re talking minimal fuss, maximum deliciousness. It’s practically idiot-proof – even I didn’t mess it up, and my track record with delicate desserts is… spotty, to say the least. So, if you’re looking for a recipe that delivers on flavor, texture, and doesn’t require a culinary degree, you’ve hit the jackpot. You’re welcome!
Ingredients You’ll Need
Gather ’round, my future baking superstar! Here’s your hit list for vanilla perfection. **Pro tip: make sure everything is at room temperature.** Trust me on this one; it makes a HUGE difference for a smooth, lump-free batter.
- 2 ½ cups (300g) All-purpose flour: The backbone of any good cake. Don’t try to get fancy with oat flour here, unless you’re aiming for a sad, dense brick.
- 1 ¾ cups (350g) Granulated sugar: For that sweet, sweet joy. Or, you know, just regular sugar.
- 1 tbsp Baking powder: Our leavening friend for a beautiful rise.
- ½ tsp Baking soda: Teams up with the buttermilk for extra lift and tenderness. Don’t skip it!
- ½ tsp Salt: Just a pinch, to make everything else sing. Science, baby!
- 1 cup (226g) Unsalted butter: Softened to room temp. Cold butter is the enemy of fluffy cake. No, seriously.
- 3 Large eggs: Also room temp. They blend better and create a smoother emulsion.
- 2 tsp Pure vanilla extract: The star of the show. Don’t skimp on the good stuff! This is a *vanilla* cake, after all.
- 1 ¼ cups (300ml) Buttermilk: The secret weapon for moisture and a delicate tang. If you don’t have it, don’t panic – check the substitutions section!
- ¼ cup (60ml) Whole milk: Just a splash, to get that perfect pourable consistency.
Step-by-Step Instructions
Alright, apron on, game face ready! Let’s turn these ingredients into a masterpiece. Remember, baking is a marathon, not a sprint.
- Preheat & Prep: First things first, crank up that oven to 350°F (175°C). Grab two 8-inch round cake pans. Grease ’em up, flour ’em, and then line the bottoms with parchment paper. No sticking nightmares here!
- Whisk the Dry Squad: In a medium bowl, whisk together the flour, sugar, baking powder, baking soda, and salt. Give it a good whisk for about 30 seconds to make sure everything’s evenly distributed.
- Cream the Dream Team: In a large bowl, using an electric mixer (stand or hand-held, your choice!), beat the softened butter on medium speed until it’s light and creamy, about 2 minutes.
- Egg-cellent Addition: Add the eggs, one at a time, beating well after each addition until just combined. Scrape down the sides of the bowl as needed to make sure no butter is left behind. Then, stir in the vanilla extract. Mmm, smells good already!
- Alternate & Mix: Now for the magic! With the mixer on low speed, alternately add the dry ingredients and the buttermilk/milk mixture to the butter-egg mixture. Start and end with the dry ingredients. So, about a third of the dry, then half the wet, another third of the dry, the rest of the wet, and finally the last third of the dry. **Mix until *just* combined.** Seriously, stop as soon as you see no more dry streaks. Overmixing is the enemy of tender cake!
- Divide & Conquer: Divide the batter evenly between your two prepared cake pans. Give ’em a gentle tap on the counter to release any air bubbles.
- Bake It Up: Pop those beauties into your preheated oven and bake for 28-32 minutes, or until a wooden skewer inserted into the center comes out clean. Don’t open the oven door too early, unless you want a sad, sunken cake!
- Cool Down: Once baked, let the cakes cool in their pans on a wire rack for about 10-15 minutes. Then, carefully invert them onto the wire rack, remove the parchment paper, and let them cool completely before frosting. This is the hardest part: patience!
Common Mistakes to Avoid
Nobody’s perfect, but we can avoid some classic cake calamities, right? Heed my warnings, friend!
- Cold Ingredients: I said it once, I’ll say it again: **room temp is your friend!** Cold butter and eggs don’t emulsify properly, leading to a lumpy batter and a denser cake. You want airy, not cement-like.
- Overmixing the Batter: This is probably the number one cause of tough, chewy cake. Once you add the flour, mix only until *just* combined. Unleashing the gluten too much is a one-way ticket to rubbery frisbee territory.
- Opening the Oven Door Too Early: Patience, grasshopper! Your cake is delicate and needs stable heat to rise properly. Resist the urge to peek before at least 25 minutes have passed. Your cake will thank you.
- Not Measuring Properly: Baking is a science, not a “pinch of this, dash of that” situation (that’s for cooking!). Use proper measuring cups and spoons, and for flour, **spoon and level** rather than scooping directly from the bag. Too much flour = dry cake.
- Not Greasing/Flouring Your Pans Well: Rookie mistake! There’s nothing worse than a beautiful cake stuck irrevocably to its pan. Don’t skimp on the butter and flour, and definitely use parchment paper on the bottom.
Alternatives & Substitutions
Life happens, ingredients run out, or maybe you just want to experiment. Here are a few tweaks you can make without sacrificing too much.
- Buttermilk Substitute: No buttermilk? No problem! Mix 1 ¼ cups of regular milk (whole milk works best) with 1 tablespoon of white vinegar or lemon juice. Let it sit for 5 minutes, and *voilà*, you’ve got homemade buttermilk. Easy peasy!
- Butter: Can you use margarine instead? *Sigh*. Technically yes, but why hurt your soul like that? Butter provides a richer flavor and superior texture that margarine just can’t replicate. IMO, stick to butter for the best results.
- Flour: Stick to all-purpose flour for this recipe. Whole wheat will change the texture significantly (denser, drier), and gluten-free flours would require major recipe adjustments.
- Extracts: Want a different vibe? You could swap out half the vanilla extract for almond extract for a marzipan-like note, or lemon extract for a bright, citrusy twist. Just don’t ditch the vanilla entirely, unless you’re making a different cake altogether!
FAQ (Frequently Asked Questions)
Got questions? I’ve got (hopefully) humorous answers!
- Can I make cupcakes instead of a layer cake? Absolutely! Fill cupcake liners about two-thirds full and bake for 18-22 minutes. Keep an eye on them, as oven times can vary.
- My cake sank in the middle, what happened? Oh, the horror! Usually, this means one of two things: you either opened the oven door too early (bad!) or you overmixed the batter (also bad!). Make sure your leavening agents (baking powder/soda) aren’t expired either.
- How long does this cake last? If kept covered at room temperature, it’ll be delicious for 2-3 days. In the fridge, it can last up to a week, but honestly, it’s usually gone way before that.
- Can I freeze this vanilla cake? Heck yes! Once completely cooled, wrap individual layers tightly in plastic wrap, then foil, and freeze for up to 2-3 months. Thaw in the fridge before frosting.
- Why is room temperature butter and eggs so important? Great question, future baking guru! They emulsify better, meaning they blend together smoothly, trapping more air. This creates a lighter, fluffier batter and a finer crumb in your finished cake. Science!
- What kind of frosting should I use for this cake? **Buttercream!** Duh. A classic vanilla buttercream is always a winner. Or, if you’re feeling a bit fancy, a cream cheese frosting or even a simple chocolate ganache would be divine.
- Can I use self-rising flour? Nope! Self-rising flour already has leavening and salt mixed in. If you use it, you’d have to adjust the baking powder, baking soda, and salt amounts, and honestly, it’s just easier to stick to all-purpose and add them separately.
Final Thoughts
See? I told you it wasn’t rocket science! You’ve just whipped up a moist vanilla cake that’s ready to impress. Whether you slather it with a fancy frosting or just dust it with a little powdered sugar, it’s going to be a showstopper. So go forth and conquer your kitchen! Share it with friends, bring it to a potluck, or just eat it all yourself with a fork straight from the pan – no judgment here. You’ve earned it, baker extraordinaire!
Happy baking, my friend!

