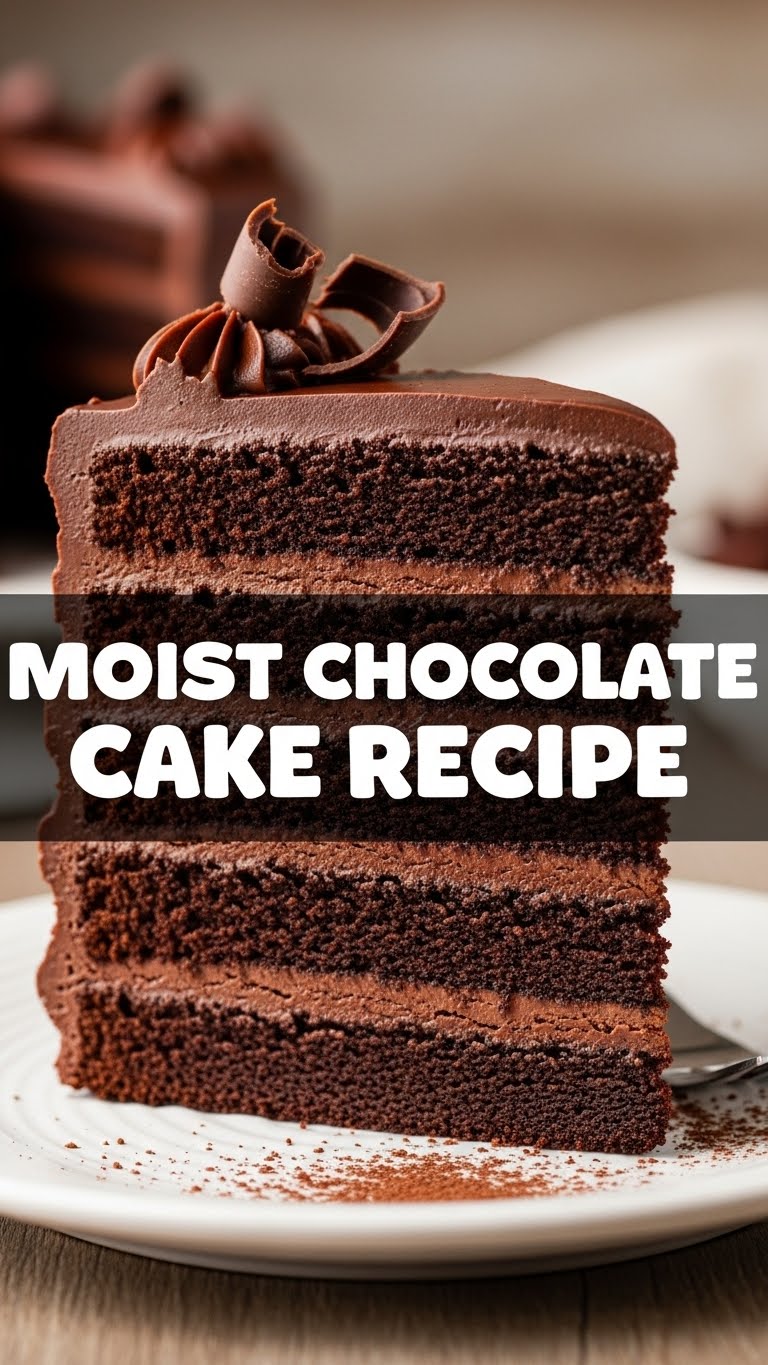
So, you’ve got that irresistible craving for chocolate cake, but the thought of spending hours in the kitchen makes your soul tired? Trust me, I get it. We’re talking about that deep, dark, intensely moist kind of chocolate cake that makes you want to hug the baker (that’s going to be you!). And guess what? This isn’t some fancy-pants, intricate recipe. This is the “I want cake now, with minimal fuss and maximum deliciousness” recipe. You ready to dive in?
Why This Recipe is Awesome
Okay, let’s be real. There are approximately 8 bajillion chocolate cake recipes out there. So why this one? Well, for starters, it’s practically **foolproof**. Seriously, if I, a person who once accidentally used salt instead of sugar in a batch of cookies (don’t ask), can nail this, so can you. It comes out ridiculously moist every single time, without needing a million weird steps or obscure ingredients. Plus, it’s fast. Like, “oops, I need a dessert in an hour” fast. No fancy equipment, no crazy techniques. Just pure, unadulterated chocolatey goodness. Think of it as your new culinary superpower. You’re welcome.
Ingredients You’ll Need
Gather ’round, my future cake champions! Here’s what you’ll need to transform into a chocolate wizard. Most of this stuff is probably already lurking in your pantry, you sneaky chef, you.
- All-Purpose Flour: About 1 ½ cups. The backbone of our cakey dreams.
- Granulated Sugar: 1 ½ cups. Because sweetness makes the world (and your cake) go ’round.
- Unsweetened Cocoa Powder: ½ cup. The star of the show! Go for good quality if you can; it really makes a difference.
- Baking Soda: 1 ½ teaspoons. Our little magic puff-upper.
- Salt: 1 teaspoon. Don’t skip this! It enhances the chocolate flavor like a secret superpower.
- Eggs: 2 large. Room temperature if you remember; if not, no biggie, just roll with it.
- Milk: 1 cup. Whole milk is great for richness, but 2% works too.
- Vegetable Oil: ½ cup. The secret to that glorious moistness. Don’t use olive oil unless you want a savory cake, haha.
- Vanilla Extract: 2 teaspoons. Essential for depth of flavor. Get the good stuff!
- Boiling Water (or hot coffee!): 1 cup. Yes, boiling! This is a game-changer for moisture and intense chocolate flavor. If you use coffee, it deepens the chocolate flavor without making it taste like coffee. Mind blown, right?
Step-by-Step Instructions
Alright, apron on (or don’t, I won’t tell), let’s get baking! This is so easy, you might think you missed a step. You didn’t.
- Prep Your Pan & Oven: First things first, **preheat your oven to 350°F (175°C)**. Then, grab a 9×13 inch baking pan (or two 8-inch round pans if you’re feeling fancy). Grease and flour it lightly. This prevents sticking, which is a total mood killer.
- Combine Dry Ingredients: In a large mixing bowl, whisk together the flour, sugar, cocoa powder, baking soda, and salt. Make sure there are no lumpy bits of cocoa. We want smooth chocolate sailing here!
- Add Wet Ingredients (Mostly): Now, pour in the eggs, milk, vegetable oil, and vanilla extract into your dry mixture. Mix it on medium speed with an electric mixer (or vigorously by hand if you need a bicep workout) until everything is just combined. Don’t overmix!
- Introduce the Hot Liquid: With the mixer on low speed (or by hand), carefully pour in the boiling water (or hot coffee). The batter will be thin—don’t panic! This is exactly how it should be for that super moist result. Mix until smooth.
- Bake It Up: Pour your beautiful, thin batter into the prepared baking pan. Pop it into your preheated oven.
- Check for Doneness: Bake for 30-35 minutes for a 9×13 pan, or 35-40 minutes for round pans. You’ll know it’s ready when a wooden skewer or toothpick inserted into the center comes out clean or with a few moist crumbs attached.
- Cool Down: Let the cake cool in the pan on a wire rack for about 10-15 minutes before attempting to invert it (if using round pans) or slicing it (if using a 9×13). Then let it cool completely before frosting, unless you want melty frosting soup. **Patience, young grasshopper!**
Common Mistakes to Avoid
We’ve all been there – kitchen mishaps are part of the charm (or trauma). Here are some pitfalls to dodge so your cake turns out stellar:
- Not Preheating: Seriously, **preheat your oven!** Throwing a cake into a cold oven is like trying to run a marathon without warming up. Rookie mistake. Your cake won’t rise properly.
- Overmixing: Once you add the wet to the dry, mix just until combined. Overmixing develops the gluten in the flour, leading to a tough, dry cake. Nobody wants a hockey puck.
- Skipping the Salt: “It’s a sweet cake, why salt?” Because salt *enhances* the chocolate flavor, making it taste richer and more complex. Trust me on this one.
- Using Cold Ingredients: While not strictly a deal-breaker for this recipe, room temperature eggs and milk emulsify better, leading to a smoother, more uniform batter. But if you forget, it’s not the end of the world.
- Cutting it Too Soon: I know, the smell is intoxicating. But slicing a hot cake often results in crumbs and structural weakness. Let it cool a bit; it’ll hold together better.
Alternatives & Substitutions
Life happens, sometimes you’re out of something, or you just want to get a little wild. Here are some easy swaps:
- Coffee for Water: I already mentioned it, but it bears repeating: **use hot coffee instead of boiling water** for an even deeper, richer chocolate flavor. It doesn’t make it taste like coffee, just amplifies the chocolate. It’s my go-to, IMO.
- Dairy-Free? Swap regular milk for your favorite plant-based milk (almond, soy, oat – whatever floats your boat!). Just make sure it’s unsweetened.
- Gluten-Free Flour: You can often swap in a 1:1 gluten-free baking blend. Just make sure it contains xanthan gum. Results might vary slightly, but it usually works well for cakes.
- Oil Alternatives: If you’re out of vegetable oil, any neutral-flavored oil like canola or grapeseed will do the trick. Melted coconut oil could work too, but might impart a subtle flavor.
FAQ (Frequently Asked Questions)
Got questions? I probably anticipated them. Let’s tackle some common conundrums:
- “Can I use semi-sweet chocolate chips in the batter?” Nope, this recipe uses cocoa powder for its intense chocolate flavor and specific texture. Adding chips would change the chemistry and might make it too dense or dry. Save those for snacking!
- “My cake came out dry! What did I do wrong?” Uh oh! Usually, a dry cake is from overbaking. **Keep an eye on that baking time!** Also, make sure you used the correct amount of oil and boiling water. Don’t eyeball it, use measuring cups!
- “Do I *really* need boiling water?” Yes, really! The boiling water “blooms” the cocoa powder, releasing more flavor and creating a super fine, moist crumb. It’s a key part of the magic.
- “Can I make this into cupcakes?” Absolutely! Line a muffin tin with liners, fill them about two-thirds full, and bake for 18-22 minutes. Keep an eye on them, as baking times will be shorter.
- “What kind of frosting should I use?” Oh, the possibilities! A classic chocolate buttercream is divine. A simple ganache is also incredible. Or, if you’re lazy like me, just dust it with powdered sugar. It’s all good!
Final Thoughts
And there you have it! Your very own, incredibly moist, deliciously chocolatey cake, created with minimal fuss and maximum sass. See? I told you it was easy. Now go forth and conquer that cake, whether it’s for a special occasion, a random Tuesday, or just because you deserve something amazing (which you always do, BTW). Share it with friends, devour it solo, or just stare at its chocolatey perfection. You earned this culinary win! Go on, get baking, you rockstar!

