So, you’ve got those sad, spotty bananas sitting on your counter, silently judging you, huh? Don’t throw ’em out! We’re about to give those neglected beauties a glorious, buttery send-off into the land of “best banana bread ever.” Seriously, if you’re craving something warm, sweet, and ridiculously easy to make without spending an entire afternoon in the kitchen, you’re in the right place. Let’s make some magic!
Why This Recipe is Awesome
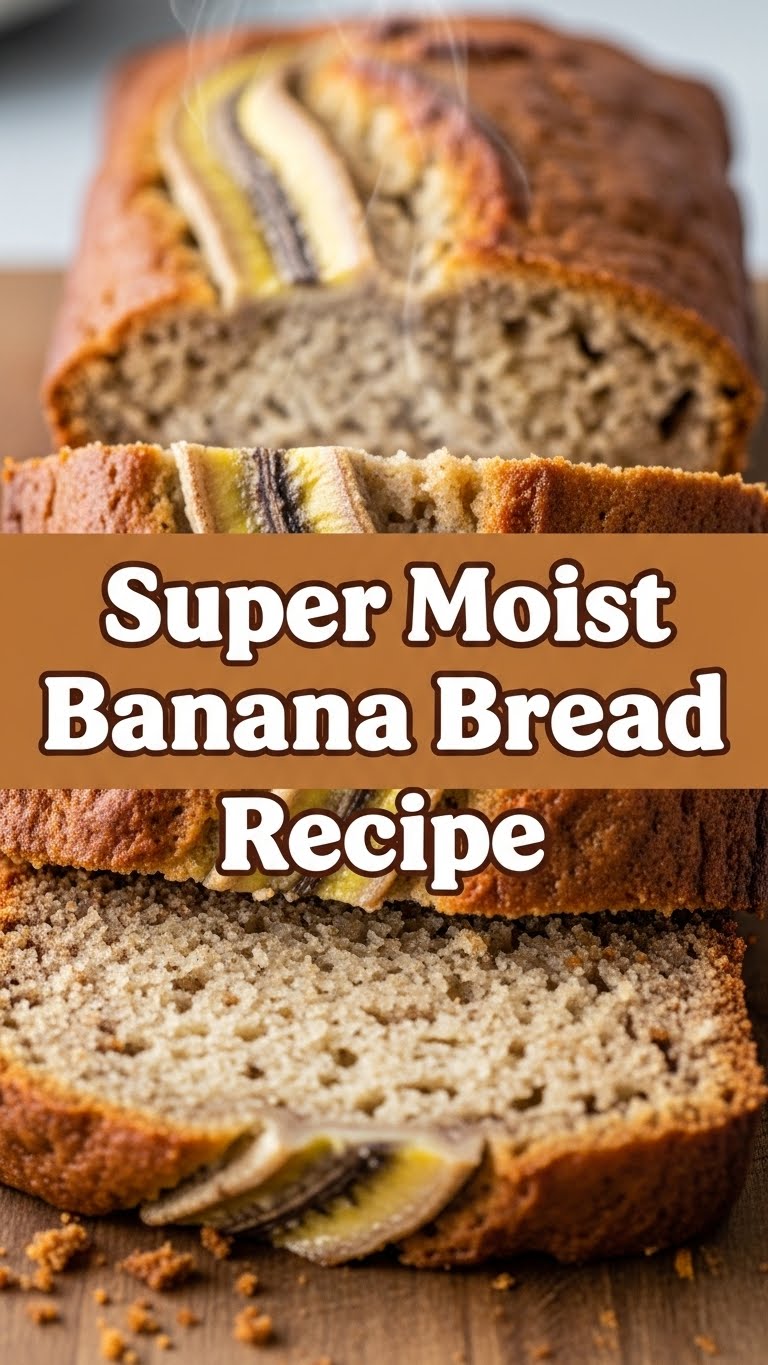
Okay, first things first: this isn’t just *any* banana bread recipe. This is THE super moist banana bread recipe. And “super moist” isn’t just a buzzword here, it’s a promise! Why is it awesome? Because it’s practically **idiot-proof**. Even if you’ve been known to burn toast, you can nail this. It’s got that perfect balance of sweetness, a beautiful tender crumb, and it smells like a hug from your grandma. Plus, it’s a fantastic excuse to use up those overripe bananas before they become… well, compost.
No complicated steps, no fancy equipment. Just simple ingredients and a little love. You’ll impress yourself, I promise. Or at least you’ll have a delicious treat all to yourself. No judgment here!
Ingredients You’ll Need
Gather your troops! Most of these are probably already lurking in your pantry.
- **3-4 Very Ripe Bananas:** The browner, the better! We’re talking serious leopard print here. If they’re still yellow, put them in a paper bag for a day or two. Trust me, it makes all the difference.
- **1/2 cup Unsalted Butter:** Melted and slightly cooled. Unsalted, because we control the salt content, thank you very much.
- **3/4 cup Granulated Sugar:** Just enough sweetness to balance the banana goodness.
- **1 Large Egg:** Room temperature, please! It helps everything emulsify better.
- **1 teaspoon Vanilla Extract:** A splash of pure magic. Don’t skip it!
- **1 1/2 cups All-Purpose Flour:** No fancy stuff needed unless you’re feeling adventurous.
- **1 teaspoon Baking Soda:** Our leavening hero, making everything rise beautifully.
- **1/2 teaspoon Salt:** Just a pinch to make all those flavors pop.
Step-by-Step Instructions
Ready to get your bake on? Let’s do this!
- **Preheat Your Oven & Prep Your Pan:** First, crank that oven to **350°F (175°C)**. Then, grab a 9×5 inch loaf pan. Grease it up and flour it lightly, or line it with parchment paper for easy removal. Future you will thank you.
- **Mash Those Bananas:** In a medium bowl, mash your super ripe bananas with a fork until they’re mostly smooth but still have a few small lumps. We like a little texture!
- **Cream the Wet Stuff:** In a separate large bowl, whisk together the melted (and slightly cooled!) butter and granulated sugar until well combined. It should look a bit sandy and smooth.
- **Add the Egg & Vanilla:** Beat in the large egg until it’s fully incorporated, then stir in the vanilla extract. Give it a good whisk.
- **Combine Dry Ingredients:** In yet another bowl (sorry, I warned you it was easy, not necessarily mess-free!), whisk together the flour, baking soda, and salt. Make sure it’s all mixed evenly.
- **Gently Combine Wet & Dry:** Pour your dry ingredient mixture into the wet ingredients. Mix until *just* combined. And I mean **just** combined. A few streaks of flour are totally fine. Overmixing is the enemy of moist banana bread, FYI.
- **Fold in the Bananas:** Gently fold in your mashed bananas. Again, don’t overmix! Just enough to distribute them.
- **Bake It Up:** Pour the batter into your prepared loaf pan. Pop it into the preheated oven and bake for **50-65 minutes**. How do you know it’s done? A toothpick inserted into the center should come out clean, or with just a few moist crumbs attached.
- **Cool Down:** Once out of the oven, let it cool in the pan for about 10 minutes. This helps it firm up. Then, carefully remove it from the pan and let it cool completely on a wire rack. Or, if you’re like me, cut a slice immediately because the smell is just too much to resist.
Common Mistakes to Avoid
Listen, we all make mistakes. But with this list, you won’t make *these* mistakes. You’re welcome.
- **Using Underripe Bananas:** Seriously, this is probably the #1 rookie mistake. Yellow bananas are for eating, brown bananas are for baking. They’re sweeter and easier to mash, creating that signature moistness. Don’t play yourself!
- **Overmixing the Batter:** I said it once, I’ll say it again: **overmixing leads to tough, dry banana bread.** Mix just until the ingredients are combined. A little lumpiness is a sign of good technique, not bad baking.
- **Not Greasing Your Pan Properly:** Thinking you can just eyeball it? Nope. Nothing’s worse than having your perfect loaf stick to the pan. Take the extra minute to grease and flour (or parchment line) it well.
- **Impatience with Cooling:** I know, the smell is intoxicating. But letting it cool in the pan for 10 minutes, then fully on a rack, helps it set and makes for cleaner slices. Resist the urge to tear into it immediately (or don’t, I get it).
Alternatives & Substitutions
Feeling creative? This recipe is super flexible! Here are some ideas:
- **Chocolate Chips or Nuts:** Add 1/2 to 1 cup of chocolate chips (dark, milk, white – whatever floats your boat!) or chopped walnuts/pecans with the mashed bananas. It’s a game-changer!
- **Spice It Up:** A pinch of cinnamon (1/2 teaspoon) or nutmeg can add a lovely warmth.
- **Brown Sugar Swap:** You can replace up to half of the granulated sugar with light brown sugar for an even deeper, more caramel-y flavor. Yum!
- **Make Muffins:** Divide the batter into a greased muffin tin. Bake for about 20-25 minutes, or until a toothpick comes out clean. Perfect for grab-and-go breakfasts!
- **Gluten-Free Version:** Use a 1:1 gluten-free flour blend. The results are usually fantastic!
FAQ (Frequently Asked Questions)
Got questions? I’ve got answers, delivered with a side of sass.
- **Why do my bananas have to be so brown? Are you serious?**
Dead serious! Those unsightly brown spots mean the starches have converted to sugar, making them sweeter and more flavorful. They also mash super easily, which contributes to that glorious moistness. Green bananas make sad, bland bread. Don’t be sad bread.
- **Can I use frozen bananas?**
Absolutely! Just make sure to thaw them completely and drain any excess liquid before mashing. They’ll be even softer and easier to work with.
- **How should I store this amazing banana bread?**
Once cooled, wrap it tightly in plastic wrap or foil, or store it in an airtight container at room temperature for up to 3-4 days. For longer storage, freeze slices or the whole loaf for up to 3 months!
- **Can I reduce the sugar? I’m trying to be good.**
You can, but don’t go too crazy. The sugar doesn’t just add sweetness; it also contributes to the texture and moisture. You could probably get away with reducing it by a quarter cup without drastically changing the outcome, but any more and you risk a denser, less flavorful loaf.
- **Margarine instead of butter? Is that okay?**
Well, technically, yes, you *could*. But why hurt your soul (and your banana bread’s flavor) like that? Butter provides a richer taste and better texture. If you must, use a stick margarine with at least 70% vegetable oil, but IMO, butter is king here.
- **My banana bread is dry! What went wrong?**
Ah, the dreaded dry bread! Usually, this is due to one of two things: overmixing the batter (which develops the gluten too much, making it tough) or overbaking. Keep an eye on that oven and don’t mix more than necessary!
Final Thoughts
So there you have it, folks! Your new go-to, super moist banana bread recipe. It’s comforting, it’s delicious, and it’s surprisingly simple. Now you have zero excuses not to transform those spotty bananas into something truly spectacular. Go forth and conquer that craving! You’re basically a professional baker now, you know. Don’t forget to share with friends, family, or just hoard it all for yourself. You’ve earned it!


