Look, we both know why you’re here. You’ve got a chocolate craving that just won’t quit, and you’re thinking, “Maybe if I add caramel to the mix, I’ll finally be satisfied.” Well, my friend, you’re absolutely right. This chocolate cake with caramel filling isn’t just a dessert—it’s practically therapy in cake form. And the best part? You don’t need a culinary degree to nail it.
Why This Recipe is Awesome
First off, this cake hits that perfect sweet spot between “impressive enough to make people think you spent hours in the kitchen” and “actually doable on a random Tuesday night.” The chocolate cake is ridiculously moist (sorry if you hate that word, but there’s just no better description), and the caramel filling? It’s the kind of thing that makes people close their eyes when they take a bite.
Plus, unlike those fussy French pastries that require equipment you don’t own, this recipe uses normal human ingredients. No specialty stores required – just regular supermarket finds and about 90 minutes of your time (including baking). Worth it? Absolutely.
Ingredients You’ll Need
For the chocolate cake:
- 2 cups all-purpose flour (the regular stuff, nothing fancy)
- 2 cups granulated sugar (yes, it’s a lot, just embrace it)
- 3/4 cup unsweetened cocoa powder (the darker, the better)
- 2 teaspoons baking soda (not powder—they’re different, trust me)
- 1 teaspoon salt (to make the sweet taste sweeter, science!)
- 2 large eggs (room temperature—important for fluffiness)
- 1 cup buttermilk (no buttermilk? Keep reading, I’ve got you covered)
- 1/2 cup vegetable oil (makes it moist without having to try)
- 2 teaspoons vanilla extract (the real kind, not that fake stuff)
- 1 cup hot coffee (don’t worry, it won’t taste like coffee)
For the caramel filling:
- 1 cup granulated sugar (about to transform into golden deliciousness)
- 6 tablespoons butter (salted is fine, unsalted works too)
- 1/2 cup heavy cream (diet food, this is not)
- 1/4 teaspoon salt (skip if using salted butter)
- 1 teaspoon vanilla extract (because vanilla makes everything better)
For the chocolate frosting:
- 1/2 cup butter, softened (patience, grasshopper)
- 2/3 cup unsweetened cocoa powder (chocolate on chocolate, as it should be)
- 3 cups powdered sugar (approximately—go by texture)
- 1/3 cup milk (add gradually, you can always add more)
- 1 teaspoon vanilla extract (sensing a pattern here?)
Step-by-Step Instructions
For the cake:
- Preheat your oven to 350°F (175°C). Do this first! Grease and flour two 9-inch round cake pans, or line them with parchment paper if you’re fancy.
- In a large bowl, whisk together flour, sugar, cocoa, baking soda, and salt. Set aside. This is your dry mix dream team.
- In another bowl, beat the eggs, then add buttermilk, oil, and vanilla. Mix until they’re all friends.
- Slowly add the wet ingredients to the dry ingredients, mixing as you go. The batter will be thick, and that’s exactly what we want.
- Add the hot coffee and mix well. The batter will suddenly become thinner—don’t panic, that’s normal. The heat from the coffee helps bloom the cocoa powder, making it taste even more chocolatey.
- Pour the batter evenly into your prepared pans and bake for 30-35 minutes, or until a toothpick inserted in the center comes out clean-ish (a few moist crumbs are fine).
- Let the cakes cool in the pans for 10 minutes, then transfer to wire racks to cool completely. Patience is key here—hot cakes and caramel do NOT play well together.
For the caramel filling:
- In a medium saucepan, heat the sugar over medium heat. Watch it like a hawk! Don’t stir—just swirl the pan occasionally until the sugar melts and turns amber (think: the color of honey).
- Once all the sugar has melted and turned that gorgeous amber color, add the butter. It will bubble aggressively—this is normal, not a sign that you’re failing at life.
- Stir until the butter is completely melted, then slowly pour in the heavy cream while stirring. Again, it will bubble and steam dramatically. You’re basically a kitchen chemist now.
- Remove from heat, stir in salt and vanilla, then let it cool until it’s thick but still pourable. This takes about 15-20 minutes.
For the frosting:
- Beat the softened butter until smooth and creamy.
- Add the cocoa powder and mix until combined.
- Gradually add powdered sugar, alternating with splashes of milk, until you reach your desired consistency. You want it spreadable but not runny.
- Mix in the vanilla and beat until fluffy and smooth.
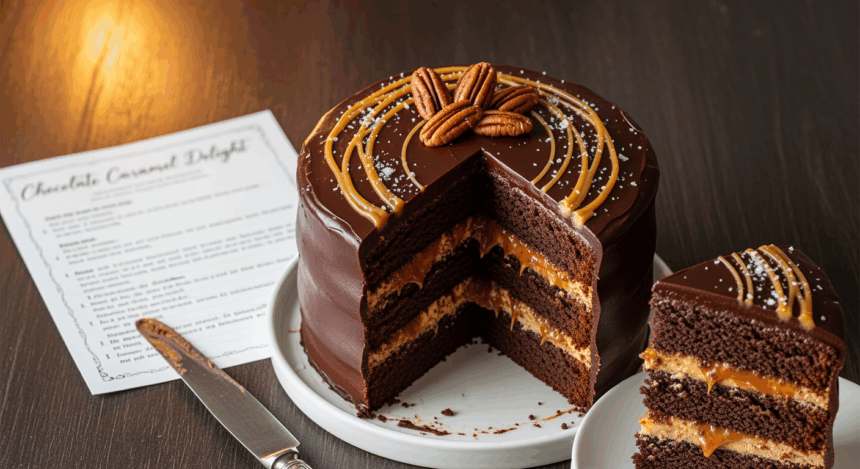
Assembly:
- Place one cake layer on your serving plate. Pro tip: place strips of parchment paper under the edges to keep your plate clean.
- Create a “dam” around the edge of the cake with frosting (basically pipe or spread a ring of frosting around the edge). This prevents the caramel from escaping and creating a sticky situation.
- Pour the caramel filling inside the dam, spreading it evenly but leaving about 1/2 inch from the edge.
- Carefully place the second cake layer on top.
- Frost the top and sides with the chocolate frosting. Get as fancy or as rustic as you want—it’ll taste amazing either way.
- Remove those parchment strips if you used them. Ta-da! You’re basically a pastry chef now.
Common Mistakes to Avoid
Rushing the caramel. Look, we’ve all got places to be, but caramel waits for no one. Rush it and you’ll end up with either sugar crystals or a burnt mess that sets off your smoke detector.
Assembling with warm cake. I know you’re excited, but warm cake + caramel = structural disaster that slides apart faster than my motivation on a Monday morning.
Skipping the frosting dam. Unless you want caramel oozing everywhere (which, to be fair, has its charm), don’t skip this step.
Substituting the coffee with water. “But I don’t like coffee!” Trust me, you can’t taste it. It just deepens the chocolate flavor. But fine, water works if you must.
Opening the oven repeatedly to check. Every time you peek, you drop the temperature and mess with the rise. It’s like watching water boil—just let it do its thing.
Alternatives & Substitutions
No buttermilk? Add 1 tablespoon of white vinegar or lemon juice to regular milk and let it sit for 5 minutes. Boom—DIY buttermilk.
Gluten concerns? Use a good quality 1:1 gluten-free flour blend. The cake might be slightly less fluffy, but it’ll still satisfy your chocolate craving.
Not a coffee fan? Use hot water instead, but consider adding an extra tablespoon of cocoa powder to make up for the lost depth of flavor.
Want to make it boozy? Add 2 tablespoons of Baileys or Kahlúa to the caramel after it’s off the heat. I won’t tell anyone.
Need a shortcut? In a pinch, you can use store-bought caramel sauce. But honestly, homemade is SO much better and gives you major bragging rights.
FAQ (Frequently Asked Questions)
Can I make this cake in advance?
Absolutely! The cake layers can be baked 1-2 days ahead and wrapped tightly in plastic wrap. The caramel can be made 3-4 days ahead and stored in the fridge—just warm it slightly before using. Assemble the day of or the day before serving.
Why is my caramel grainy?
You probably stirred it while the sugar was melting. Next time, just swirl the pan instead. If it’s already grainy, add a splash of water and reheat gently, but honestly, it might be easier to start over.
Can I use a boxed cake mix to save time?
Can you also wear socks with sandals? Technically yes, but should you? Look, I’m not the cake police, but the from-scratch cake is what makes this recipe special. That said, if you’re in a time crunch, doctor up a box mix with an extra egg and replace the water with buttermilk.
How do I store leftover cake?
Leftover cake? What’s that? But seriously, it keeps at room temperature for 2-3 days in an airtight container, or up to a week in the refrigerator. Let it come to room temperature before serving for the best flavor.
Can I freeze this cake?
Yes! Freeze individual slices or the whole shebang for up to 3 months. Thaw overnight in the refrigerator, then bring to room temperature before serving. Future You will be very grateful to Present You.
Is this cake kid-friendly if I used coffee?
Unless your kid is extremely caffeine-sensitive, they’ll be fine. The amount of caffeine per slice is minimal, and honestly, the sugar high will kick in way before any coffee buzz.
Final Thoughts
Here’s the thing about this chocolate caramel cake: it’s like wearing sweatpants to a fancy restaurant and somehow still being the best-dressed person there. It’s comfortable, approachable, yet undeniably special. The combination of moist chocolate cake, silky caramel, and rich frosting hits all the right notes without requiring pastry school training.
So go ahead and make this cake. Maybe it’s for a birthday, maybe it’s for a Tuesday, maybe it’s because you had a bad day and need chocolate therapy. Whatever the reason, I promise it’ll be worth every minute you spend making it. And hey, if anyone asks where you got the recipe, feel free to be vague and mysterious about it. Your chocolate caramel secrets are safe with me.
