Picture this: you’re standing in your kitchen, staring at your baking supplies, and suddenly you’re possessed with the need to create something that would make even Paul Hollywood raise an approving eyebrow. Not just any dessert—a chocolate drip cake that looks like it teleported straight from a fancy bakery window. Well, grab your apron and let’s make some magic happen!
Why This Recipe is Awesome
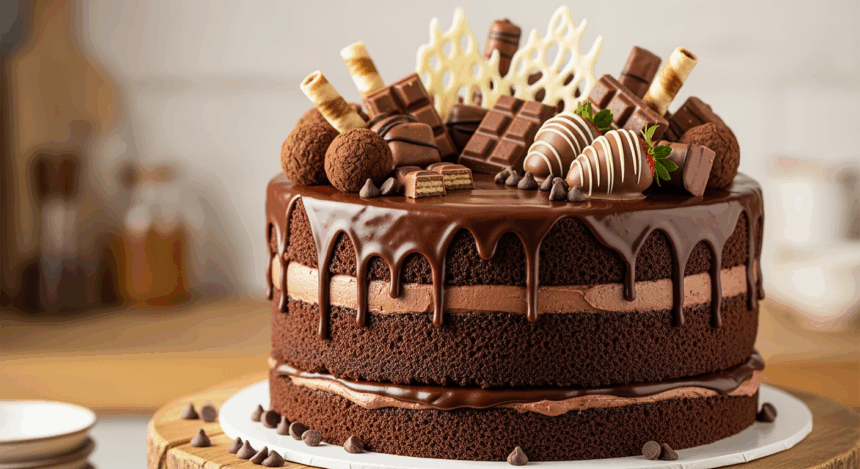
Look, I’m not saying this chocolate drip cake will change your life, but your Instagram followers might think you’ve secretly enrolled in pastry school. This cake hits the sweet spot between “looks intimidatingly professional” and “actually doable by normal humans.” The dramatic chocolate drips cascading down the sides create that wow-factor, while the chocolates on top are basically just you showing off (as you should).
Plus, it’s completely customizable. Want it boozy? Add some Baileys to the ganache. Making it for kids? Load the top with every colorful chocolate candy known to mankind. The best part? If you mess up the drips, just add more chocolates on top. Problem solved!
Ingredients You’ll Need
For the chocolate cake:
- 2 cups all-purpose flour (the regular stuff, nothing fancy)
- 2 cups granulated sugar (yes, that much—it’s cake, not a salad)
- ¾ cup unsweetened cocoa powder (the good kind, not the sad hot chocolate mix)
- 2 teaspoons baking soda (not baking powder—they’re different, trust me on this)
- 1 teaspoon salt (to make the sweetness pop)
- 2 large eggs (room temperature, because cold eggs are party poopers)
- 1 cup buttermilk (no buttermilk? Regular milk + 1 tbsp vinegar works too)
- ½ cup vegetable oil (keeps it moist—sorry if you hate that word)
- 2 teaspoons vanilla extract (the real stuff, not the imitation nonsense)
- 1 cup hot coffee (brings out the chocolate flavor—and no, the cake won’t taste like coffee)
For the frosting:
- 1 cup unsalted butter, softened (like, really softened, not just sitting out for 5 minutes)
- 4 cups powdered sugar (yes, your kitchen will look like a cocaine bust went down)
- ½ cup cocoa powder (same good quality as before)
- ¼ cup heavy cream (or more if needed)
- 2 teaspoons vanilla extract (still the real stuff)
- Pinch of salt (trust me on this one)
For the chocolate drip:
- 1 cup chocolate chips (semi-sweet or dark, depending how fancy you’re feeling)
- ½ cup heavy cream (liquid, not whipped—duh)
For decoration:
- Assorted chocolates (Ferrero Rocher, truffles, chocolate-covered strawberries, or whatever makes your heart happy)
- Sprinkles, gold dust, or other edible bling (optional but recommended for maximum showing off)
Step-by-Step Instructions
- Prep your battle station. Preheat oven to 350°F (175°C). Grease and line two 8-inch round cake pans. If you’re feeling extra cautious, add parchment paper circles to the bottom.
- Mix the dry ingredients. In a large bowl, whisk together flour, sugar, cocoa powder, baking soda, and salt. Try not to inhale the cocoa powder cloud—we’ve all done it, it’s not fun.
- Add the wet team. Add eggs, buttermilk, oil, and vanilla. Mix until just combined. Slowly add the hot coffee (it will be liquidy—don’t panic, that’s normal).
- Bake those babies. Divide batter between the two pans and bake for 30-35 minutes or until a toothpick comes out clean. Let cool in pans for 10 minutes, then transfer to a cooling rack. If you try to frost them while warm, you’ll create a delicious disaster.
- Make the frosting. Beat the butter until creamy. Add powdered sugar one cup at a time (unless you enjoy the look of a sugar snowstorm in your kitchen). Mix in cocoa powder, then add cream, vanilla, and salt. Beat until fluffy and try not to eat it all with a spoon.
- Level and stack. Once cakes are completely cool, level the tops if needed. Place one layer on your cake stand, add a generous layer of frosting, then top with the second layer.
- Crumb coat and chill. Apply a thin layer of frosting all over the cake—this is your crumb coat. Refrigerate for 20 minutes (perfect time to check Instagram or text that friend you’ve been ignoring).
- Final frosting. Apply the remaining frosting smoothly around the entire cake. For extra smoothness, dip your spatula in hot water and dry it before each swipe. Get it as smooth as you can—we’re going for that professional look here.
- Chill again. Put the cake back in the refrigerator for at least 30 minutes. The cake needs to be cold for the drip to set properly.
- Make the chocolate drip. Heat the heavy cream until just simmering (not boiling), then pour over the chocolate chips. Let sit for 2 minutes, then stir until smooth. Let cool until it’s slightly warm and has a pourable consistency.
- Create the drip effect. Using a spoon or squeeze bottle, apply the ganache around the edge of the cake, letting it drip down the sides. Then fill in the top. If your drips are running all the way down, your ganache is too warm—let it cool more.
- Add the crown jewels. Before the ganache sets, arrange your chocolates on top. Go wild—this is your masterpiece! Add any sprinkles or edible decorations now too.
- Final chill. Refrigerate for at least 20 minutes to set everything. Take roughly 400 photos from every angle for social media.
Common Mistakes to Avoid
Rushing the cooling process. Hot or warm cakes + frosting = sliding layers and tears (both the crying kind and the ripping kind).
Making the ganache too hot. If your chocolate drip is too warm, it’ll run all the way down and pool at the bottom, giving you less “elegant drips” and more “chocolate waterfall” vibes.
Forgetting to crumb coat. Unless you enjoy little chocolate cake bits throughout your pristine frosting, don’t skip this step.
Using cold butter for frosting. This is how you get those annoying little butter lumps that refuse to smooth out. Room temperature means ROOM temperature—should indent when you press it but not be oily.
Decorating a warm cake. The ultimate rookie move. Unless melted chocolate avalanche is the aesthetic you’re going for.
Alternatives & Substitutions
Make it boozy: Add 2-3 tablespoons of Baileys, Kahlúa, or your favorite liqueur to the ganache. I’ve found that bourbon makes it taste extra fancy, but maybe that’s just me feeling sophisticated while drinking bourbon.
Dairy-free version: Substitute the buttermilk with almond milk + 1 tablespoon vinegar, use coconut oil instead of butter, and coconut cream instead of heavy cream. It’ll have a slight coconut undertone, but with all that chocolate, who’s really going to notice?
No coffee, no problem: If you’re making this for kids or coffee-haters, just use hot water instead. You’ll lose some depth of flavor, but the cake will still be delicious.
Different sizes: For a three-layer cake, multiply everything by 1.5. For cupcakes, reduce baking time to about 18-20 minutes and drip the ganache over the frosted tops.
Topping alternatives: Not feeling chocolates on top? Try fresh berries, edible flowers, or crushed cookies. Or go minimalist with just some gold sprinkles—sometimes less is more (but not always, IMO).
FAQ (Frequently Asked Questions)
Can I make this cake in advance?
Absolutely! The cake layers can be made up to 2 days ahead and wrapped tightly in plastic wrap. The fully assembled cake will hold up in the fridge for 3-4 days, though the drip might lose some shine after day 2.
My ganache seized up—what did I do wrong?
You likely got water in it or overheated the chocolate. Next time, make sure all your utensils are completely dry, and heat the cream instead of the chocolate. If disaster has already struck, try whisking in a tablespoon of warm heavy cream to bring it back.
Can I freeze this cake?
You can freeze the unfrosted cake layers wrapped well in plastic for up to a month. I wouldn’t recommend freezing the fully decorated cake unless you enjoy the look of condensation spots and dull chocolate.
Do I really need to use coffee in the cake?
No one’s going to arrest you if you don’t, but you’ll be missing out on extra chocolate flavor. The cake doesn’t taste like coffee—promise. The coffee just enhances the chocolate, like how a good Instagram filter enhances your selfie.
My cake layers sank in the middle—help!
Your oven temperature might be off, you might have overmixed the batter, or you opened the oven door too early during baking. But hey, that’s what frosting is for—to fill in life’s little disappointments.
What if my frosting is too sweet?
Add a pinch more salt or a squeeze of lemon juice. Acidity cuts sweetness faster than you can say “sugar rush.”
Can I use milk chocolate for the drip?
You can, but it will be softer and might not set as well. If you do use milk chocolate, reduce the cream slightly (try 1/3 cup instead of 1/2 cup).
Final Thoughts
Congratulations! You’ve just created a chocolate drip cake that would make pastry chefs slow-clap in appreciation. Take a moment to bask in your glory before someone asks “can I have a slice?”—which will happen approximately 2.5 seconds after you announce it’s ready.
Remember, the beauty of this cake is that it looks complicated but is actually pretty forgiving. Drips not perfect? Call it “artistic.” Frosting a bit uneven? That’s your “signature style.” Ate half the decorative chocolates while assembling? That’s just quality control.
Now go slice into that masterpiece and enjoy every decadent bite. You’ve earned it. And when people ask where you got the recipe, just wink mysteriously and say it’s an old family secret. Or, you know, send them this link. I won’t tell.
