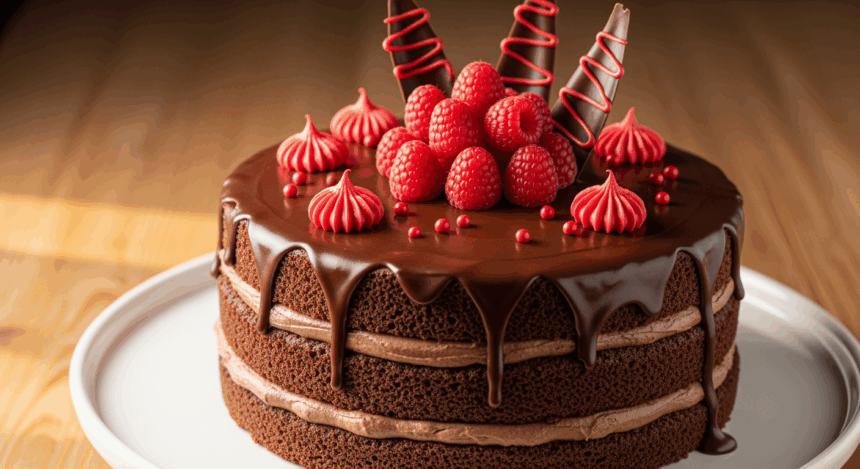
Ever stared at a chocolate cake and thought, “This needs more drama”? Same. That’s why we’re diving into this ridiculously delicious chocolate cake with red decorations that screams “I’m fancy but I didn’t actually spend all day on this.” Perfect for Valentine’s Day, Halloween (hello, blood aesthetic), or just because you want to feel like a baking rockstar on a random Tuesday. Let’s make some chocolate magic happen!
Why This Recipe is Awesome
First off, this cake is basically foolproof. Like, “I once burned water” level foolproof. The chocolate base is rich enough to make you question all your life choices (in a good way), while those red decorations add that perfect Instagram-worthy pop. Plus, the whole thing takes less than two hours from start to finish—including cooling time, which is when you can scroll through TikTok and pretend you’re being productive.
The best part? People will think you spent way more time on it than you actually did. That’s the sweet spot of impressive-yet-lazy baking, friends.
Ingredients You’ll Need
For the cake:
- 2 cups all-purpose flour (the regular stuff, nothing fancy)
- 2 cups granulated sugar (because we’re not here to count calories)
- 3/4 cup unsweetened cocoa powder (the darker, the better—like my soul)
- 2 teaspoons baking soda (not baking powder—they’re different, trust me)
- 1 teaspoon salt (to balance all that sweetness)
- 2 large eggs (room temperature, please—cold eggs are party poopers)
- 1 cup buttermilk (or regular milk with a splash of vinegar if you forgot to buy buttermilk, again)
- 1/2 cup vegetable oil (keeps it moist—sorry if you hate that word)
- 2 teaspoons vanilla extract (the real stuff, not the fake stuff)
- 1 cup hot coffee (makes the chocolate taste more chocolatey—science!)
For the frosting:
- 1 cup unsalted butter (softened, not melted into oblivion)
- 4 cups powdered sugar (yes, that much)
- 1/2 cup unsweetened cocoa powder (because more chocolate is always the answer)
- 1/4 cup heavy cream (makes it fluffy like clouds)
- 2 teaspoons vanilla extract (again, the real stuff)
For those dramatic red decorations:
- Red food coloring (gel works best—liquid can make things too runny)
- 1/2 cup white chocolate chips (for melting and designing)
- Red sprinkles, if you’re feeling extra (and who isn’t?)
- Fresh raspberries (optional, but makes you look like you have your life together)
Step-by-Step Instructions
- Preheat your oven to 350°F (175°C). Do this first or you’ll be standing around awkwardly later waiting for it to heat up.
- Grease and flour two 9-inch round cake pans. If you’re feeling fancy, line the bottoms with parchment paper. Your future self will thank you during the unmolding process.
- In a large bowl, whisk together the flour, sugar, cocoa powder, baking soda, and salt. Make sure there are no cocoa clumps—nobody wants to bite into a dry pocket of cocoa powder. Nobody.
- In another bowl, beat the eggs, then add buttermilk, oil, and vanilla. Mix until they’re having a nice little party together.
- Slowly add the wet ingredients to the dry ingredients, mixing on low speed. It’ll look like mud at first—that’s normal, embrace it.
- Add the hot coffee and mix again. The batter will be thin, but that’s what we want. Resist the urge to thicken it!
- Pour the batter evenly into your prepared pans and bake for 30-35 minutes, or until a toothpick comes out with a few moist crumbs (not wet batter).
- Let the cakes cool in the pans for 10 minutes, then flip them onto a wire rack to cool completely. If you frost them while warm, you’ll have a delicious mess on your hands (literally).
- For the frosting, beat the softened butter until creamy, then gradually add powdered sugar and cocoa powder. Pour in the heavy cream and vanilla, then beat until fluffy (about 3 minutes). If it’s too thick, add more cream; too thin, add more sugar.
- Once the cakes are cool, place one layer on your serving plate. Spread a thick layer of frosting on top, then carefully place the second layer on top. Cover the entire cake with the remaining frosting.
- For the red drama: Melt white chocolate chips in the microwave in 30-second bursts. Mix in red food coloring. Let it cool slightly, then transfer to a piping bag (or ziplock with the corner snipped off).
- Drizzle the red chocolate around the edges of the cake, letting it drip down the sides dramatically. Add additional red decorations on top—sprinkles, raspberries, or whatever your heart desires.
Common Mistakes to Avoid
Let’s not sabotage our chocolate masterpiece with these rookie moves:
- Opening the oven too early – Your cake will sink faster than my motivation on Monday mornings.
- Frosting a warm cake – Unless you’re going for the “melted snowman” aesthetic, wait until it’s completely cool.
- Using cold ingredients – Room temperature eggs and buttermilk mix better. Science, people!
- Skipping the coffee – “I don’t like coffee” isn’t an excuse. You won’t taste it, but you’ll miss it if it’s gone.
- Rushing the decorations – Those red drips need a semi-cool white chocolate base or they’ll just disappear into your frosting like my paycheck into my bills.
Alternatives & Substitutions
Because we all forget ingredients or have dietary restrictions:
Buttermilk substitute: Mix 1 cup of milk with 1 tablespoon of vinegar or lemon juice. Let it sit for 5 minutes until it looks slightly curdled (appetizing, I know).
Coffee alternatives: Not a coffee fan? Use hot water instead. But honestly, the coffee just enhances the chocolate flavor—you won’t taste coffee in the final product, I pinky promise.
Gluten-free version: Swap the all-purpose flour for a 1:1 gluten-free flour blend. The cake might be slightly denser, but still delicious.
Vegan options: Replace eggs with flax eggs (2 tablespoons ground flaxseed + 6 tablespoons water, let sit for 15 minutes). Use plant milk + vinegar for buttermilk, and vegan butter for frosting.
Red decoration alternatives: Not into food coloring? Try crushed freeze-dried raspberries mixed with white chocolate for a natural red color. Or go with red candies, strawberry sauce, or cranberry gel.
FAQ (Frequently Asked Questions)
Can I make this cake ahead of time?
Absolutely! The cake layers can be baked 1-2 days ahead and wrapped tightly in plastic wrap. The frosting can be made a day ahead and stored in the fridge—just let it come to room temperature before using. I’d save the red decorations for the day of serving for maximum wow-factor.
Will this cake work as cupcakes?
You bet! Fill cupcake liners about 2/3 full and bake for 18-22 minutes. This recipe makes about 24 cupcakes. The red drip might be trickier, but you can always do a red swirl on top instead.
My cake layers are domed. Did I mess up?
Nope! That’s normal. You can either embrace the dome or use a serrated knife to level them off. Pro tip: chef’s snack on those cake scraps while no one’s looking.
The red color isn’t bright enough. What gives?
Gel food coloring is your BFF here. Liquid food coloring can make your white chocolate seize up faster than I do when someone says “let’s go around the room and introduce ourselves.” If you need it brighter, try red candy melts instead of coloring white chocolate.
How do I store leftovers? (As if there will be any…)
Cover any exposed cake with plastic wrap or store in an airtight container. It’ll keep at room temperature for 2-3 days or in the fridge for up to a week. Let it come to room temp before eating for maximum flavor, though—cold chocolate cake is like eating chocolate-flavored butter. Actually, that doesn’t sound terrible…
Final Thoughts
Look at you! You’ve just created a chocolate masterpiece that’s equal parts delicious and dramatic. This cake isn’t just a dessert—it’s a conversation starter, a mood lifter, and potentially the reason your friends “just happen to drop by” more often.
The beauty of this recipe is that even if your decorations don’t look professional, that rustic homemade vibe has its own charm. And FYI, you can always claim any mistakes were “intentional artistic choices.”
So slice it up, snap that pic for the ‘gram (we all know that’s half the reason for baking anyway), and enjoy the fruits of your minimal labor. Whether you’re serving it for a special occasion or just because it’s Wednesday, this cake makes any day feel like a celebration.
Now go forth and let your inner dramatic baker shine! Your chocolate cake with its sassy red accessories is waiting to make someone’s day—even if that someone is just you in pajamas watching Netflix. No judgment here!
